Creating a POS Special Order


Create a POS special order to order an item you do not usually stock. You can start a Special Order transaction from either the Header screen or the Posting screen in POS.

For more information about working with saved transactions, including special orders, refer to the online help topics. From the Contents tab, open the Point-of-Sale book and then the Saved Transactions book.


1

Create a special order from the Header screen in POS

  1. From the Header screen, click SpOrd (F4).

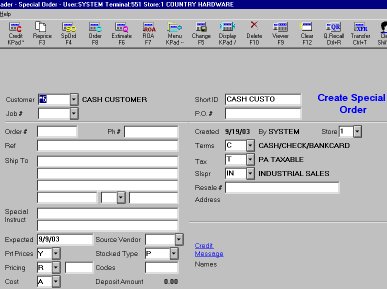
  2. Enter or change customer and transaction information (for example, from the Terms drop-down list, select COD if the special order is Cash on Delivery). For information about some of the fields on the Header screen, see the last section of this job aid.

  3. When all the information is correct, click Post (F11) to return to the Posting screen. Post items to the special order as you normally do to a saved transaction.


2

Create a special order from the Posting screen in POS

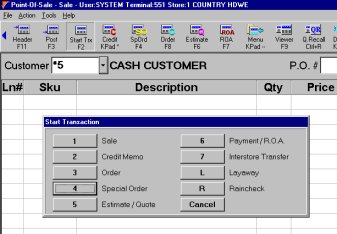
  1. From the Posting screen, click Start Trx (F2).

  2. From the Start Transaction menu, click Special Order (4).

  3. Enter or change customer and transaction information.

  4. When all the information is correct, post items to the special order as you normally do to a saved transaction.


Information about the fields

  • Order# – When creating a special order, do not enter anything in this field. The system assigns a number when you complete the transaction.

  • Ph# –  If the transaction is for a cash customer (for example, *5), then enter the phone number and do not enter anything in the Short Id field.

  • Ship To, Special Instruct – Use these boxes to specify any delivery information or other information for this transaction.

  • Deposit Amount – For an existing special order, this is the amount of the deposit taken on the order to-date.

  • Expected – Enter the date the special order is due to arrive at your store from the vendor.

  • Prt Prices – This determines if prices print on this transaction. Y indicates print item prices and transaction total. N indicates do not print item prices, only print transaction total.

  • Pricing – This box defaults to the standard pricing for this customer as set up in Customer Maintenance. Use the drop down list to select a different pricing method.

  • Cost – Use this field to enter the cost of the special order item. If you do not enter a cost, the system will use the cost from the Inventory file (if the item is found in Inventory Maintenance).

  • Source Vendor – Use this box if you will create a purchase order (PO) from this special order using Report GPO. Entering a vendor is optional. The vendor you enter here becomes the default vendor for  items entered on the Posting screen. You can change the vendor code for any item on the Posting screen.

  • Stocked Type – Use this box if you will create a purchase order (PO) from this special order using Report GPO. From the drop-down list, select the vendor to use when generating the PO with Report GPO.