
Balance Cash Drawer
The Cash Drawer Balancing feature enables the system to accumulate cash drawer totals by clerk or terminal, and then close the drawer (zero-out the totals) at any time without printing a finalized RDS report. When you select the option to close the drawer, a dialog displays that the clerk can use to enter the monies in the cash drawer, and then print a cash drawer receipt.
This job aid assumes you have completed the required setup tasks, including setting up security, options configuration, updating the RDS report in the EOD Queue, and adding the cash drawer in Device Configuration. For more information on the setup tasks, refer to the online help topics. From the Contents tab, open the Point-of-Sale book, the Sales Review book, and then the Cash Drawer Balancing book. In this book you will also find information on using the Cash Drawer Balancing viewer.
1
At the start of POS
-
Start POS and enter you Clerk ID as you normally do.
-
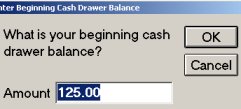
If prompted, enter the beginning cash amount or press enter to accept the default amount that displays. This dialog displays if set it up to do so in Options Configuration.
If you do not want to start a cash drawer balancing record, click Cancel. For example, if you are just using POS to check a price.
If the POS terminal is set up to always start an Order transaction when the clerk signs on, then the dialog will not display automatically. To display the dialog, click Start Transaction and select Sale.
-
Continue to ring up transactions as you normally would.
2
Close out the cash drawer
Do the following to close out the cash drawer. This can be done at any time, for example, before a break, at the end of a work-shift, or at closing time.
-
In POS, click Menu and then click K-Print totals and close cash drawer.
-
From the menu, select one of the following:
-
1 – to enter the monies in the drawer, close the drawer, and print the cash drawer receipt. Select this option if the clerk is responsible for all aspects of the cash drawer balancing. Continue with step 3.
-
2 – to close the drawer and print the cash drawer receipt. Select this option if the clerk is only responsible for writing the cash drawer totals on the printed receipt. Skip to step 4.
-
3 – to only print the cash drawer receipt. Select this option if you will close the drawer at a later time (using the RDS report or the Viewer). The clerk fills in the cash drawer totals on the printed receipt. Skip to step 4.
-
4 – to change the beginning cash amount. This option only displays if set up to do in Options Configuration.
-
If you selected option 1 from the menu, then a dialog displays in which to enter the actual cash drawer amounts. The dialog may display the expected amounts, if set up to do so.
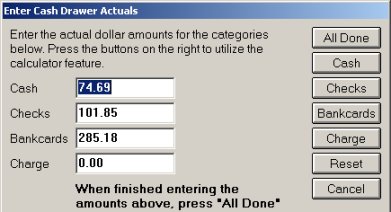
Count and total each tender type. Then enter the amount in the dialog. Or, if the amount already displays, verify that it is correct and if not, enter the correct amount.
You can use the buttons on the right of the dialog to have the system total each tender type for you. For example, click Cash and a dialog displays in which you enter the number of one-dollar bills in the drawer, the number of 5's, the number of 10's, 20's, etc. The system then does the math for you and calculates the cash totals.
-
If you selected option 2 or 3 from the menu, then the cash drawer receipt prints. On the receipt, fill in the actual amounts of the monies in the cash drawer. The receipt may print the expected amounts, if set up to do so.
At a later time, the cash drawer amounts will be entered into the system using the Cash Drawer Balancing Viewer.