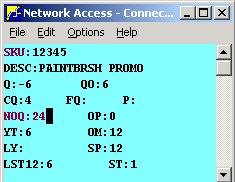
Enter Order Quantity in Radio Frequency
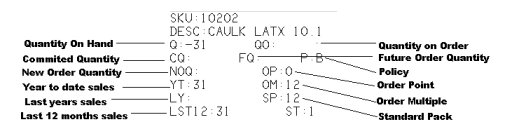
This task is performed from the Eagle Browser and in Network Access. The following is an example of the screen that displays when entering new order quantities. Callouts provide the name of each field:
1
Access RF Menu
At the RFMENU, select 2. Shelf Manager.

2
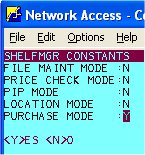
Access Constants
The Shelf Manager constants display. If you answer Y to a mode, you can set the constants for that mode.
At Purchase Mode prompt, type Y.
3
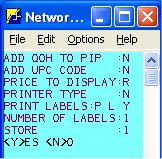
Setting Constants and Options
You can set the following options:
-
Add QOH to PIP: Yes or No (Y = add items to PIP, N = add to FIL)
-
Add UPC Code: Yes, No or Prompt
-
Price to Display: Retail or Promo
-
Printer Type: P=PS-1001; M=MP5033 Q=QL320 N=Network Printer
-
Print Labels (This consists of three fields.):
-
-
Yes, No, Prompt or Always
-
Small or Large size label (if using network a printer, this field can be set to L, S, A, B, or C depending on which RF "flex-label format" in Options Configuration you want to use)
-
Print Price Yes or No
-
-
Number of Labels: Enter a value between 1 and 9. (This value is only used if PRINT LABELS is set to A - Always.)
-
Store: Displays the store number
![]()
These options can also be set up in Options Configuration, so that you don't have to enter them every time you use RF Shelf Manager. Once you've set them up in Options Configuration, simply press <Next Screen> to bypass these options in Shelf Manager.