
View Signed Invoices from a Back Office Terminal
![]()
This job aid applies to Signature Capture users only.
To view invoices with electronic signatures from a particular terminal, the system requires that you have a "Document Imaging Printer" set up for that terminal in Device Configuration Therefore, if you have any terminals that don’t have a printer set up, use the following procedure to set up a fictitious printer so that you can view invoices with electronic signatures.
1
Display Device Configuration
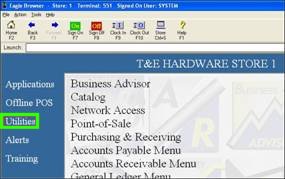
From the Eagle Browser, click Utilities (in the blue, left pane of the window).
From the menu that displays, click Device Configuration.
2
Set up the "Document Imaging Printer" in Device Configuration
-
Double-click on Document Imaging Printer.
-
Because the Document Imaging Printer is currently not configured ("Not Configured" displays in the Description column), the Select Document Imaging Printer dialog box displays.
-
Click a printer that the can be used as the Document Imaging Printer, and click OK.
-
If no printers display in the list, go to the next section, "Adding a Bogus Printer," and then return to this section and start over.
-
When the Document Imaging Printer dialog box displays, click OK.