 Emery Waterhouse: Receive and Process Price Changes
You must subscribe to Emery price changes to receive this service. Contact Emery for pricing information or to confirm that you have subscribed for this service. Price changes are available for download every other Friday. When you download them, your Eagle system will print out of all your Emery price changes and you can review the changes in the Item Price Change window (IPC).
This job aid assumes that you have completed all the setup steps required to receive Emery price changes. See the job aid "Emery Telecom Setup" for more information.
1
Download price changes
-
From Network Access at the FUNCTION prompt, type BTC and press <Enter>.
-
At Transmission Control Stream, type EMRPCA and press <Enter>. The Price Change Transmission Screen displays.
-
Choose the appropriate Update Options and Report Options, and enter your Emery Vendor code in the Vendor Code field.
-
Press <Run> (F3) to begin the transmission.
-
In a few minutes, the call to Emery is complete. If the transmission is successful, the Price Change Transmission Report will print.

2
Check transmission status
If the Price Change Transmission Report doesn't print, do the following:
-
From Network Access at the Function prompt, type ASYMSG and press <Enter> to display the Async Transmission Log.
-
You may need to press <Next Item> to view the correct section of the log. Check the transmission results. If the log instructs you to try the transmission again, do so. Write down any error messages displayed in the log.
-
Press <End> to exit the screen.
3
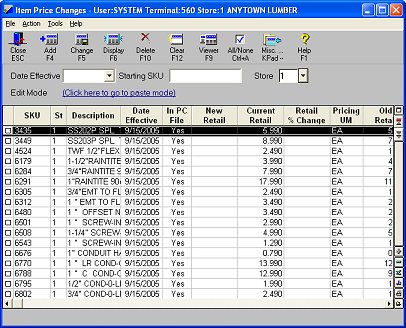
Review/edit price changes
-
From the Eagle Browser, click Inventory Menu, then Item Price Changes (or simply type IPC in the launch bar and press Enter).
-
The grid will say "nothing to display." Press Enter to see all the downloaded price changes.
-
Make any adjustments to the price changes as desired. You can also delete price changes and/or add price changes of your own.
-
When finished, press Change to save your changes.
![]()
-
You can sort the grid by "% Change" for retail or cost to identify any problems with unit of measure differences (i.e. roll vs. foot pricing).
-
A negative percent change means that the item’s price when down.
4
Print price labels
If you want to print price or bin labels for the new prices, you must print them BEFORE you finalize price changes.
-
From the Eagle Browser, click Reports Menu, Inventory Reports, and then click either Item Bin Labels (RBL) or Item Price Labels (RLA). On the File to Use page, select 2-Price Change File.
-
Choose the appropriate options, and click Run (F4) to generate a labels file or to print your labels directly to the printer.
-
Open the Print Inventory Labels program and verify that the label file is available for import.
![]()
Once you finalize the price changes, you cannot run RLA or RBL again for the price changes.
5
Finalize price changes
You MUST finalize price changes to update your inventory file and change retails at POS.
-
From the Eagle Browser, click Reports Menu, Inventory Reports, Price Changes (RPC).
-
On the Options page, select option F.
-
If desired, you can fill in the Date Effective fields on the From/To page with the date you downloaded the price changes. This limits the finalization to just that day's price changes.
-
Press Run.