Use the following procedure to set up the devices necessary to run the Document Imaging application. (Note: your Local Platform Specialist (LPS) may have already set up the devices for you, except for the Topaz Signature Gem signature capture device, which is always user-installed).
The devices you'll set up are:
receipt printer
signature capture unit (if applicable)
invoice printer
document imaging printer
![]()
E-invoice users: If you want to email a PDF version of invoices, and you don't have a laser printer, you must add a generic laser printer driver for the system to render and create the PDF.
Signature Capture users: If you want to view signed invoices from back office terminals that don't have a printer set up in Device Configuration, you must add a generic laser printer driver for the system to render the signature.
From the Eagle Browser, click Utilities (in the blue left pane of the window). From the menu that displays, click Device Configuration.
The Configure Devices window displays.
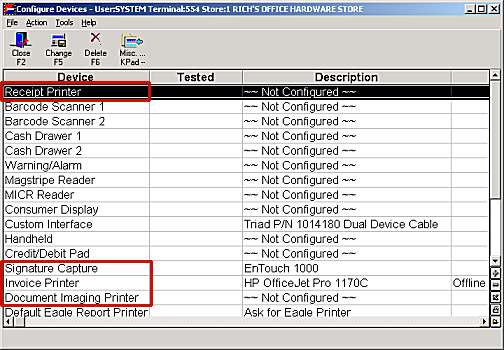
Double-click on Receipt Printer. When asked where the receipt printer is attached, select "PC Receipt Printer." The Document Management application will not work with a "System Receipt Printer."
Finish the setup of the receipt printer. For more information on setup, click here.
If you have a Topaz Signature Gem signature capture device that you need to attach to a POS station, do the following:
Remove the SignatureGem™ 1 x 5 from its shipping container (store the extra pen batteries in a safe place until they are needed).
Plug the USB cable into any available USB port on the POS PC where it is intended to be used.
Remove the Pen tip protector from the Pen tip.
In Device Configuration, double-click "Signature Capture."
Select Topaz Signature Gem 1 x 5 HID, and click OK.
Click Test to verify connectivity, then click OK.
If you have an Entouch signature capture device attached to your station, do the following:
Double-click on Signature Capture. Select the appropriate device, and click OK. When the Signature Capture dialog box displays, click OK again.
Double-click on Document Imaging Printer. Select the appropriate printer,* click the Laser Invoices checkbox, and click OK. When the Document Imaging Printer dialog box displays, click OK again.
Check the Invoice Printer field. Verify that it is set up to print laser invoices to a laser printer. If it is set up to use an invoice printer connected directly to the Eagle system, it will not work with Document Management. To change the setup, click here for the procedure.