(Document Scanning users)
Carefully follow the manufacturer's installation instructions that came with your scanner.
If you're installing one of the Epicor-recommended Fujistu scanners, the following summary is designed to help you with the installation process.
Unlock the shipping lock, attach the paper chute, etc.
Plug in the scanner and attach the USB cable. Ignore any "SCSI" instructions.
Hook up the scanner and CANCEL the Auto-installer when it displays.
Insert the SETUP CD ROM and run install.exe (if it doesn’t come up automatically).
A web page may launch automatically to do product registration with Fujitsu. You can register now or later.
When installing the driver, accept all the defaults, and allow the PC to reboot. You don’t need to install the Error Recovery Guide.
After the reboot, launch the SETUP CD ROM installer again, and install Scandall21 per the instructions provided by FUJITSU. During this process, accept all the defaults.
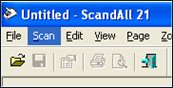
Start Scandall21 and test the scanning process per the instructions. The test procedure is summarized below:
Click the Scan menu.
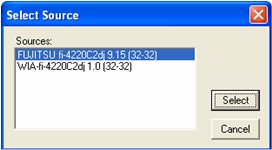
Choose Select Source and select the FUJITSU scanner.
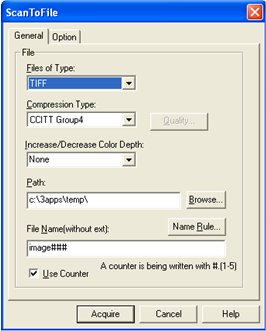
From the Scan menu, click Select To File. The ScanToFile dialog displays. Set Files of Type to TIFF, set Compression to CCITT Group4, and set the Path to c:\3apps\temp. Leave the default settings in the other fields.
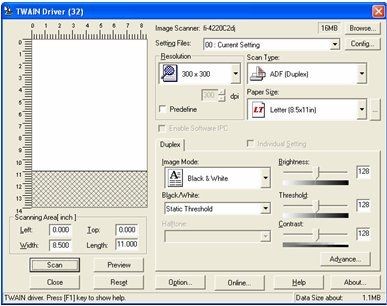
Click Acquire. The TWAIN Driver (32) dialog displays. Set the Scan Type to ADF (Duplex), and set Image Mode to Black & White. Leave the default settings in the other fields.
 .
.
To test the scanner, place any document face down in the document feeder and press SCAN.
When the scan is finished, use Windows Explorer to browse to the c:\3apps\temp directory. Locate the image created by the scan. It should be named something like image001.tif
Exit Scandall21. The scanner installation is complete.