(Delivery Confirmation users only)
Once transactions have been added (manually, automatically, or by scanning in) to the Delivery Manifest, use the following procedure to download them from the Delivery Manifest to the PDA. Typically you will download a set of transactions based on a delivery run that a particular truck is going to make. This topic explains how to make any desired changes to the transactions in the Delivery Manifest, and then how to download the desired transactions to the PDA.
Before downloading transactions to the PDA, you can make changes to them in the Delivery Manifest. For example, if you have multiple PDAs, you may want to change the PDA Name on transactions that automatically downloaded from POS/Order Entry, since those transactions always use the default PDA name you set up in Options Configuration (ID# 8786).
Other fields you may want to change include Delivery Date, Delivery Time, Customer PO, Ship-To Address, Ship Via, Driver, etc.
To change a field, simply display the desired transaction in the grid, click the field you want to change, make the change, and click Change on the toolbar (note: not all fields in the grid can be changed).
Connect the PDA to the PC by placing it in the cradle (or by enabling the wireless networking, if the PDA is so equipped).
In the Header area of the screen, do the following:
In the PDA field, select the PDA to which you want to download (select "Unassigned" if you automatically download transactions to the Manifest from POS, and your default PDA name is set to "Unassigned" in option 8786).
If you only want to download transactions with a specific Delivery Date, Driver, or Ship Via, fill in any or all of those fields.
Click Refresh to display the relevant transactions in the grid.
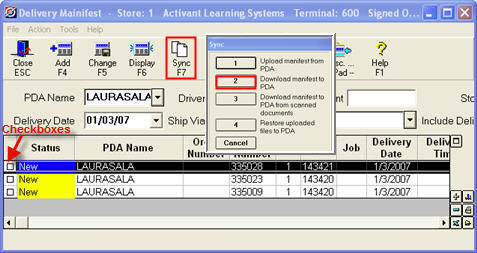
Click the checkbox next to the transactions you want to download. (Note: you can also use the down-arrow key and spacebar to place or remove checkmarks.)
Click Sync (F7), and select 2-Download Manifest to PDA.
![]()
If the following message displays:
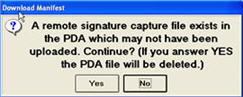
This means there are existing transactions on the PDA that have not been uploaded back to the Eagle system. Click Yes if you want to delete the existing transactions on the PDA, and replace them with the transactions you're downloading now. Otherwise, click No, and be sure to upload the existing transactions from the PDA to the Eagle before re-attempting to download new transactions .
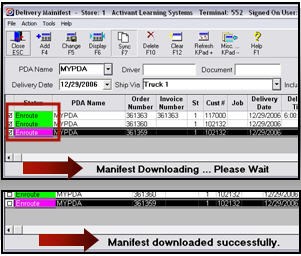
The bottom of the screen indicates that the download is in progress. When the download is complete, a confirmation message displays, and the Status field changes to "Enroute," highlighted in green.
![]()
If you selected "Unassigned" in the PDA Name field in step 3 (because option 8786 "Default PDA Name" is set to "Unassigned"), the system automatically changes the PDA Name of the transactions to match the name of the PDA that is cradled to the PC.