Label Manager: Print From Data File (RQ/CSV)
This job aid describes how to use the Label Manager application to print labels from a data file.
1
Create the data file
Use any available methods to create a data file and save it on your PC. For example, the file could be customer data that you displayed in the Customer Viewer and then exported to an Excel file. Then create a mailing label and print the labels using the customer data file. The job aid will use this example to explain the procedure steps for using Label Manager.
-
From the Eagle Browser, click Applications, then click Accounts Receivable Menu, and then click Customer Maintenance.
-
From the Customer Maintenance window, click View Cust. The Customer Viewer displays.
-
In the viewer, right-click any column header and click Select Columns To View. Click None to clear the check boxes. Check the boxes for Name, Street, City, State, and Zip. Click Apply. Just the fields you selected now display as columns in the viewer.
-
(Optional) Click Lookup and use the View By options to limit the data that displays in the viewer.
-
In the viewer, right-click any column header and point to Control Panel, then point to Export to CSV File, and then click Export and Launch Excel.
-
In Excel, Save the file to the location of your choice on your PC. Name the file and save it as a .CSV file.
![]()
The order of the columns in the viewer correspond to fields that will be used in the Label Manager. The file is read from left to right — Name = Field1, Street = Field2, City = Field3, State = Field4, and Zip = Field5.
2
Define the label in Label Manager
Once you've created and saved a data file, the next step is to define the label and select the data file to use.
-
From the Eagle Browser, click Applications, click Label Design & Printing Menu, and then click Design RQ/CSV Labels. The Designer window displays.
-
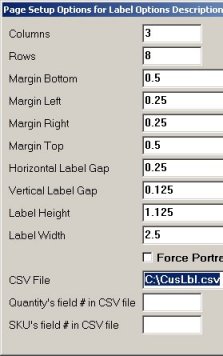
Click Pg Format to display the Setup Options dialog. Use this dialog to define the sheet of labels. All measurements are in inches.
-
Columns – number of columns
-
Rows – number of rows
-
Margin Bottom – bottom of page to last row
-
Margin Left – left edge of page to the left edge of the first row
-
Margin Right – right edge of page to the right edge of last row
-
Margin Top – top of page to first row
-
Horizontal Label Gap – gap between each column
-
Vertical Label Gap – gap between each row
-
Label Height
-
Label Width
-
Place your cursor at CSV File and click Local CSV. The Open dialog displays. Locate the data file, select it, and click Open. The Open dialog closes and the file name and path is automatically copied to the CSV File field. Click OK and continue with the next section to define the label data fields.
3
Define the label data fields
-
From the Designer window (blank white label), click Add Fld. New Field displays in a box to the left of the blank label.
-
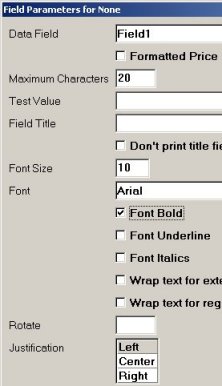
Click Format Fld to display the Parameters dialog. Click the arrow to the right of Data Field and select Field 1 from the list. Refer to the Note in section 1 for field information. Field1 = Name, etc.
-
Fill in the following for Field1 and then click OK.
-
Maximum Characters
-
Test Value (can be blank)
-
Field Title (can be blank)
-
Font Size
-
Font and font characteristics
-
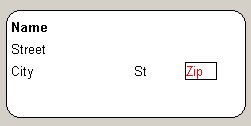
Drag the Name field over the blank white label and position it where you want it to print.
-
Repeat steps 1 through 4 for remaining fields, Field2 = Street, etc.
-
Click File and click Save View. In the Save dialog, type a Description to name this label format and click Save.
-
Close the Designer window and continue with the next section to print labels.
4
Print the labels in Label Manager
-
From the Eagle Browser, the Label Design & Printing menu, click Print Labels from RQ/CSV file. The Select dialog displays.
-
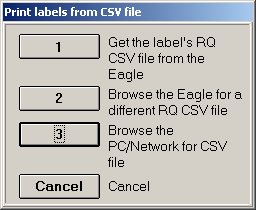
Select the format from the list and click Open. The Print dialog displays. Click 3 to Browse for the CSV file. The Open dialog displays.
-
Locate the data file, select it, and click Open. The Open dialog closes and the Print Labels dialog displays.
-
Select the printer from the list and click OK to print the labels.