(Epson TM-J7100 receipt printer users only)
Use the following procedure to print header and footer logos on each receipt that is generated in Epicor Eagle™ POS for Windows.
This procedure assumes the receipt printer has already been set up in Device Configuration.
Using a graphics program, create a company logo in .bmp format. Use the information below to determine the maximum size (width x height) of the header and footer logo, and the name you must use when saving it on your hard drive.
|
Type of Logo |
Name You Must Use |
Maximum Height |
Maximum Width |
|
Header logo |
ReceiptLogo1.bmp |
3" |
2 1/2" |
|
Footer logo |
ReceiptLogo2.bmp |
3" |
2 1/2"
|
Place the .bmp file(s) in the appropriate folder on the PC, as specified below:
If you are running a Network Master/Client setup, place the file(s) on the network master PC, in the C:\3net\Userdata\Logos folder.
If you are running a Standalone setup, place the file(s) in the C:\3apps\Userdata\Logos folder of the PC.
If you don't know what kind of setup you are running, click here.
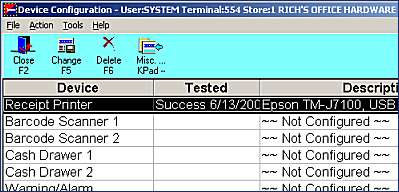
From a POS station with an Epson TM-J7100 printer attached, do the following to display Device Configuration: from the Eagle Browser, click Utilities in the blue left pane of the window, and from the menu that displays, click Device Configuration.
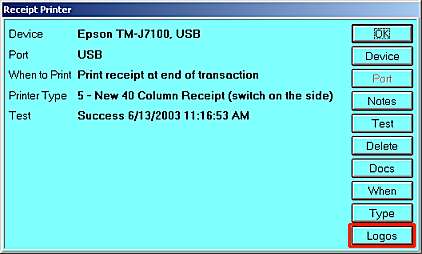
Double-click on the Receipt Printer row in the grid.

Click the Logos button at the bottom of the window.

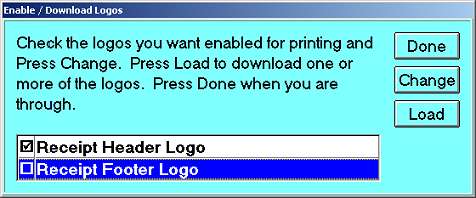
In the Enable/Download Logos dialog box, click in the box to the left of Receipt Header Logo and/or Receipt Footer Logo, depending on which type of logo(s) you placed in the Logos folder on your PC. Then click Change.

Click Load. In the next dialog box that displays, click the same logo(s) and click OK.
A window that says "For Your Information" displays. This window indicates that the printer is about to print the logo. Depending on the size of the logo file, there may be a short delay before the logo begins printing.
Once the logo has printed, click OK to continue.
If you downloaded both a header and footer logo, the "For Your Information" window displays again. Again, depending on the size of the footer logo, it may take a few seconds to print.
Click OK to continue.
Click Done, and then click OK to exit the Enable/Download Logos dialog.
Exit Device Configuration.
Repeat the above procedure at each POS station that has an Epson TM-J7100 receipt printer.
If you ever want to deactivate logo printing, initiate the logo download procedure, except un-check the header and footer logos in the Enable/Download Logos dialog box.