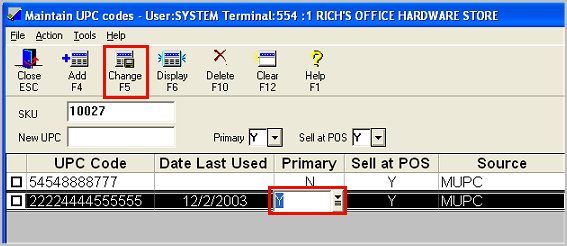
From the Inventory Maintenance window, you can add, modify, or delete the UPC associated with an item.
Important: You can also assign a "Primary UPC" to an item to indicate the UPC that will print on Windows Labels and RF labels, display in Inventory Maintenance and the Inventory Viewer, and print on invoices. Assigning a Primary UPC is optional. If you don't assign one, the last UPC used at POS will print or display in the above situations.
Click one of the following to take you to the procedure steps:
From the Inventory Maintenance window, display the item.
Click UPC (the word is written in blue underlined text and is just to the right of the Mfg # field). The Maintain UPC Codes window displays.
In the New UPC field, type the UPC you want to add.
If this UPC is the primary UPC for this item, select Y in the Primary box.
If you want your clerks to be able to enter the UPC to sell the item, enter Y in the Sell at POS box. If you only want your clerks to be able to sell the item by SKU, enter N.
In the Pkg Qty field, if applicable, enter the number of units in the package. For example, if this UPC code is for selling a package of 12 units, enter 12 in the Pkg Qty.
Click Add. The UPC is added.
If you have more UPCs to add, clear the previous entry in the New UPC box, type the next UPC, and click Add.
If you are multistore and you belong to more than one coop (Ace, True Value, Do it Best, etc.) you can link the same UPC to multiple SKUs. For example, you may have a 16 oz claw hammer that is manufactured by Stanley that one store purchases from Ace, but the other store purchases from Do it Best. You can link the UPC to both the Ace SKU and the Do it Best SKU, enabling both stores to scan the item at POS and get the correct SKU for that store.
To begin linking the same UPC to multiple SKUs, you must set option 8949 "Allow UPC to be linked to multiple SKUs" to Yes in Options Configuration.
For scanning to operate correctly, only one SKU can be linked to a UPC in a given store. In our example, this means Ace SKUs should only exist in the stores that are affiliated with Ace, and Do it Best SKUs should only exist in the stores that are affiliated with Do it Best. Note, however, that the system doesn’t enforce this. If you want to have a store that includes all SKUs, that is fine, except be aware that when clerks recall an item by UPC using any method (by scanning, by clicking UPC to search in POS, or by using "smart lookup" in POS) POS will bring up the first SKU in collating sequence that exists in that store; the clerk will not be presented with a list of SKUs to select from.
Use the Adding UPCs procedure (above) to add the UPCs. If you want to audit your system for UPCs with more than one SKU associated with them in the same store, run the Alternate Part Number Report (RAP) with format U (Print UPC List), and option I "Only UPCs with more than 1 SKU in this store."
You can change the Sellable option associated with a UPC. If you want to change the UPC, you must first delete the UPC and then re-add the UPC.
From the Inventory Maintenance window, display the item.
Click UPC (the word is underlined and just to the right of the Mfg #). The Maintain UPC Codes window displays.
In the grid, double-click the Sell at POS field of UPC code you want to change.
Click the arrow that displays, set the Sellable option, and click OK.
Click Change.
From the Inventory Maintenance window, display the item.
Click UPC (the word is underlined and just to the right of the Mfg #). The Maintain UPC Codes window displays.
In the grid, click the checkbox next to the UPC code(s) you want to delete. (Note: you can also use the down-arrow key and spacebar to place or remove checkmarks.)
Click Delete.
Click Yes to confirm the deletion.
Use the Package Qty field to enter the quantity that is contained in a package/box that has its own package UPC printed on the outside of the box. Each time that UPC is scanned, the quantity will increment by that multiple rather than just incrementing by 1. You must set option 9133 “Increment posting quantity by UPC package quantity? “ to Yes.
Important: You must scan the UPC Barcode. The package quantity feature does NOT work when you manually enter the UPC at Point of Sale.
Click here to see the applications that utilize the Package Qty.
Note: Neither EFM nor FastStart tapes contain the package quantity from any of Epicor's affiliates. Thus, entering the package quantity is a manual process.
Set option 9133 to Y in Options Configuration.
From the Inventory Maintenance window, display the item.
Click UPC (the word is underlined and just to the right of the Mfg #). The Maintain UPC Codes window displays.
In the Package Qty field, enter the number of packages in a box.
Click Change.
From the Inventory Maintenance window, display the item.
Click UPC (the word is underlined and just to the right of the Mfg #). The Maintain UPC Codes window displays.
Click in the Primary column of the UPC you want to assign as the Primary UPC, type a Y, and click Change.
