If you use location codes and you stock items in more than one location in your store, use the following procedure to enter multiple location codes. In this procedure you can also specify the number of bin labels you want to print for an item.
![]()
When you assign more than one location to an item, the field label for Location in Inventory Maintenance displays as +Location to indicate multiple locations exist.
From the Inventory Maintenance window, display the item for which you want to enter multiple locations.
Click ![]() (in the far left column which is labeled "Quantities"). The Location Code Maintenance dialog box displays.
(in the far left column which is labeled "Quantities"). The Location Code Maintenance dialog box displays.
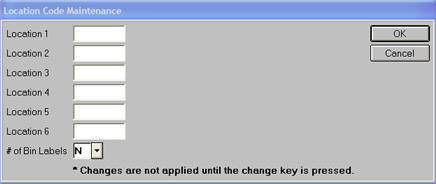
Using the Location 1, 2, and 3, 4, 5. and 6 boxes, enter the locations of the item.
Note: Locations 1-6 are independent of each other. You can fill them in or leave them blank in any combination.
(Optional) In the Number of Bin Labels box, enter the total number of bin labels you want to print for the item. The number you enter will supersede the number in the "Number to Print" field when you run the Item Bin Labels report (RBL), or when printing laser bin labels from the Print a Label dialog box. If you want the system to use the number in the Number to Print field in RBL, leave the default of N in this field.
Click OK. The dialog box closes.
Click Change on the toolbar.

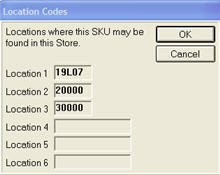
In the Inventory Viewer, there are columns for locations 1, 2, and 3 only, but the "Location 3" cell is a hyperlink that, when clicked, displays a dialog with all of the item’s locations.