When you want a queue to run automatically, you must select a time schedule to tell the system when to run the queue. For example, at a specific time, day of the week, date of the month, etc. Select one of the system-level time schedules that came with your system. Or, if none of the system-level schedules suit your needs, create and save your own schedule. The schedules you create are then available for selection, just like the system-level schedules.
This topic includes the following procedures, how to:
For more information about using queue schedules, click here to go to the scheduling help topic.
To check if there is a queue schedule that suits your needs, use the following procedure to review existing time schedules.
From the Eagle Browser, click System Management Menu. From the list that displays, click Schedule an End-of-Day Queue (SEQ). A window displays with scheduled queues.
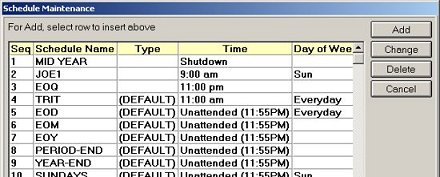
Click the Maintain Schedules link (next to the Store field). Or, Click Misc and from the Miscellaneous menu select 2 - Queue Schedule Maintenance. The Schedule Maintenance dialog displays with the time schedules that currently exist. Up to 99 schedules can exist per store. Use the scroll box or scroll arrow to view the schedules.
For each schedule name, the following information is provided:
Seq— This is the sequence number of the time schedule. It determines the order that the schedule displays in this Schedule Maintenance window.
Schedule Name— The name of the schedule.
Type— In this column, (DEFAULT) indicates a system-level schedule that is permanent and can't be changed or deleted. If this column is blank, then the schedule is one that you created and it can be changed or deleted.
Time— Indicates the time the queue will load.
Shutdown— The system loads the queue during the SHUTDOWN procedure.
Unattended— The system loads the queue during the SHUTDOWN procedure. Or, if SHUTDOWN does not occur by 11:55 pm, then the system loads the queue at that time.
Specific time— The system loads the queue at the time indicated.
Schedule— The remaining columns indicate the day(s) of the schedule (the day(s) the queue will run). Each schedule can only include one of the following:
Day of Week— Indicates the day(s) of the week of the schedule, Everyday or specific days.
Day of Mo / Month of Year— Indicates the day of the month and the month of the year of the schedule.
End of Period— Indicates the end of periods(s) of the schedule.
If none of the existing queue schedules suit your needs, use the following procedure to create your own time schedule.
From the Eagle Browser, click System Management Menu. From the list that displays, click Schedule an End-of-Day Queue (SEQ). A window displays with scheduled queues.
Click the Maintain Schedules link (next to the Store field). Or, click Misc and from the Miscellaneous menu select 2 - Queue Schedule Maintenance. The Schedule Maintenance dialog displays with the time schedules that currently exist. Up to 99 schedules can exist per store. Use the scroll box or scroll arrow to view all existing schedules.
Click Add to create a new schedule. The following dialog displays:
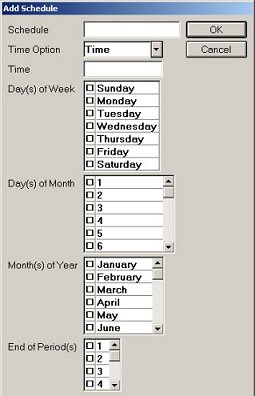
At Schedule, type a name for the schedule.
At Time Option, select one of the following:
Time— Select Time and then enter a specific time in the Time field.
Shutdown— The system loads the queue during the SHUTDOWN procedure.
Unattended— The system loads the queue during the SHUTDOWN procedure. Or, if SHUTDOWN does not occur by 11:55 pm, then the system loads the queue at that time.
Set the schedule for the queue by using one of the following categories. Do not combine the categories. For example, if you create a schedule using Day(s) of Week, do not also use Day(s) of Month / Month(s) of Year in the same schedule.
Day(s) of Week— Select the day(s) of the week of the schedule.
Day(s) of Month / Month(s) of Year— Select the day(s) of the month and the month(s) of the year of the schedule.
End of Period(s)— Select the end of periods(s) of the schedule.
Click OK. The dialog closes and the schedule is added to the grid.
Use the following procedure if you've created a queue schedule and now want to modify it. Note that a schedule type of (DEFAULT) is a system-level schedule that is permanent and can't be changed or deleted. If the Type column is blank, then the schedule is one that you created and it can be changed or deleted.
From the Eagle Browser, click Applications and then click System Management Menu. From the list that displays, click Schedule an End-of-Day Queue (SEQ). A window displays with queues.
Click the Maintain Schedules link (next to the Store field). Or, Click Misc and from the Miscellaneous menu select 2 - Queue Schedule Maintenance. The Schedule Maintenance dialog displays with the schedules that currently exist. Up to 99 schedules can exist per store. Use the scroll box or scroll arrow to view all existing schedules.
Locate the time schedule you want to modify (change or delete) and click to select and highlight it.
To delete the schedule, click Delete. In the 'are you sure' dialog, click Yes. A dialog displays that the schedule was deleted, click OK.
To change the schedule, click Change. The Change Schedule dialog displays. Make changes to the schedule, using the following fields.
Time Option— Select one of the following:
Time— Select Time and then enter a specific time in the Time field.
Shutdown— The system loads the queue during the SHUTDOWN procedure.
Unattended— The system loads the queue during the SHUTDOWN procedure. Or, if SHUTDOWN does not occur by 11:55 pm, then the system loads the queue at that time.
Schedule— The remaining columns indicate the day(s) of the schedule (the day(s) the queue will run). Each schedule can only include one of the following:
Day(s) of Week— Select the day(s) of the week of the schedule.
Day(s) of Month / Month(s) of Year— Select the day(s) of the month and the month(s) of the year of the schedule.
End of Period(s)— Select the end of periods(s) of the schedule.
After making your changes, click OK. A dialog displays that the change was successful, click OK.
To exit the Schedule Maintenance dialog, click Cancel.