After you set up the options and alerts for Stock Transfer Balancing, you must set up a dedicated terminal, printer(s), view, auto-transfer accounts, and (optionally) multiple order points.
Follow the steps below to set up a terminal record specifically for Stock Transfer Balancing.
Note: If you have already set up a dedicated terminal for Centralized Distribution, skip this section and use that same terminal for Inventory Balancing. Proceed to the next section, "Printer Setup."
In Options Configuration, add a new user named MPOTRAN, and set the "Check Pswd at POS" field to No.
Using Terminal-Based Security, assign this user full security.
In Options Configuration, add a new terminal . Assign MPOTRAN as the default user and set Special Security to No.
In Options Configuration, display option 9082 "Terminal for options and security when transfers created outside of POS." In the Current Value column, enter the terminal number you just added.
Verify that option 79 “Use Enhanced forms" is set to yes.
Set up a network printer (or use an existing one).
Verify that this MPS printer number is entered in option 9085 "Default printer for Central Distribution or Stock Transfer Balancing Transfer." Note: If you print transfers by store, set the Kept By method for this option to Store.
On the terminal running the listener that the network printer is pointing to, do the following:
Display the Device Configuration window, and set a default Enhanced forms printer as one that is connected to or networked to that terminal.
In the Transfer* field in Device Configuration, indicate a printer for printing transfers. The printer must be one to which this terminal is connected or networked. If your transfer printer is the same as the Default Enhanced Forms printer, then simply set the transfers to use the Default printer.
In Options Configuration, set option 7583 "Enhanced Form for transfer documents" to the preferred form type for printing automatic transfers.
If option 9085 is set by store, repeat steps 4-6 for the transfer printer in each store.
In the Inventory Viewer, set up a grid view for Stock Transfer Balancing. Required grid columns include Store, SKU, Description, Overstock, and Posting Quantity. You can also add other grid columns, as desired.
(Optional) Set option 2804 "WinPUR posting - Default view for Inventory Viewer" to the view you just created.
Use the following procedure to set up automatic Transfer accounts in Customer Maintenance. You must link each combination of “From and To” that you will use. Click here for the procedure.
Note: If you already set up automatic Transfer customers for Centralized Distribution or for Customer Order Management (COM) sourcing to orders, you can skip this section. The system will use the same customer links you set up for COM when you use Stock Transfer Balancing.
If desired, you can set up multiple order points (and, optionally, corresponding maximum stock levels) for items in your inventory. These can work well with Stock Transfer Balancing in various business situations; for an example, click here.
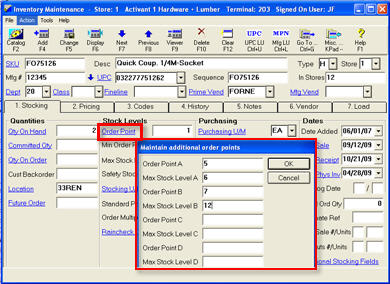
Multiple Order Points are stored in Inventory Maintenance. You access them by clicking the Order Point field on the Stocking tab.
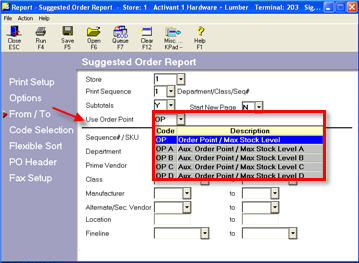
When running a suggested order (RSO), you'll designate which order point/max stock level to use for the order calculation in the "Use Order Point” field.
To set up Multiple Order Points, do any of the following, or a combination thereof:
Manually set them up in Inventory Maintenance, in the Maintain Additional Order Points dialog that displays when you click the Order Point hyperlink (see image above).
Run the Order Point Calculation Report (ROP) as you normally would to calculate Order Points, except that in the Calculate Order Point field, select which order point you want to update: Order Point, Order Point A, Order Point B, Order Point C, or Order Point D. If you use maximum stock levels, the corresponding Max Stock Level field will be updated automatically based on the Max Stock Level setting.
If you want to copy order points from existing order points, run the Order Point Calculation Report (ROP) using Method 4 "Copy Order Point from Current Order Point."