(Centralized Distribution and Stock Transfer Balancing users only)
Note: you must have security bit 899 to use this viewer.
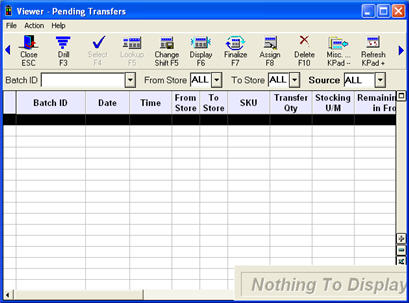
Use the Pending Transfer Viewer to:
Finalize transfers that you did not previously finalize
You used the RIB report and now want to change, delete, or finalize transfers
Finalize transfer items that previously failed to finalize (the failure would be indicated by one of the following Alerts: "Create Transfer Request FAILED," or "Transfer Request-item not added"). Make sure you correct the issue that caused the failure before finalizing.
Delete an unneeded pending transfer
If you are finalizing transfer items that previously failed to finalize, correct the issue that caused the failure based on the information in the Alert you received.
From the Eagle Browser, type VIEWPT and press Enter. Report RIB users: type VIEWRIB and press Enter. For more information about the difference between VIEWPT and VIEWRIB, click here.
Note: You can also access this viewer from the Misc menu of the Inventory Viewer.
Use the fields at the top of the window (Batch ID, From Store, To Store, and Source) as needed to display the pending transfer(s) you want to view. When the From Store and To Store are the same, the viewer shows all pending transfers "coming to" that store, and all pending transfers "going out" of that store.
Click Viewer (F9) to display the Inventory Viewer. The system automatically carries in the SKU and Store from the Transfer Viewer, and performs an item number lookup starting with that SKU.
For more information about an item in the grid, click Drill (F3) or double-click a row. In the dialog that displays, select the store (Transfer From Store, Transfer To Store, or Other Store). The item information then displays.
If desired, display check boxes so that you can work with multiple rows in the grid.
To delete an item from the grid, click on it so that it is highlighted, or if you are using check boxes, click the check box next to the item(s) you want to delete. Then click Delete.
RIB Report users only:
To change the quantity to be transferred, highlight the appropriate item in the grid, click Change (Shift F5), type the new quantity, and press Enter.
To assign a new batch ID to items, click the checkbox next to the relevant items, and click Assign. This can be useful if you have several different batches that have items coming from the same store, so that when you finalize to a transfer, those items would all be on one transfer. You could also assign a new batch ID to items you have reviewed for transfer, so that you can finalize just those reviewed items.
To finalize a previously un-finalized transfer item, click on it so that it is highlighted, or if you are using check boxes, click the check box next to the item(s) you want to finalize. Then click Finalize.