Entering Serial Numbers
From the Inventory Maintenance window, you can add, modify, or delete
the serial number(s) associated with an item. For serial numbers that
are longer than 13 digits, you can enter additional digits in the Reference
field (preceded by a + sign).
You can also enter
a serial number at Point-of-Sale if you have security bit 655. This
bit also controls whether a list of existing serial numbers displays at
POS, allowing the clerk to select one.
Click one of the following to take you to the procedure steps:
Adding Serial Numbers
From the , to which
you want to add a serial number.
Click Misc, then click Maintain Serial Numbers.
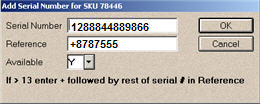
If no serial numbers exist for the item, the Add Serial
Number dialog box displays. Enter the serial number and optionally
a ReferenceThis field can be used for any purpose such as
entering a location, a comment, or even the remainder of a serial
number that is longer than 13 characters. If using it for the latter
purpose, enter the first 13 characters in the Serial Number field,
then enter the remainder in the Reference field, but prefix it with
a plus sign (+). This plus sign tells POS to concatenate the two parts
together after the partial serial number is selected. The entire number
will print as the serial number descriptor (comment) line.
 , and click
OK.
, and click
OK.
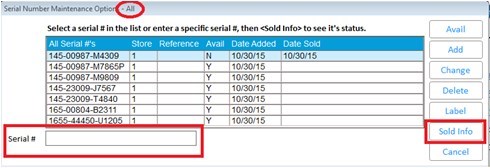
If one or more serial numbers already exist for the
item, the Serial Number Maintenance Options dialog box displays. Click
Add, enter the serial number, and optionally a ReferenceThis field can be used for any purpose such as
entering a location, a comment, or even the remainder of a serial
number that is longer than 13 characters. If using it for the latter
purpose, enter the first 13 characters in the Serial Number field,
then enter the remainder in the Reference field, but prefix it with
a plus sign (+). This plus sign tells POS to concatenate the two parts
together after the partial serial number is selected. The entire number
will print as the serial number descriptor (comment) line.
, and click
OK.
Click the Codes
tab. In the *Tally box, enter an S, and then click Change.
Note: The benefit of putting an
S in the *Tally box is that at point-of-sale, when a clerk attempts
to sell the item, a list of available serial numbers automatically
displays.
Top
Changing Reference Number or Availability
Use the procedure below to change a serial number's reference number
or its "availability."
When you enter a new serial number for an item (or if a customer returns
an item with a serial number), the system marks that serial number as
Available, and when that item is sold the system marks the serial number
as Sold. However, this procedure allows you to manually change the availability
of a serial number from Available to Sold or vice-versa. You must have
security bit 219.
From the , .
Click Misc, then click Maintain Serial Numbers.
Click the arrow to the right of the Serial Number
box, and click on the appropriate serial number from the list.
Note: By default, the list displays only
"available" (unsold) serial numbers. To display both sold and
available serial numbers, click All.
Click Change.
Make your change(s), and click OK.
Click Cancel to close the dialog box.
Top
Printing a Label for Items with Serial Numbers
Before
you begin, use the Label Designer to create a template label that
includes the Serial Number field, and optionally the Serial Number
Reference field. Assign this template to option 5818 "Default
price label format used for printing from Serial # Maintenance."
.From
the , .
Click Misc, then click Maintain Serial Numbers.
Click the arrow to the right of the Serial Number
box, and click the appropriate serial number from the list.
Click Label. In the dialog that displays, select your
criteria and click OK. Note the following:
In the Label Type filed, be
sure to select "Serial Label per Option
5818."
In
the Print or Batch field, select Print Immediately or Save to Batch.
If you select the latter, the system adds
the SKU to the Label Manager, where the labels can be printed later.

You
can add the same SKU to Label Manager multiple times as long you select
a different serial number. To do this, select the first serial number,
click Label, fill in the fields, and click OK. Press Cancel, then select
the next serial number and repeat the process.
Deleting Serial Numbers
From the , .
Click Misc, then click Maintain Serial Numbers.
Click the arrow to the right of the Serial Number
box, and select the serial number you want to delete from the drop-down
list.
Note: By default, the list displays only
"available" (unsold) serial numbers. To display both sold and
available serial numbers, click All.
Click Delete.
Click Yes to confirm your selection.
Click Cancel to close the dialog box.
Looking Up Sold Information
For items with
a large number of serial numbers, instead of scrolling through a long
list, you can now easily lookup a specific serial number. On the ‘All’
serial #’s dialog enter the serial number and click on the <Sold Info>
button to see if that serial number has been sold and, if so, see the
sale information for that serial number.
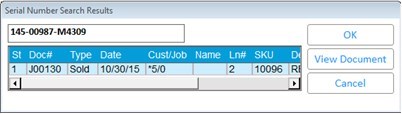
Example of the sold info dialog box for a
serial number which has been sold:
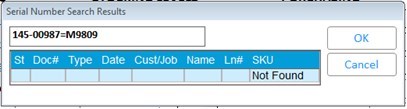
Example of the sold info dialog for a serial
number which is still available (not
sold).
Top