(Advanced Receiving users only)
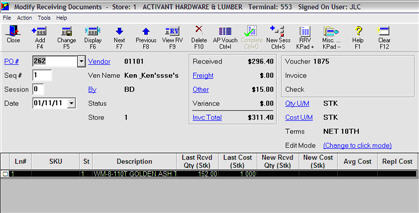
Use the Modify Receiving Documents (MRV) window to enter the correct invoice total (assuming it is different from the displayed total). This generates a variance, indicating a discrepancy between the invoice total you just entered, and the actual total of the line items received on the PO. Then, you make the necessary adjustments in the MRV window, such as changing the quantity or cost of items received, adding a freight amount, etc. As you make adjustments, the variance will tend toward zero.
The MRV window is divided into two sections, representing the two parts of a Receiving Document: the header area and the detail area (or grid). In the header, you can change Invoice Total, Freight, and Other charges. In the grid, you can change item costs and quantities received.
Do the following to enter a new amount of Freight Charges, Other Charges, or a new Invoice Total to a received PO. You can also change the displayed quantity and/or cost units of measure.
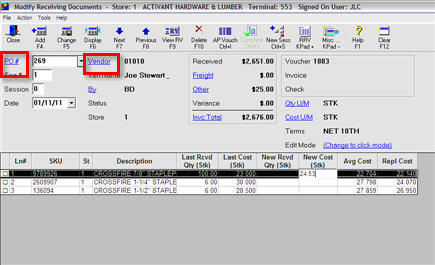
In the PO# field, from the drop-down list, select a finalized PO, then press Enter, or simply enter the PO # and press Enter.
The purchase order information displays. For a definition of each field in the window, click here.

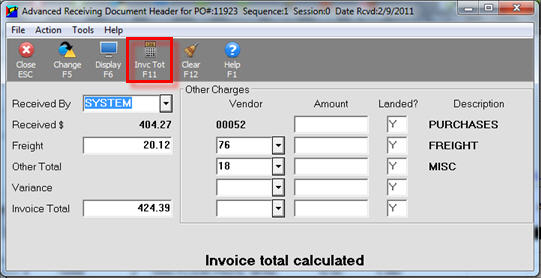
In the MRV window, make header changes in the Document Header window by clicking the hyperlinks for Freight, Other, or Invoice Amount.
Note: Never change the invoice amount if you are not going to complete and finalize the MRV document that day. When you enter a different invoice dollar amount, you cause an imbalance between RRA report and Temporary Vouchers. When running RRA for balancing purposes, use document status 1-ALL DOCUMENTS.
If desired, from the Document Header window, you can click Invc Tot (F11) so that the system adds the amounts currently showing in the ‘Received $’, ‘Freight’, and Other Total fields, and updates the Invoice Total field with this amount. Doing this eliminates any potential variance. Once the Invoice Total has been calculated, press Change (F5) before closing this window to write that new Invoice Total back to the receiving document.

Once you change the invoice amount or use the Invc Amt (F11) button, click Change. The MRV document is now in a state of “In Progress.”
If you want to be able to enter adjustments to quantity and/or cost in purchase units rather than stocking units, click Qty U/M and/or Cost U/M. The Last Rcvd Qty (Pur) and/or the Last Cost (Pur) columns display along with the other columns that are already displayed in the grid.
In the Qty U/M and/or Cost U/M fields, enter your changes. Do not enter changes in the Last Rcvd Qty (Stk) or the Last Cost (Stk) columns even though all four columns display in the grid.
To change the unit from purchasing units back to stocking units, click Qty U/M and/or Cost U/M again, using View RV (F9) to find MRV records.
Use the detail area (grid) of the MRV window to update costs and/or quantities received of specific line items on a received PO.
![]()
SKUs with the Keep Stock Info or Keep Prices fields set to N on the Codes tab of Inventory Maintenance cannot be adjusted in MRV.
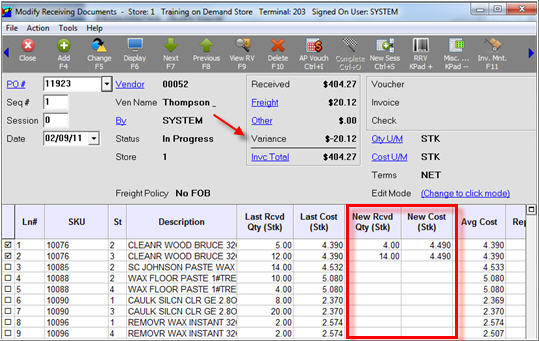
Click in the New Rcvd Qty and/or the New Cost column of the item you want to change, and enter the new quantity or retail. Repeat this process for any other items you want to change.

Note: While a SKU is highlighted in the grid, you can click Inv. Mnt. (F11) to take you into Inventory Maintenance for that SKU/receiving store.
Click Change.
As you change costs and/or quantities in the grid, the Received field in the header area changes accordingly, so that it always reflects the latest total merchandise dollar amount in the detail area. When the Variance field changes to zero, then you are in balance— that is, Invoice Total = $ Received + Freight + Other.
If you need to add items to the receiving document, continue to the next section.
Use the following procedure to add items to a receiving document that were not on the original purchase order.
Click Add. The Add Item to Receiving Document dialog displays.

Enter the SKU, Store (if multistore), Quantity received, and the Cost of the item, and click OK. The item is added and posted to the receiving document.
Note: The Store field defaults to the store in which the PO was created.
Repeat steps 1 and 2 for any additional items that need to be added.
When you run RRV, option F to finalize, the system updates Inventory Maintenance with the quantities and costs you specified for the added item(s), and the values in the New Rcvd Qty and New Cost columns are moved to the Last Rcvd Qty and Last Cost columns.
When the PO is finalized, the special instructions from it are carried forward into MRV. If you entered an A/P Remittance Note in Purchasing and Receiving (MPO), that note attaches to the A/P voucher and can be viewed/changed in MRV. If you entered Vendor Notes in Vendor Maintenance, they can be viewed/changed in MRV as well. Use the following procedure to view or change any of these fields.
Display the PO and click Misc. The Miscellaneous menu displays.
Click one of the following:
4 – Add/Change Special Instruction Note
5 – View Vendor Notes
N – Add/Change AP Remittance Note
Make additions or changes as desired.
Click OK.
![]()
You can also access Special Instructions or Vendor Notes by clicking their corresponding hyperlink.
