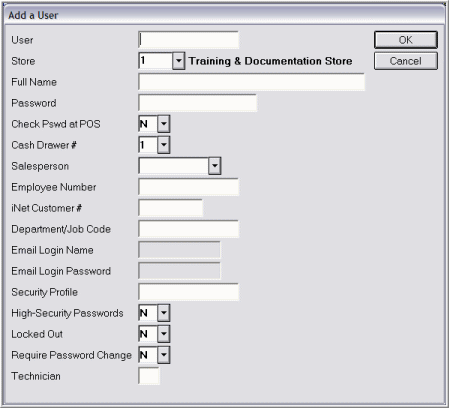
In addition to setting up a user's security in the Security Maintenance window, you must also create a "user record" for each user. A user record stores information such as the user's name and password.
From the Security Maintenance window, click Misc. A dialog box displays.
Click Add/Delete/Change User, then click Add a User. The Add a User dialog box displays.

In the User field, type a name for the user.
The Store field only applies if you have a Multistore system. Select the store number in which you want the user to be added, or select ALL to add the user to all stores.
In the Full Name field type the first and last name of the user.
(Optional) In the Password field, enter a password for this user. The password field is alphanumeric and is case-sensitive (the clerk will have to use the same case that the password was set up in).
In the Check Pswd at POS field, enter a Y if you want POS to require the user to enter his or her password when ringing up a transaction in POS. Otherwise, leave the N.
In the Cash Drawer # field, leave the default of 1 if you have only one cash drawer per POS station. If you have more than one cash drawer per POS station, enter the correct cash drawer number for this user.
(Optional) Enter values in any of the following fields:
Default Salesperson
Employee Number
iNet Customer Number
Department/Job Code
Email Login Name
Email Login Password
For a definition of each field, click here.
Do one of the following to add security for the user you just created:
In the Security Profile box, enter another user from which you want to copy security. Note that the user you enter must exist in Store 1, Terminal 1.
Multistore: If you enter a Security Profile, the new user's security will be added to all terminals that are currently locked into the store you specified in the Store box. However, if you entered ALL in the Store box, the new user's security will be added to all terminals that are currently locked into any of your stores.
If you left the Security Profile box blank, add security for the user in the Security Maintenance window.
In the High Security Passwords fields, enter Y to use high security passwords for this user or N to use standard password security.
In the Locked Out field, enter Y to prevent this user from logging in to your Eagle system. Enter N to allow this user access to everything specified in their security settings.
In the Require Password Change field, enter Y to require this user to change their password at the next login. Enter N to allow them to log in without a password change.
Click the Technician checkbox if this user is a technician.
![]()
A QuickTip video is available for adding a user record. To view QuickTips, go to http://www.activant.com/eagle-customer-support/, and click Training Browser. When the Training Browser displays, click Videos in the left pane, and then click Quick Tips.