Use the following procedure to set up Epicor Eagle™ for Windows to print reports to a printer connected to a PC on your network. This procedure assumes that the printer is already attached and working properly in a Windows environment.
This procedure consists of three parts:
setting up the Listener (the Listener translates the report so Windows can interpret and print it)
setting up the printer in MPS
testing the printer
The Eagle for Windows Listener program needs to run on a PC that is connected to the network. Avoid using a POS station for the Eagle For Windows Listener program; instead, use a back-office PC if possible. Select a PC that will be up and operational 24 hours a day, 7 days a week.
Multi-Store: Set up Listener on one PC per location. This will prevent one location from disrupting all locations' report processing if the Listener PC is interrupted for any reason.
Locate the PC you have selected to run the Listener program. Verify that Eagle For Windows software has been installed on this PC. If it has not, perform a normal Eagle For Windows software installation.
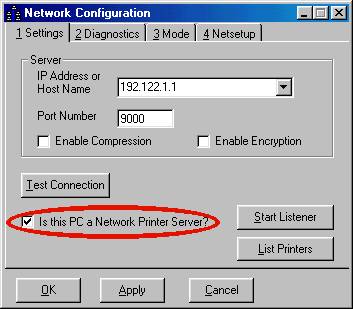
From the Eagle Browser, click Utilities. From the menu that displays, click Network Configuration.
In the Network Configuration dialog box, click the box next to "Is this PC a Network Printer Server?" so that a checkmark displays.
Click Apply. Two buttons now display to the right: Start Listener and List Printers.
Click Start Listener, click Apply at the bottom of the dialog, and then click OK. The Network Configuration dialog box closes.
Verify that you see the Eagle for Windows Listener
is running on your Windows taskbar.![]()
From the Launch field, type MPS and press <ENTER>. The Printers And Channels Viewer displays.
Click the <Add> button. The Add new Printers & Channels dialog displays.
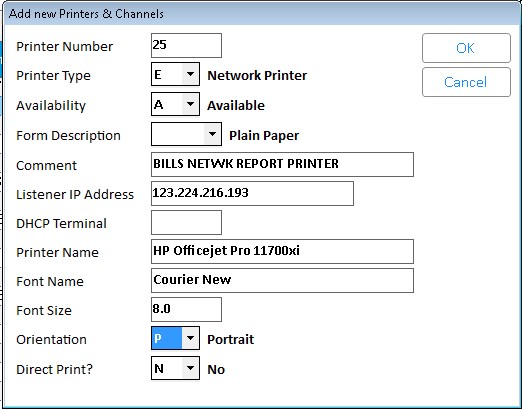
At Printer Number, type in the Printer Number that will identify the Eagle Network Report Printer on the network.
At Printer Type, select E (Network Printer).
At Availability, select A (Available).
At Form Used In Printer, leave the entry blank.
At Comment, type in a description that describes the printer, or leave it blank.
At Listen PC IP Address, type the IP address of the PC that is running the Eagle for Windows Listener program for the printer you are adding.
Click here if you need help finding your PC's IP address.
If you are using DHCP, type the terminal number in the field DHCP Terminal.
At Printer, type the name that Windows uses to identify this printer. The name must match exactly, including spaces, case, etc. If you're not sure what the exact name is, do the following:
From your desktop, click Start, Settings, Printers.
Find the printer name, and write it down exactly as it appears on the screen (take note of spaces, case, etc.).
Close the Printers window.
At Font Name, accept Courier New. If the printer being added is a dot matrix printer, Font Size and Orientation will be ignored. If the printer being added is a laser printer, Font Size and Orientation will be applied to the laser printer. A standard setting for laser printers would be Font Size: 8.0, Orientation: Landscape. (Note: if you decide to set the orientation to Portrait, change the Font Size field to 7.0.)
At Direct Print:
(Epicor recommends this setting) Leave the default of N if you want the printer driver to control the printer. This means if you use a Dot Matrix printer, it will not perform a form feed at the beginning of each report or apply the double line space option (if used), and if you use a laser printer, it will use the font and orientation settings. Note: if you set this field to No, the option "Eagle Network Report Printing Print Mode" should be set to S (Standard) in Options Configuration.
Enter Y if you want the application to control the printer, causing Dot Matrix printers to perform a "form feed" at the beginning of each report, and causing Laser printers to ignore font and orientation settings.
Press <OK>. You will receive the message "Printers & Channels record has been added", Click <Cancel>.
You will return to the Printers and Channels Viewer. Close the window.
From the Network Access main menu, type MPS and press <ENTER>. The Modify Printer Status screen displays.
At Printer Number, type in the Printer Number that will identify the Eagle Network Report Printer on the network and press <ENTER>.
At Printer Type, type E (Network Printer) and press <ENTER>.
At Availability, type A and press <ENTER>.
At Form Used In Printer, press <ENTER> to leave the entry blank.
At Comment, type in a description that describes the printer, or leave it blank.
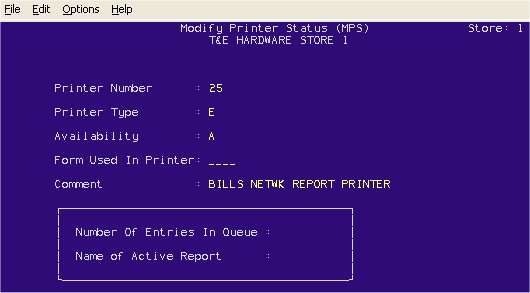
Press <ADD> to add the printer or <CHANGE> if modifying an existing printer entry. The message "Record Added" or "Record Changed" displays at the bottom of the screen.
Press <NEXT SCREEN>. Another screen displays.
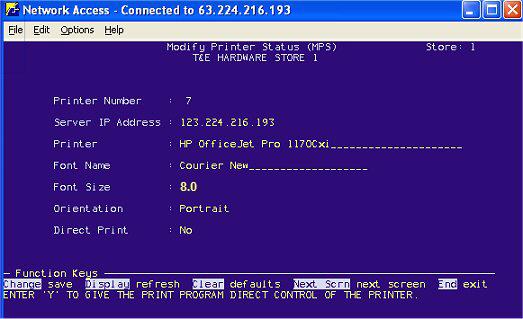
At Listen PC IP Address, type the IP address of the PC that is running the Eagle for Windows Listener program for the printer you are adding, and press <ENTER>.
Click here if you need help finding your PC's IP address.
At Printer, type the name that Windows uses to identify this printer and press <ENTER>. The name must match exactly, including spaces, case, etc. If you're not sure what the exact name is, do the following:
From your desktop, click Start, Settings, Printers.
Find the printer name, and write it down exactly as it appears on the screen (take note of spaces, case, etc.).
Close the Printers window.
At Font Name, press <ENTER> to accept Courier New. If the printer being added is a dot matrix printer, Font Size and Orientation will be ignored. If the printer being added is a laser printer, Font Size and Orientation will be applied to the laser printer. A standard setting for laser printers would be Font Size: 8.0, Orientation: Landscape. (Note: if you decide to set the orientation to Portrait, change the Font Size field to 7.0.)
At Direct Print:
(Epicor recommends this setting) Leave the default of N if you want the printer driver to control the printer. This means if you use a Dot Matrix printer, it will not perform a form feed at the beginning of each report or apply the double line space option (if used), and if you use a laser printer, it will use the font and orientation settings. Note: if you set this field to No, the option "Eagle Network Report Printing Print Mode" should be set to S (Standard) in Options Configuration.
Enter Y if you want the application to control the printer, causing Dot Matrix printers to perform a "form feed" at the beginning of each report, and causing Laser printers to ignore font and orientation settings.
Press <CHANGE>. Then press <END> to exit MPS and return to the Eagle main menu.
Test the network report printer by running a small Eagle report, as follows:
From the Network Access main menu, type RTM and press <ENTER>.
At printer number, type the number of the Eagle Network Report Printer that you just set up in function MPS.
Press <RUN>.
Once the report prints, verify that it printed correctly.