Using the Bank Reconciliation Viewer
This topic describes the various functions of the Bank Reconciliation
Viewer. Accounts Payable and Payroll checks automatically pass to the
Bank Reconciliation Viewer whenever you run their respective reports to
post checks. You can also add transactions to the viewer manually, so
that the transactions you reconcile in the viewer match the transactions
listed on your bank statement.
This procedure assumes that option 8963 "Bank Reconciliation Enabled"
is set to Yes in Options Configuration, and that you set security bit
748 "Access Bank Reconciliation Viewer” set to Yes in Security Maintenance
for users whom you want to have access to this viewer. You may also want
to set option 9031 "Create G/L Transactions for Cash Drawer Short/Over"
to Yes.
This procedure includes how to:

For
a definition of the fields in the Bank Reconciliation Viewer, click here.
Displaying Transactions
- Display
the Bank Reconciliation ViewerFrom the Eagle Browser, type BRVIEW in the Launch
bar, and press Enter. (Alternatively, you can click Accounts Payable
Menu, Bank Reconciliation Viewer)..
- The viewer defaults to displaying all transactions.
To look up a subset of transactions, click Look Up, and select one
of the lookup methods: unreconciled, reconciled, all, or voided.

- In the From and Thru fields, select the range
of dates of the transactions you want to view.
- (Optional)
Click the Bank Codes hyperlink, select a bank code(s), and click OK.
You can also leave this field set to the default of ALL bank codes.
- (Optional)
Click the Stores hyperlink, select a store(s), and click OK. You can
also leave this field set to the default of ALL stores.
- Click Refresh to
populate the grid based on your previous selections.
Adding Transactions Manually
To make the Viewer match your bank statement, you can add other transactions
to the viewer manually.
- Display
the Bank Reconciliation ViewerFrom the Eagle Browser, type BRVIEW in the Launch
bar, and press Enter. (Alternatively, you can click Accounts Payable
Menu, Bank Reconciliation Viewer)..
- Click Add. The Add Bank Reconciliation Transaction
dialog displays.
- Fill in the fields, based on the type of transaction
you want to add. If you are adding a negative amount, for transactions
such as a register adjustment, ATM withdrawal, etc., be sure to enter
a negative (-) sign before the number you enter in the Amount field.
- Click OK to post the transaction to the grid.
If you want to enter another transaction, repeat step 3. Otherwise,
click Cancel to exit the Add window.
Changing Transactions
- Display
the Bank Reconciliation ViewerFrom the Eagle Browser, type BRVIEW in the Launch
bar, and press Enter. (Alternatively, you can click Accounts Payable
Menu, Bank Reconciliation Viewer)..
- Highlight the transaction you want to change.
- Click Change, or double-click on the transaction.
The Change Bank Reconciliation Transaction dialog displays.
- Make your changes.
If
you are entering a Cash Out amount in the Amount field, be sure to use
a negative sign before the number.
- Click OK, and click OK again in the confirmation
dialog.
Copying Transactions
- Display
the Bank Reconciliation ViewerFrom the Eagle Browser, type BRVIEW in the Launch
bar, and press Enter. (Alternatively, you can click Accounts Payable
Menu, Bank Reconciliation Viewer)..
- Highlight the transaction you want to copy.
- Click Misc, and select Copy Bank Reconciliation Transaction.
The Copy Bank Reconciliation Transaction dialog displays.
- If desired, make any changes to the information
from the original transaction.
- Click OK. Then click OK again in the confirmation
dialog. The transaction is copied, including the fields you modified
(if any).
Deleting Transactions
- Display
the Bank Reconciliation ViewerFrom the Eagle Browser, type BRVIEW in the Launch
bar, and press Enter. (Alternatively, you can click Accounts Payable
Menu, Bank Reconciliation Viewer)..
- Place a checkmark next to the transaction(s)
you want to delete.
- Click Delete, then click OK in the confirmation
dialog.
Reconciling Transactions
Note: Epicor strongly recommends you perform reconciliation on one bank
at a time, because the new reconciled balance is only updated in the bank
record if a single bank is selected. If multiple banks are selected, the
new balance cannot be determined for each bank, thus requiring you to
manually update bank balances.
- Display
the Bank Reconciliation ViewerFrom the Eagle Browser, type BRVIEW in the Launch
bar, and press Enter. (Alternatively, you can click Accounts Payable
Menu, Bank Reconciliation Viewer)..
- (Optional)
In the Last Stmt field, enter the ending balance amount from your
last reconciliation. The system uses this figure to calculate a reconciled
balance based on the following formula: Last Reconciled (statement)
Balance + Cash In - Cash Out.
- Place a checkmark next to the transactions you
want to reconcile. Note the following:
- The “Selected” field displays the total value
of the selected rows.
- The amount in the “Variance” field
is based on the following calculation: Last Stmt + selected transactions–
New Stmt
- The fields in the header area of the viewer are
disabled to keep the “Variance” amount correct. If you change the
lookup method, de-select records in the grid, refresh the grid, or
reconcile the items in the grid (in the next step), the header fields
are re-enabled.
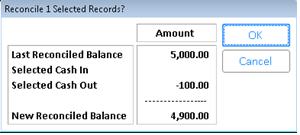
- Click Reconcile.
If you entered an amount
in the Last Stmt field, a summary displays of Last
Reconciled BalanceThe
ending balance from your last reconciliation that you entered in the Old
Statement field., Cash
InThe sum of all the debit
transactions you check-marked for reconciliation in the grid.,
Cash OutThe sum of all the credit transactions you check-marked
for reconciliation in the grid., and New
Reconciled BalanceLast
Reconciled Balance +Selected Cash In - Selected Cash Out..
- Select Yes in the dialog that displays, and
click OK in the confirmation dialog. This sets all the selected transactions
to "reconciled” and enters the current date in the Date Reconciled
field.
Saving a Reconciliation in Progress
If you need to leave the Bank Reconciliation viewer before completing
the reconciliation, you can save your work-in-process. Then upon re-opening
Bank Reconciliation and selecting the desired bank code and date range,
you can recall and apply that saved session and continue on with your
work to finish up the reconciliation to their bank statement.
- Click Misc, and select “Save Session.”
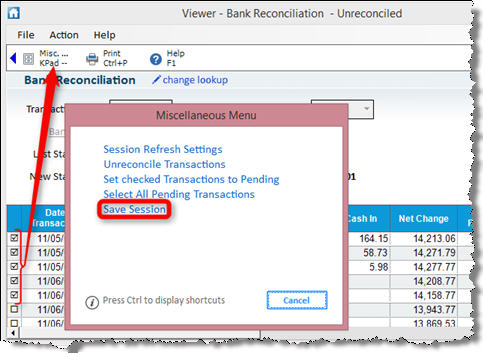
You are now safe to exit Bank Reconciliation;
your work-in-process for that session has been saved locally to the PC.
- To recall a saved session, after opening Bank
Reconciliation and selecting the correct bank code and date ranges,
click “Misc.” button and select “Reload Session.”
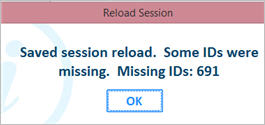
The session is saved locally on the PC that
selected to save a session. If in the time between saving a session and
reloading a session items have already been reconciled or deleted, when
you attempt to reload the saved entries, a dialog indicates that some
items could not be loaded and which ID's they were. Below is a sample
of this message.
Un-Reconciling Transactions
Display
the Bank Reconciliation ViewerFrom the Eagle Browser, type BRVIEW in the Launch
bar, and press Enter. (Alternatively, you can click Accounts Payable
Menu, Bank Reconciliation Viewer)..
Display unreconciled transactions
by clicking Lookup, and selecting Reconciled. Then click OK
Place a checkmark next to
the transaction(s) you want to un-reconcile.
Click Misc, and select Unreconcile
Transactions. A warning message displays.

Click Yes. Then click OK
in the confirmation dialog.
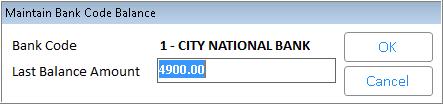
Manually Update Bank Balance
Use this feature only if you need to manually change
the last bank balance amount (for example, you performed reconciliation
for multiple banks at one time, thus requiring that you manually change
individual bank balances).
Display
the Bank Reconciliation ViewerFrom the Eagle Browser, type BRVIEW in the Launch
bar, and press Enter. (Alternatively, you can click Accounts Payable
Menu, Bank Reconciliation Viewer)..
Click Misc, and select Maintain
Bank Balance. The Maintain Bank Code Balance dialog displays.

Select the bank code to
change, and click OK.
In the next dialog, enter
the last balance amount and click OK.

For
a definition of the fields in the Bank Reconciliation Viewer, click here.