The True Value, Ace, and Do it Best Corp. catalogs have images that you install from CD so that the catalog displays images of its various products.
The procedure for loading the images CD is printed on the CD label. That same procedure is described below.
![]()
Before you load catalog images, note the following:
As of Release 18, True Value Catalog images are available via EFM. Click here for more information.
If your Epicor Eagle™ for Windows system is set up with a Network Master and clients, install the CD on the Network Master PC only.
If your Epicor Eagle™ system is set up using the stand-alone method, install the CD on each PC on which you want catalog images.
Place the CD in the Network Master PC’s CD drive if you have the Network Master/Client setup. Otherwise, place the CD in the CD drive of any PC running Eagle Catalog for Windows software. (If you're not sure if you have a Network Master/Client setup, click here.)
From the desktop, double-click on the "My Computer" icon. The My Computer folder opens.
Locate the CD drive icon and double-click on it. A list of files displays.
Double-click the "Setup" icon. Make sure to select the "Setup" icon as opposed to the "3 Setup" icon in the file list.
A dialog box may display, asking you if you want to install all images, only color images, or only black and white images (line art). If this dialog box does not display, skip to step 6.
If the dialog box does display, and you choose the "All images" install, line art (black and white) displays if that is the only image available for an item. If an item has both line art and a color image available, the color image displays. If no image exists, the message "No Image" displays in the item image box.
Select the image option you prefer, and click Next.
From the "Start Installation" box, click Next. The catalog image load process begins. Depending on your PC, this process may take 5 to 10 minutes. When the installation is complete, the system returns to the file list screen from step 3.
Select "File" and "Close" to return to the Windows desktop. The installation is now complete.
Remove the CD from the CD drive.
Start the Catalog software. If an item has an image, the image displays on the list screen.
Repeat steps 1-9 for each PC running the Eagle Catalog for Windows software (unless your system is set up with a Network Master and clients, in which case you’d only need to load images on the Network Master PC).
If you have another vendor's catalog images to load, repeat the steps above. Then, you must do the following for multiple catalog images to work properly:
In Options Configuration:
Set the option " Catalog image set support for multiple catalogs" in Options Configuration to M, "Multiple Image Sets, May 2003 or Newer."
(Optional) Set the option " Alternate part number mapping when looking for images" to A, "Alternate Part Number," if you use your own SKU numbers for catalog items in your inventory, and have alternate part numbers set up to identify the corresponding vendor SKUs. The system will check the alternate part number file to link the image to the SKU in Inventory Maintenance.
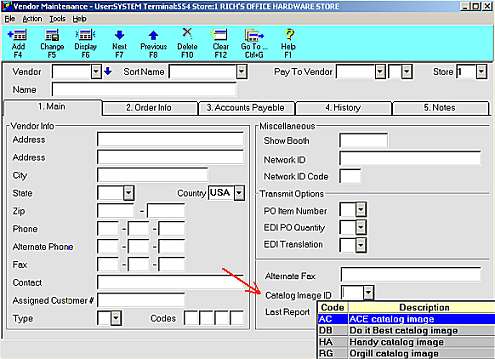
In Vendor File Maintenance, display each vendor for whom you're loading images, select the appropriate code in the Catalog Image ID field, and click Change. (This ensures that the correct image displays when you're displaying an item in Inventory Maintenance.)
