Using/Managing the Gift & List Registry - Retailer
This topic covers the following information pertaining to the retailer.
Click on a link below to jump to the desired section.
Logging
into the Registry
Configure
Store Information
Configure
the Carousel
Configure
Pages
Configure
Email
Advanced
Configuration
Searching
for Users
Adding
a Guest Account
Adding
an Employee Account
Creating
a Project
List
Projects
Creating
a New Registry
Import
Items from a Project
Import
Items from a List
View
Purchases
Logging into the Registry
- From
the Registry homepage, click on Login and enter your user credentials.
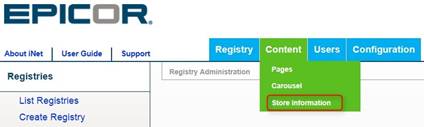
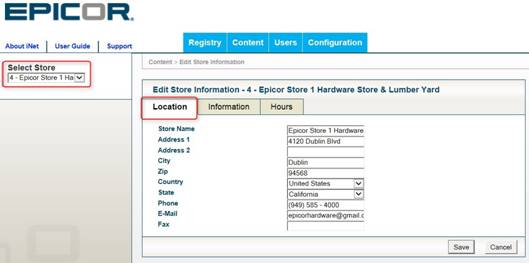
Configure Store Information
- The
main use of the store information section is for you to enter the
information that will appear on your site. The information entered
generally appears in the header/footer of all pages of the site.
- For
multi-store sites:
- You
should fill this detail out for all stores you have configured
on the site.
- Clicking
store info at the top of the page will show detail for all stores
setup on the site. Information from the active store will be used
for the header/footer of each page.
- Access
Store Information by clicking on Content->Store Information
- Store
information is configured/modified by selecting a store, entering
the appropriate data in the Location, Information, Hours
tabs, and then clicking on Save.
- Fill
in the fields on the following tabs: Location, Information, and Hours
- Location
tab: Note:
This also appears at the bottom of the page when clicking on the
Store Info link.
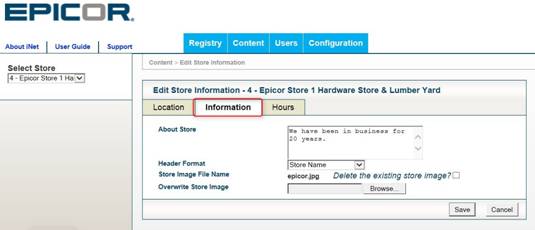
- Information
tab:
- The
header format will determine how your store name or logo is
shown at top of each page. You can choose to show your store
name, logo, or both.
- If
you chose to show a logo, you can add/replace the logo on
this tab.
- The
About Store should be filled in and will appear at
the bottom of each page.
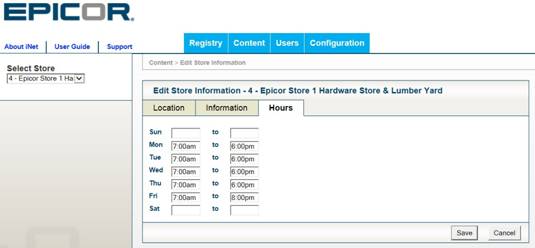
- Hours
tab:
- This
also appears when clicking the Store Info link at the
top of the page.
- Note: If each day of the
week has different store hours, all days will be listed. If
some days have the same store hours, iNet will combine them
intelligently when displaying to customers.
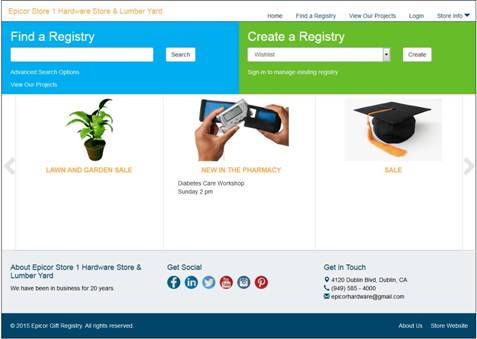
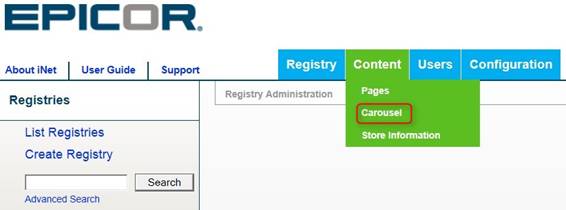
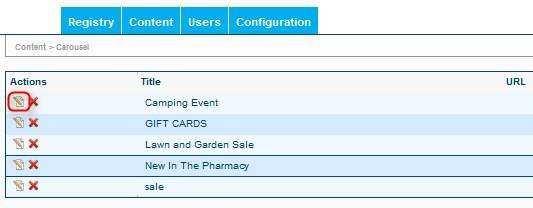
Configure the Carousel
- The
Carousel scrolls across the screen and can be used to direct consumers
to specific products, events, or even project lists (i.e. building
a deck). Configuring the Carousel is optional and can be accessed
by clicking on Content->Carousel.
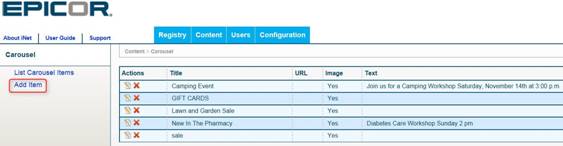
- If
items have been added to the Carousel previously, they will display
in the grid. You can also display the list by clicking on List
Carousel Items. To add a new item, click on the Add Item
button.
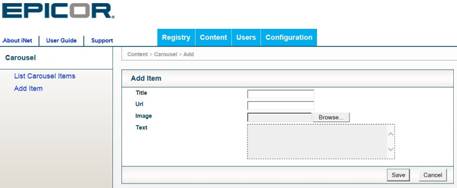
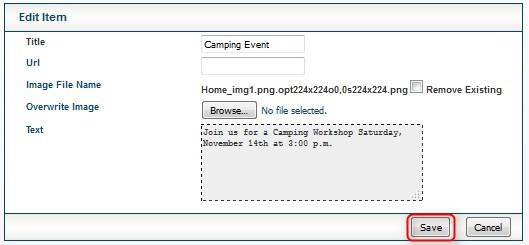
- Fill
in the fields for the Carousel item.
- Title – The title of the
Carousel Item
- URL
– The web address of the item.
- Image
– The image you wish to use.
- Text
– What you would like to say about the item (i.e. “Diabetes Care
Workshop Sunday 2 pm”).
- To
edit the carousel item, click the Edit button
 next to the item
you wish to edit.
next to the item
you wish to edit.
- Make
the necessary changes, and click Save.
- To
delete a carousel item, locate the item you wish to delete and click
the Delete button
 .
.
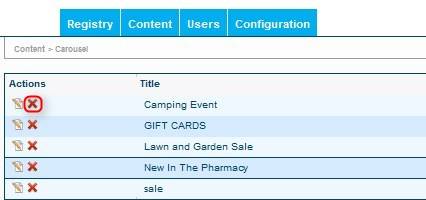
- You
will see a dialog asking to Confirm or Cancel. Click
on the appropriate button.

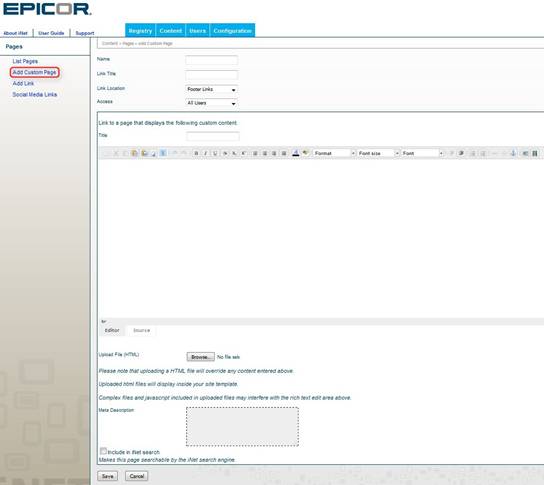
Configure Pages
- This
function allows you to display links to other pages on your registry.
You can configure this by clicking on Content->Pages. If there
are any pages currently linked to the registry, they will display
in the grid. You can also click on List Pages to display the
linked pages. Here are a few examples:
- Display
links to custom pages you create on your registry site. (i.e.
An “about us” page with some detail about your store.
- Display
links to external pages (such as a non-registry home page if you
have one)
- Display
links to existing pages on your registry site. (Such as a contact
page, or to a specific project…)

- To
add a custom page, click on Add Custom Page on the left side
of the screen and fill in the following fields:
- Name—The
Name of the page.
- Link
Title—The Title of the link.
- Link
Location—Where is the link located on the page?
- There
are two types of custom page you can load (controlled by link
location).
- Footer
Links—These appear at the bottom of the site.
- Project
instructions – Used by a merchant defined project as the instructions
for that project. You will need to create the custom page
first, and then go add/edit their project and select the custom
page to use.
- You
can embed a YouTube video in a custom page:
- Find
the video on YouTube.
- Click
Share
- Choose
Embed and copy the code from YouTube.
- Add
a custom page in iNet, and change the Source tab for
the custom content, then paste the code from YouTube.
- Note
it is also possible to embed images, however non-iNet integrated
customers will need to host the images on another (secure/https)
site and then reference them from iNet.
- Access
– Who can access the page?
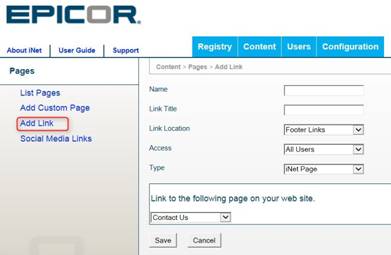
- To
add a link on the registry page that points to a link on your company’s
website, click on Add Link and fill in the following information:
(i.e. link to www.mystore.com)
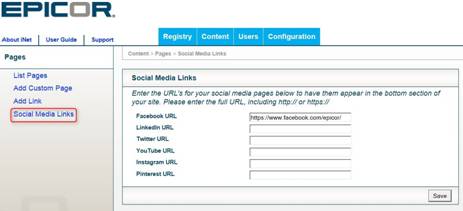
- If
you would like to add Social Media Links (i.e. Facebook) to the registry
home page, click on Social Media Links and fill in the appropriate
URL fields:
- Facebook
- LinkedIn
- Twitter
- YouTube
- Instagram
- Pinterest
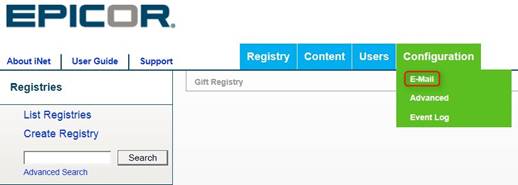
Configure email
- To
configure email, click on Configuration->E-Mail
- Click
on Email Settings, set the values for E-Mail Signature
& E-Mail Signature Format, and click Save Changes
(editing this is optional).
- This
is a similar concept to editing your e-mail signature format in
outlook. It’s mainly just text that appears at the
bottom of your e-mail
- iNet
will automatically fill out the store name, address and phone
number from the database, so there will be a nice looking default
.
- An
example of a possible change would be to add a tagline either
before/after the address info ( i.e. “ABC hardware, helping customers
since 1967”) if you want it to appear on all e-mail sent from
your registry site.

- Click
on List Addresses. Use the edit button
 to
modify the configuration (if necessary).
to
modify the configuration (if necessary).
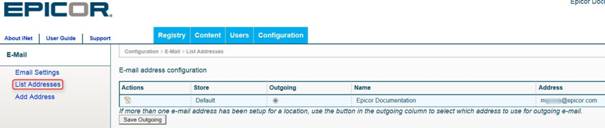
- Modify
the email address for each store by clicking on the dropdown arrow
in the store field. Click the Save button when finished.
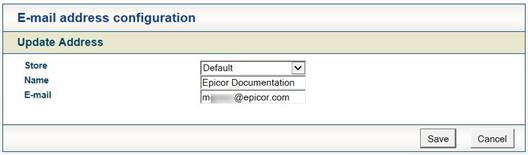
- Add
a new address by clicking on Add Address, then select each
store (if multi-store) from the dropdown, fill in the fields, and
click on Save.

Advanced Configuration
- This
area contains some settings somewhat similar to Eagle options. There’s
a lot more on a full iNet site, however for a registry standalone
site there are still a number of things Epicor has made configurable.
- Epicor
has selected default values believed to work well for the majority
of merchants.
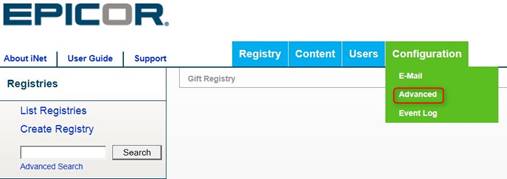
- Access
Advanced Configuration by clicking on Configuration->Advanced
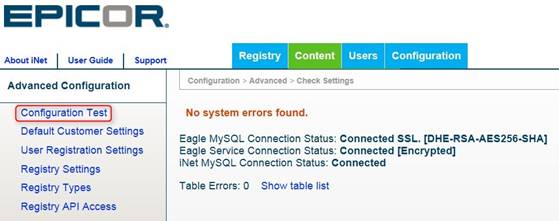
- To
execute a Configuration Test, click on the link on the left hand side
of the screen. If everything is set correctly, you will receive a
message stating “No system errors found.”
- This
test does a few things:
- A
number of internal health checks, which should always pass.
- A
test of iNet’s ability to communicate with Eagle. This can fail
if:
- Customer’s
internet is down
- Customer’s
IP address has changed
- Customer’s
Eagle is down, running maintenance, or in quiet mode.
- Configuration
issues--such as Eagle NTA setup or the customers firewall.
- When
users sign up for an account, iNet will create an iNet(web) user and
an Eagle Customer Maintenance (MCR) account. The default customer
settings are used by iNet when creating that MCR account.
- Most
settings directly map to Customer Maintenance (MCR). They can
be left blank, and if supplied will be used when iNet creates
the account.
- Update
account codes are used by iNet user admin if adding an iNet web
user for a pre-existing MCR account – iNet will update the user
codes on that MCR account based on this setting
- Starting
customer number is used to determine what customer number is used
for the MCR account iNet creates –first “free” number after the
starting number will be used.
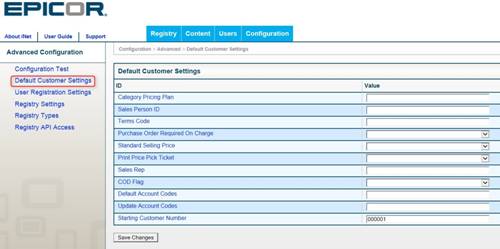
- If
you would like to enter/modify the default customer settings,
click on the Default Customer Settings link on the left hand side
of the screen. Fill in the appropriate fields and click Save
Changes.
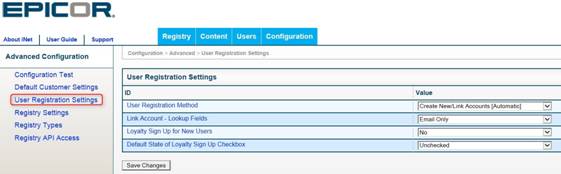
- User
Registration Setting— Controls how the registration process works
when creating accounts.
- Fill
in the appropriate fields and click Save Changes.
- User
Registration Method—Controls the options and process for customers
to create new accounts.
- Link
Account-Lookup Fields—Fields used to lookup a matching Eagle customer
account when creating a new iNet user linked to an existing Eagle
customer.
- Loyalty
Sign Up for New Users—Create Eagle loyalty accounts during the
sign up process. This option requires local loyalty on you Eagle
server.
- Default
State of Loyalty Sign Up Checkbox—When Loyalty Sign Up for New
Users is set to Prompt, this is the default state of the
loyalty sign up checkbox.
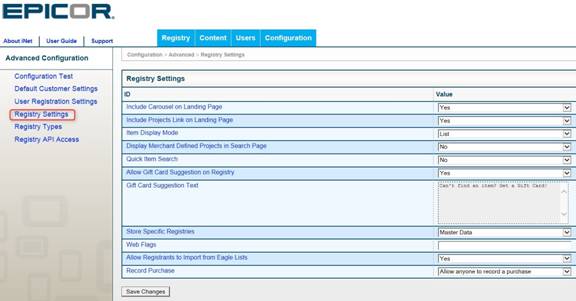
- To
modify the registry settings, click on the Registry Settings
link, make the necessary changes, and click Save Changes.
- Include
Carousel on Landing Page—Display the carousel on the registry
landing page
- Include
Projects on Landing Page—Display a link to view projects that
you have set up on the registry landing page.
- Item
Display Mode—Select how the items will appear when viewing a registry
(List or Detail).
- Display
Merchant Defined Projects in Search Page—Enable this setting to
include projects you set up in the standard registry search.
- Quick
Item Search—Yes or No
- Allow
Gift Card Suggestion on Registry—Allows the registrant to click
a checkbox that will automatically add a message to suggest gift
cards in their registry. This is recommended for any store that
uses gift cards.
- Gift
Card Suggestion Text—Allows the merchant to specify the text that
displays when a registrant chooses to suggest gift cards in their
registry. This entry field allows limited HTML.
- Store
Specific Registries—For multi-store users. Associate each registry
with a specific store the registrant picks, or keeps them as master
data allowing items on the registry to span all stores. Preferred
store option will allow registrant to select a preferred store
to pick up their items while leaving the list as master data.
- Web
Flags—Enter a comma delimited list of web flags to indicate what
products are visible in the registry.
- Allow
Registrants to Import from Eagle Lists—Allows the registrant to
import into registries items from scanned item lists.
- Record
Purchase—Set who is allowed to record a purchase of an item on
a registry. This setting controls the record purchase button,
and does not impact Eagle Point of Sale, or purchases made in
iNet eCommerce.
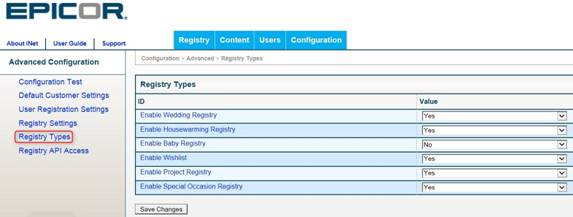
- If
you wish to enable/disable specific registry types, click on the Registry
Types link, make the necessary changes, and click Save Changes.
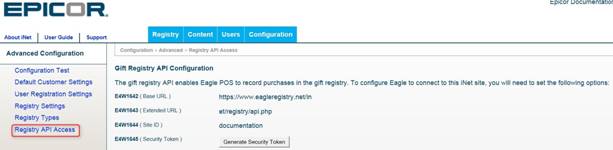
- To
access the Registry API, click on Registry API Access on the
left side of the screen.
- These settings will need
to be input in Eagle to allow Eagle POS to communicate with the
registry and record items as purchased.
- Note
that the Site
ID option is blank for iNet integrated, and needs to be used
for the standalone registry.
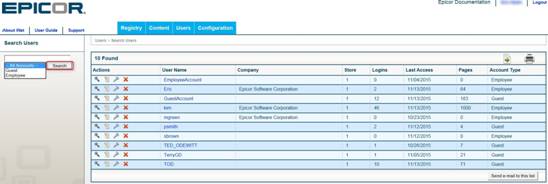
Searching for Users
- There
may be times you need to search by a user. To do so , click on Users->Search
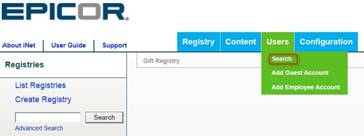
- Enter
the user you wish to search for and click Search. If you leave
this field blank, it will give you a list of all users.
Adding a Guest Account
- To
add a guest account, click on Users->Add Guest Account.
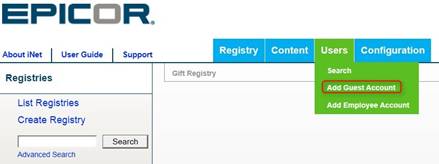
- Fill
in the fields and click Save.

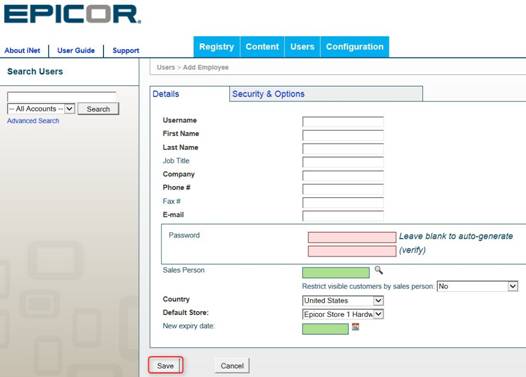
Adding an Employee Account
- To
add an employee account with preset security and options, click on
Users->Add Employee Account
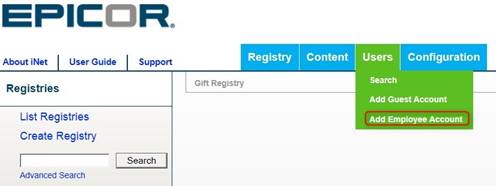
- Fill
in the fields and click Save.
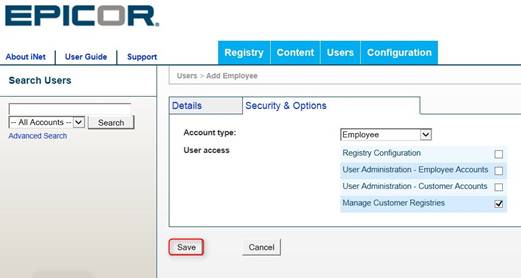
- Click
on the Security & Options tab and select the appropriate
security and options for that employee.
- Registry
Configuration--Allows access to the configuration and content
tabs.
- User
Administration – Employee Accounts—Allows user to manage employee
user accounts/permissions.
- User
Administration – Customer accounts—Allows user to manage customer
user accounts/permissions. (i.e. reset passwords for customers,
etc).
- Manage
Customer Registries—Allows user to manage customer registries
- Note:
Both
Manage Customer Registries and Registry Configuration are required
to manage employee projects—use the purge utility or the registry
item report.
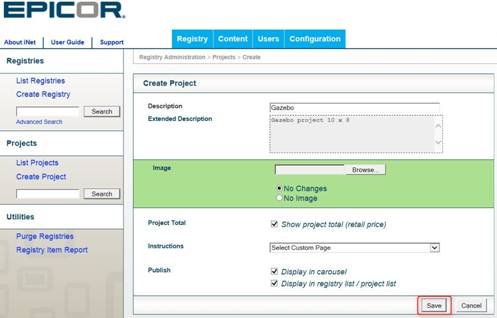
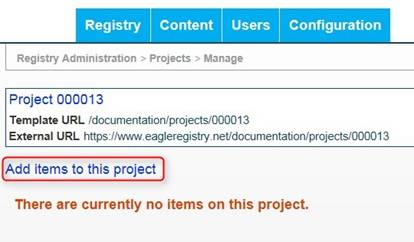
Creating a Project
- Projects
are a useful way of putting together a “package” that a user can easily
add to a registry. For example, if you have a list of all the items
it takes to build a gazebo you can create a “Project” for that gazebo.
- Fill
in all of the fields for the project, and click Save.
- Locate
the project you created and click the Manage button
 .
.

- Click
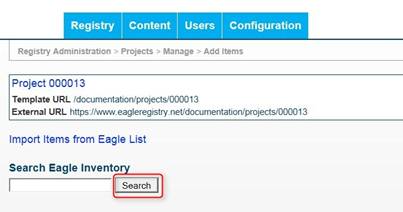
on Add items to this project.
- Enter
the name or SKU of the item you wish to search for and click Search.
- Locate
the item you want to add, change the quantity (if necessary), and
click the Add button.
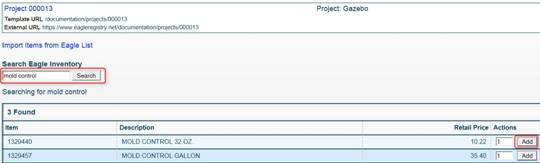
- A
confirmation will appear next to the price along with an Edit
button if you would like to make changes.
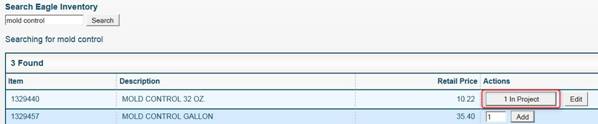
- Continue adding
items until the project list is complete
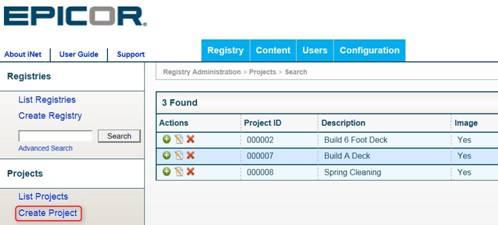
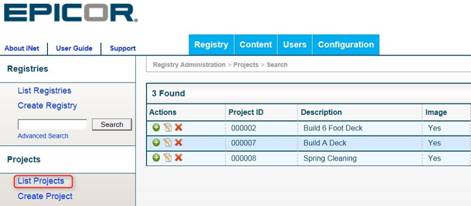
List Projects
- To
get a list of projects that have been created, log into the registry
and click on List Projects on the left side of the screen.
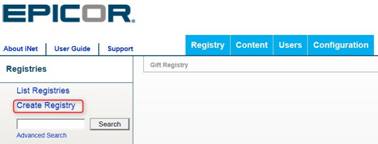
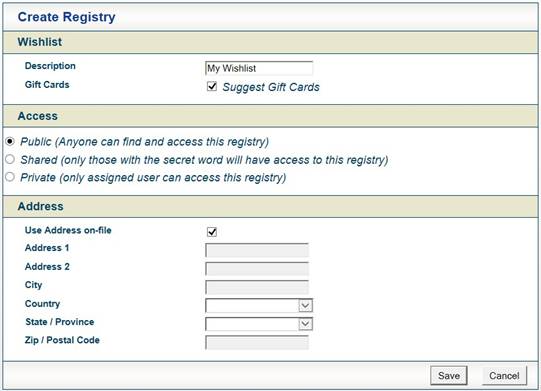
Creating a new Registry
- Click
Create Registry on the left hand side of the screen.
- Enter
the user name you wish to create a registry for or click the search
tool
 for a list of users.
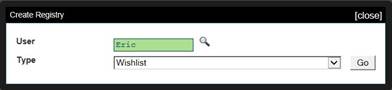
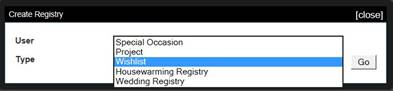
- In
the Type field, click on the dropdown arrow
 and
select the list type.
and
select the list type.
- Fill
in the fields:
- Enter
a description for the registry.
- Check
the Suggest Gift Cards box if you would like the registry
to suggest a gift card when a consumer accesses the page.
- Set
the access of the registry (Public, Shared, or Private).
- If
the user would like to use the address already on file for their
account, leave the Use Address on File box checked. Otherwise,
uncheck the box and enter a valid address.
- Click
Save when finished.
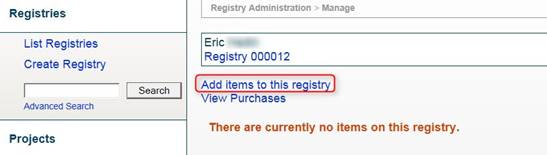
- A
list of all the registries will display. Click the Manage
button
 on the left
hand side next to the list you just created.
on the left
hand side next to the list you just created.

- Click
on Add items to this registry
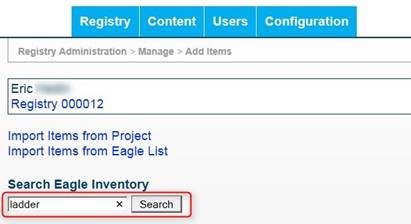
- Type
the name of the item, and click Search.
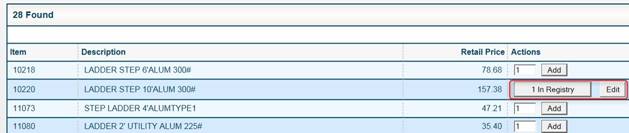
- A
list of items matching your description will appear. Locate the item
you wish to add and click the Add button, or modify the quantity
and click the Add button.

- The
message “1 in Registry” (or the quantity you chose) will appear. You
can click the Edit button to remove the item or modify the
quantity.
Import Items from Project
- Look
up the registry you wish to modify and click the Manage button
 .
.

- Click
on Add items to this registry.
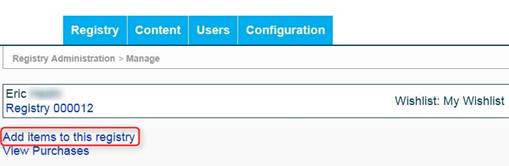
- Click
on Import Items from Project.
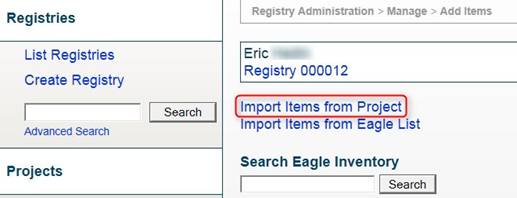
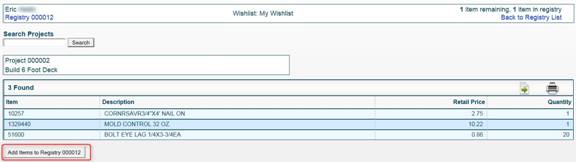
- The
project list will display. Click the View Items button next to the project you wish to add.

- The
components of the project will display. Click the Add Items to
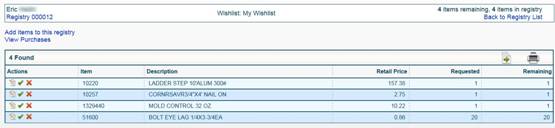
Registry XXXXX button (where XXXXX is the registry number).
- You
will receive the following message confirming the project was added.

- If
you click on View Registry, the registry will display updated
with the components of the project.
Import Items from a List
- An
item list can be created by hand, or by using an RF (Mobile) device.
Follow the instructions below to import an Eagle list into a registry.
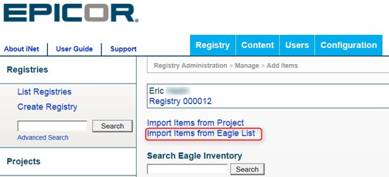
- Locate
the registry you wish to modify and click on Add Items to this
registry.
- Click
on Import Items from Eagle List
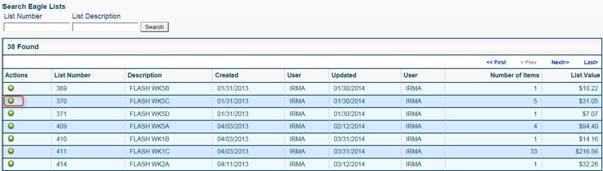
- You
can either search for a list by list number, description, or simply
click on Search to display all lists.

- Once
you have located the list you want to add, click on the View Items
button next to the
list.
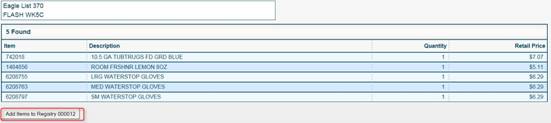
- Click
on Add Items to Registry XXXXX (where XXXXX is the registry
number).
- You
will receive the following message confirming the list was added.
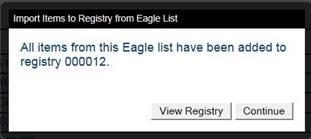
- If
you click on View Registry, the registry will display updated
with the components of the list.
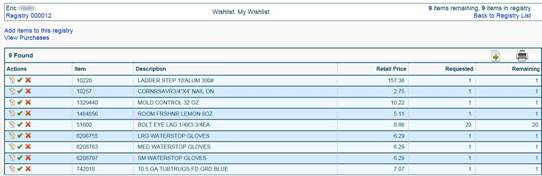
View Purchases
- To
view a list of registry items that have been purchased, retrieve the
desired registry and click on the View Purchases link.

- A
list of all the items from the registry that have been purchased will
display along with the purchase quantity, date, & time.

