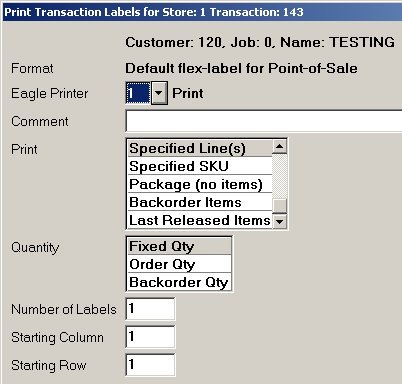
The following dialog displays when printing POS Flex-Labels from:
POS for an order/special order/transfer transaction (click here to go to the procedure topic)
the POS Order Viewer (click here to go to the procedure topic)
a Pick/Pack/Ship transaction (click here to go to the procedure topic)
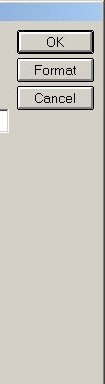
Buttons: OK / Format / Cancel—
After setting all options that apply to labels you want to print, click OK.
To change the entry in the Format field, click Format. From the dialog that displays, select a different label format and click Open.
To close the print label dialog without saving any settings and go back to the previous screen, click Cancel.
Format— This is the label format that will be used to print the labels. It defaults to the format you entered in the option "Default Flex-Label for shipping" (ID# 7883) in Options Configuration. To select a different label format, click the Format button in the upper right corner.
Eagle Printer— This is the printer to which the labels will print. It defaults to the printer you entered in Options Configuration. The printer you select must be a network printer.
Comment— If the label format you are using includes a comment line, type the comment you want to print in this field or leave it blank.
Print— select one of the following options to determine which items are selected to print labels:
All Items
Specified Lines(s)— After you click OK, a dialog displays. Fill in the line numbers of the SKUs that you want to print. Separate the line numbers with a comma (for example, type 3,7,11,12).
Specified SKU— After you click OK, a dialog displays. Fill in the SKU number of the item that you want to print.
Package (no items)
Backorder Items
Last Released Items
Quantity— select one of the following options to determine the quantity for each item. This number prints in the Qty field on the label.
Fixed Qty— if you select this option, enter the quantity in the Number of Labels field.
Order Qty
Backorder Qty
Number of Labels— if you selected Fixed Qty in the Quantity field, enter the number of labels that you want to print for each item.
Starting Column— select the column on the sheet of labels where printing should start.
Starting Row— select the row on the sheet of labels where printing should start.