Creating Advanced Rainchecks

  1. If the customer is purchasing any items that are in stock, complete a transaction for those items.  Then proceed with the next step.

  2. From the POS posting screen, click , and click Raincheck.  

  3. Enter or change customer and transaction information, if necessary.

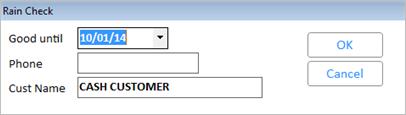
  4. Press Enter. The Raincheck dialog box displays.

  1. Change the date in the "Good until" box if desired.  Enter the phone number and name of the customer in the appropriate boxes if this information is not already displayed.

  2. Click OK. On the Posting Screen, post the item(s) for which the customer wants a raincheck.

  3. Click Total. A dialog box displays.

  4. Click Yes if you want to print a duplicate raincheck receipt for your records, or click No if you do not.  The Document Number dialog box displays the document number the raincheck has been assigned.

 Note:  Advanced rainchecks say "RAINCK #" at the bottom of the receipt, whereas regular rainchecks say "JRNL #". This distinction will help you identify rainchecks you created after you began using advanced rainchecks. This is important because with advanced rainchecks, the clerk needs to use the raincheck redemption feature so that raincheck history is properly updated.

  1. Click OK.