Use the following procedure to
Modify or delete items in a QuickFind grid
Change the name of Main Group or Sub Group
Change the order of items in a Main Group or Sub Group
From the POS window, click Tools, and point to Setup QuickFind.
In the Main Group box, click the arrow and select the main group you want to modify.
In the Sub Group, click the arrow and select the sub-group you want to modify. The grid displays.
In the Type list, click the type of items you want to change.
To delete information, clear the information in the box and click Add/Change (F5).
To change information, clear the information in the box, type the new information, and click Add/Change (F5).
From the POS window, click Tools, and point to Setup QuickFind.
In the Main Group box, click the arrow and select the appropriate main group.
If you're modifying a Sub Group, click the arrow and select the appropriate Sub Group. The grid displays.
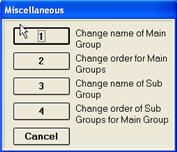
Click Misc, and select one of the four options.
If you selected to change the name of a Main Group or Sub Group, simply type the new name in the dialog that displays, and click OK.
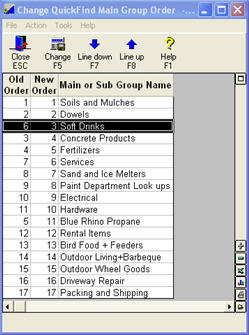
If you selected to change the order of the items in a Main Group or Sub Group, click on an item you want to move in the window that displays. Use the Line Up and Line Down buttons to change its position in the list. Repeat this process for any other items you want to move. Then click Change, and click Close to exit.
![]()
To print a QuickFind grid, click File and select Print Screen.
See also: Setting Up QuickFind Overview