Use receipt on account (ROA) when a customer comes to your POS register to give you a payment to be applied to their accounts receivable account. You can begin an ROA from the Header Screen or Customer Area of the Posting Screen.
Note: If you want ROAs to print, option 10 "Print Invoices" must be set to Y in Options Configuration.
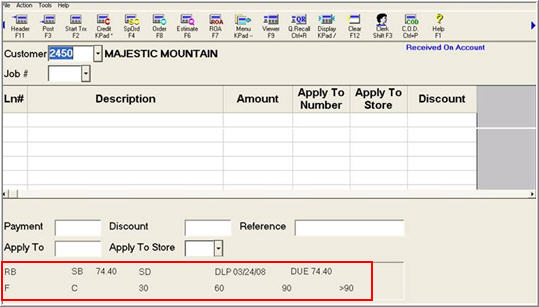
To receive a payment on account:
From the Header Screen or Customer Area of the Posting Screen, press roa. If you haven't selected a customer yet, do so now, and press Enter.
![]()
Notice that the bottom of the screen gives you a thumbnail view of the account, including Running Balance (RB), Statement Balance (SB), Statement Discount (SD), Date of Last Payment (DLP), and aging buckets (Future, Current, 30 days past due, etc). The Due amount is calculated from the Statement Balance – Statement Discount; it does not change if the account goes past the discount date.
Those figures are updated like the ones in ROA at the time the statement is run.
In the Payment box, type the amount the customer is paying.
In the Discount box, type the amount of the discount you are allowing. If you do not know the amount of the discount, leave it blank.
In the Reference box, type a comment, up to 15 characters (optional).
If the boxes Apply To and Apply to Store display on the screen, continue with step 5. If not, go to step 7.
In the Apply To box, type the invoice number this payment applies to. If you do not know the invoice number, leave it blank.
If you are applying a payment to an invoice from another store, in the Apply to Store box, type that store’s number.
Press enter.
Press total.
Type the amount you are receiving and press enter.