Purchase Order Adder: Setup and Maintenance
The procedure steps in this topic
describe how to set up a new Purchase Order Adder
type and how to modify existing PO Adder types.
Once PO Adder types are set up,
you can assign the codes
to purchase orders.
Set Up a PO Adder Type
Complete the following steps
to enter and set up a new PO Adder type.
- From the Eagle Browser, click Purchasing &
Receiving (MPO). The Purchasing & Receiving window displays.
- Click Go To. From the Goto Menu, select U -
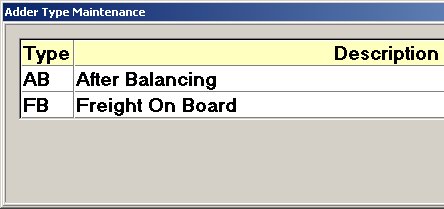
Maintain P.O. Adder Types. The Adder Type Maintenance dialog displays
with a list of Adder types that are currently available.
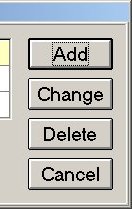
- Click Add. The Add Adder Type dialog displays.
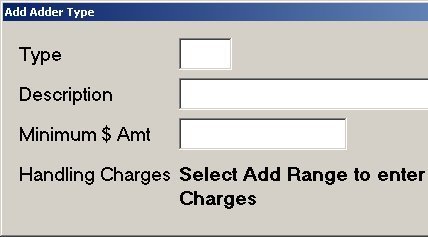
- Fill in the dialog as follows:
- Type—
Enter a one-digit or two-digit code to identify the PO Adder type.
The code can be alpha, numeric, or a combination of both.
- Description—
Enter a description of the PO Adder type, up to 30 characters.
- Minimum $ Amount—
Enter the minimum dollar amount for this PO Adder type. This is the
minimum freight charge that will be added to the PO if this PO Adder
type is associated with a PO.
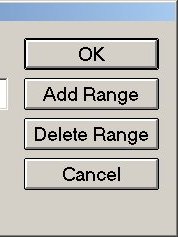
- Click Add Range. The Add Range dialog displays.
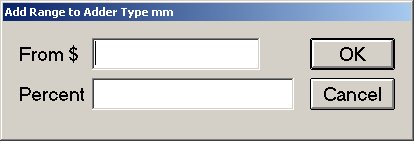
You'll use this dialog
to enter the "from" dollar amount for up to 10 ranges for a
PO Adder type. Enter the from dollar value for the first range and the
percent associated with that range. Click OK. As you enter the ranges,
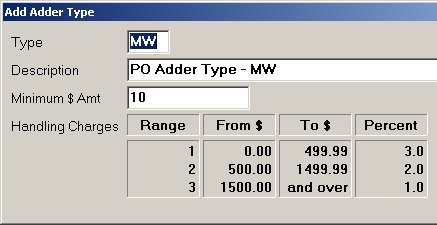
a table of Handling Charges displays in the Add Adder Type dialog.
For example, the ranges
for the PO Adder type are $0 to 499.99 at 3%, $500 to 1499.99 at 2%, and
$1500 and over at 1%. To add the first range, leave the From $ field blank
and fill in the Percent field with 3 and click OK. The Add Adder Type
dialog displays with a table of Handling Charges. Click Add Range to enter
the next range. Continuing the example, you would enter 500 in the From
$ field and 2 in the Percent field and click OK. Click Add Range to enter
the next range. Continuing the example, you would enter 1500 in the From
$ field and 1 in the Percent field and click OK. After entering the ranges
for this example, the Add Adder Type dialog would look similar to this:
- After entering all the ranges, then in the Add
Adder Type dialog click OK. The Adder Type Maintenance dialog displays
with the type you just entered included in the list.
If you make a mistake, you can delete the entire PO Adder type and start
over, or you can delete a range and re-enter the range information. For
procedure steps to change or delete a PO Adder type, refer to the next
section of this topic, PO Adder Maintenance.
Adder Type Field in Vendor Maintenance
In Vendor Maintenance (MVR), you can set up the default Adder Type for
a vendor. Use the Adder Type field in the Order Info tab. Then, whenever
a purchase order is added for a vendor, the PO’s Adder Type defaults to
the Adder Type entered for that vendor in MVR. This field is store specific.
PO Adder Maintenance
Use the procedures in this section to change or delete an existing PO
Adder type. Click any of the following to go to the procedure steps.
Add
a From / To Range
Use this procedure to add a from / to range.
Ranges can only be added one range at a time, and the range you are adding
must be higher than the highest range that currently exists. You can't
add a range in the middle, you would first have to delete
the higher ranges to get to the middle range, then add the new range,
and then re-add the higher ranges.
- From the Eagle Browser, click Purchasing &
Receiving (MPO). The Purchasing & Receiving window displays.
- Click Go To. From the Goto Menu, select U -
Maintain Purchase Order Adder Types. The Adder Type Maintenance dialog
displays with a list of Adder types that are currently available.
- Click to highlight the PO Adder type that you
want to modify. Click Change. The Change Adder Type dialog displays.
- Click Add Range. The Add Range to dialog displays.
Fill in the From$ amount and the Percent amount. Click OK. The dialog
closes and the Change Adder Type dialog displays. The new range that
you added displays in the Handling Charges table.
- To add more ranges, repeat step 4. If you are
done adding ranges, click Cancel. The Adder Type Maintenance dialog
displays. Click Cancel to close the dialog.
Change
a From / To Range
To change a from / to range, you'll delete
the range and re-add the range. Follow the steps in the delete
procedure and then follow the steps in the add
procedure.
Delete
a From / To Range
Use this procedure to delete a from / to
range. Ranges can only be deleted one range at a time, starting with the
highest range. You can't delete a range in the middle, you would first
have to delete the higher ranges to get to the middle range, then re-add
the higher ranges.
- From the Eagle Browser, click Purchasing &
Receiving (MPO). The Purchasing & Receiving window displays.
- Click Go To. From the Goto Menu, select U -
Maintain Purchase Order Adder Types. The Adder Type Maintenance dialog
displays with a list of Adder types that are currently available.
- Click to highlight the PO Adder type that you
want to modify. Click Change. The Change Adder Type dialog displays.
- Click Delete Range. The highest range is deleted.
Click Delete Range until the range that you want to delete is deleted.
If you need to re-add ranges, click here
to go to the procedure steps.
- Click OK. The Change Adder Type dialog closes
and the Adder Type Maintenance dialog displays. Click Cancel to close
the dialog.
Delete
a PO Adder Type
Use this procedure to delete the ranges
and the PO Adder type code.
- From the Eagle Browser, click Applications.
From the list that displays, click Purchasing & Receiving (MPO).
The Purchasing & Receiving window displays.
- Click Go To. From the Goto Menu, select U -
Maintain P.O. Adder Types. The Adder Type Maintenance dialog displays
with a list of Adder types that are currently available.
- Click to highlight the PO Adder type that you
want to delete. Click Delete.
- The Delete Type confirmation dialog displays.
To delete the PO Adder type (the type code and the ranges), click
Yes. The Adder Type Maintenance dialog displays. The type you deleted
no longer displays in the list.
- Click Cancel to close the Adder Type Maintenance
dialog.
Top
Submit
Your Comments on This Help Topic