The Suggested Order Report (RSO) generates suggested orders either on demand, or as part of a queued process to run on a scheduled cycle. This procedure describes running this process on demand.
RSO can generate suggested orders for both external vendors and internal replenishment orders (orders going from the DC to the remote retail stores).
From the Eagle Browser, type RSO in the Launch bar and press Enter. The Suggested Order Report screen displays.
From the Print Setup page, if you are practicing or doing trial runs, set the “Print To” to “S.” Otherwise, select the setting you prefer.
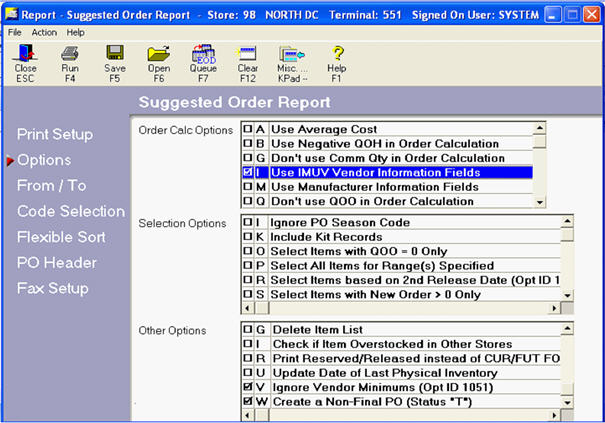
Order Calc Options – You should always use option I-Use IMUV Vendor Information Fields when generating an order that is creating a central distribution purchase order. This tells the system to use the alternate vendor field values when generating the purchase order, and only the alternate vendor contains the additional fields that are necessary for a central distribution order.
Selection Options – in this section, you can tell the system to limit what items it should consider, or to ignore certain normal considerations. In the screen example below, no options were selected from this section. However, if you are generating a replenishment order and want to look at 2nd release date items, you would also include option R. Option R limits the items selected to those that have a 2nd release date and forces the entire remaining product out to the stores listed in the DC’s 2nd release date group. This option is only required when looking at 2nd release date items and is not required to generate a standard replenishment order.
Other Options – this section of the Options page defines what kind of a purchase order should be created. For a Central Distribution type of purchase order, the most common option is W-Create a Non-Final PO (Status “T”), but if you are working a manual order and you want it to create a purchase order for you to edit even if you don’t reach the vendor minimums, you may want to consider also using option V-Ignore Vendor Minimums. In the example below, both options have been selected.
The From/To page of the RSO defines the store(s) for which the order will be created, and the range of items to be considered. If you want all stores to be considered, blank out the Store field. If the order is for an external vendor, use the desired store(s) or store group(s).
If the order is being generated for a replenishment order, the store field must be a DC location. With replenishment orders, you can define which store or store groups should be considered by populating the “Replenish Store Group” field with a valid value. The stores you indicate are considered for replenishment from the DC listed in the Store field. If you leave this field blank, the replenishment order runs for the "2nd Release Date" group as defined in the store record for the DC location listed in the Store field.
Since this report is generating a purchase order for a specific vendor, you must include at least a single vendor in both the from and to fields for Alternate/Sec. Vendor. You likely also want to include the prime vendor in the from/to, as this assists with performance and may aid in correct selection of items.
(Optional) Use the Code Selection section to include or exclude items from consideration based on the various code positions available. See RSO Code Selection field help for more information.
(Optional) If you are printing the Suggested Order report, you can use the Flexible Sort to change the order in which the items print.
The PO Header page allows you to define what kind of a Central Distribution order you are creating. You may leave the other fields blank, as they populate based upon the vendor’s information. If for some reason the terms code is blank on the vendor record, you receive a warning that this field must be filled in.
If desired, enter values on the PO Header section of the RSO; they are used when the order is generated.
Note: The field “Ready to Transfer” only displays if you have a warehouse management system enabled for the Eagle to send orders, and this field only has meaning if the Order Type is one that the warehouse management system accepts, such as splits, splits with auto-reallocation, pass thru, and replenishments.
If you want to fax this report instead of printing it, set up your parameters in the Fax Setup section. Note that this section is not intended for faxing of the order to the vendor--it is for faxing the report that generates the order.
Once you have all of the options set the way you want for this report, click Run (F4).
Access the PO that RSO creates in Purchasing and Receiving (MPO). If you want to view the RSO report, use the spooler to view it.

You will likely want to create several saved report views so that you do not have to go through the process of selecting the options each time you want to create the various order types available.
You will likely want to create queued RSO reports that run automatically at specific intervals to automatically create needed purchase orders.