(ITR users only)
Use the following procedure to adjust inventory quantities when you cut or modify an inventory item.
![]()
The To SKU (the SKU you are creating by cutting or modifying the original SKU) must have the same stocking unit as the original SKU. For example, if the original SKU's stocking unit is Board Feet, the To SKU must also have Board Feet as its stocking unit.
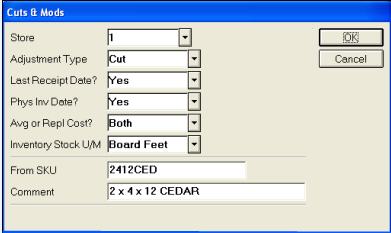
Fill in the fields. For more information about a particular field, click it in the list below.
When finished, click OK. The Qty field displays. If you selected "Cut" as the Adjustment Type, additional fields for Thickness, Width, and Length also display. These fields are filled in automatically with the dimensions in Inventory Maintenance, unless the item is set up as Lumber Type 0 (user-defined), in which case you'll have to manually enter the dimensions.
In the Qty field, enter the quantity (the number of pieces) of the From SKU that you have cut/downgraded/upgraded. For example, if you are upgrading one piece of lumber, enter 1, if you cut two pieces of lumber, enter 2, etc. Make sure you enter the number of pieces, NOT the number of board feet. If there are no more fields in the dialog, skip to step 6.
If the fields for Thickness, Width, and Length are displayed, they will already be filled in if the From-SKU is Lumber Type 1 or 2. If the From-SKU is set up as Lumber Type 0, the fields will be blank, and you must enter the dimensions of the From-SKU. For example, if you are using From-SKU pieces that are 2x4x12, enter 2 in the Thickness field, 4 in the Width field, and 12 in the Length field.
Click OK. The To SKU fields display at the bottom of the dialog. In the middle of the screen, the From SKU information is displayed, as well as a summary of remaining board feet and cost, if the Adjustment Type is a Cut.
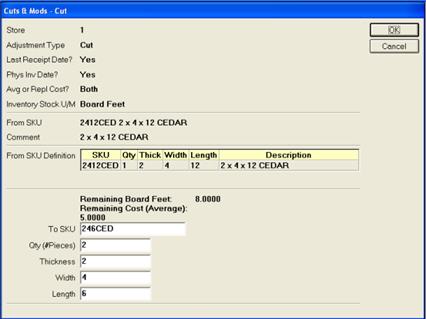
In the To SKU field, enter the SKU of the items you created from the From SKU. For example, if you cut a 2x4x12 to create 2x4x6's, enter the SKU for 2x4x6's. If you are upgrading a 2x4x16 because you had it treated, enter the SKU for treated 2x4x16's.
In the Qty field, enter the quantity (the number of pieces) of the To SKU. For example, if you created two 2x4x6's from a 2x4x12, enter 2. If you are upgrading one 2x4x16, enter 1. Make sure you enter the number of pieces created/modified, NOT the number of board feet. If there are no more fields in the dialog, skip to step 10.
If the fields for Thickness, Width, and Length are displayed, they will already be filled in if the From-SKU is Lumber Type 1. If the From-SKU is set up as Lumber Type 0, the fields will be blank, and you must enter the dimensions of the From-SKU. For example, if you have created 2x4x6's, enter 2 in the Thickness field, 4 in the Width field, and 6 in the Length field.
Click OK. The To SKU fields at the bottom of the dialog are now cleared, and the From SKU Definition and the To SKU List display in the middle of the dialog.
If you have another To SKU to enter, enter it now, enter the Qty, and click OK. Repeat as necessary until you've entered all To SKUs.
If you need to delete a To SKU from the To SKU List, click the checkbox to the left of the To SKU you want to delete, then click Delete To SKU.
When you have finished entering To SKUs, click OK. The Confirm Finalization screen displays.
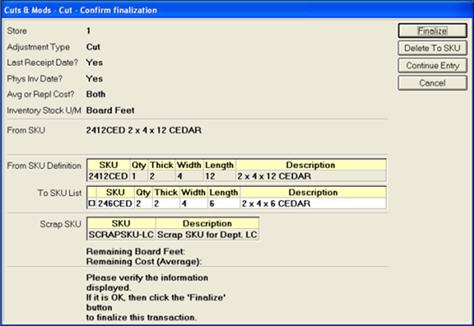
![]()
Scrap SKU information displays in the middle of the screen if both of the following are true: 1) you selected Cut as the Adjustment Type, and 2) option 8136 "Allocate unapplied amounts in Cuts and Mods" is set to S (Scrap SKU) in Options Configuration.
Do one of the following:
If you're satisfied with your entries, click Finalize.
If you need to enter more To SKUs, click Continue Entry. When finished, click OK, then click Finalize.
If you need to delete a To SKU, select a SKU in the list, then click Delete To SKU. When finished, click OK, then click Finalize.
To abort all changes, click Cancel to close Cuts & Mods.
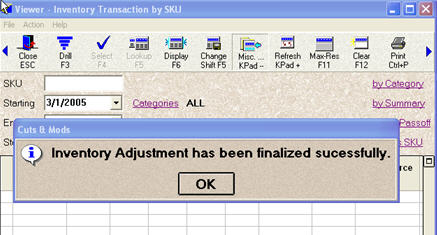
If you clicked Finalize, a confirmation message displays.