This topic provides the procedures to follow to transmit EFM (Electronic File Maintenance) data with Orgill Brothers, then review and finalize the data.
![]()
Option 1141 "Distributor EFM" must be set to Y in Options Configuration. If it isn't, contact Epicor Direct at (800) 538-8587.
Before you transmit EFM data for the first time with Orgill Brothers, complete the required setup procedures.
This topic includes the following sections. Click any of the bullets to go to that section of this topic.
This section provides additional information specific to Orgill Brothers and EFM data transmission.
When setting up Orgill Brothers EFM, you verified that two control streams exist in MTC, ORGEFM1 (for 1 week prior) and ORGEFM4 (for 4 weeks prior).
Use ORGEFM1 if you want to transmit only EFM data for the current week. Use ORGEFM4 if you want to transmit EFM data from the previous four weeks.
Multistore: Orgill Brothers has only one file available for EFM that includes all stores. So you don't have to use individual EFM control streams for each store; use one control stream for all stores.
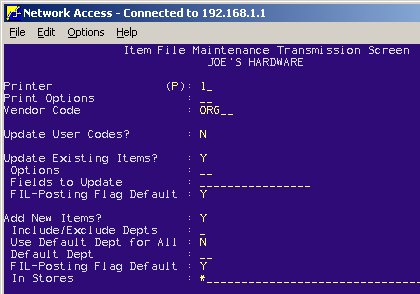
From Network Access at the Function prompt, type EFM and press <Enter>. The Electronic File Maintenance (EFM) screen displays.
At Transmission Control Stream, type ORGEFM1 or ORGEFM4 and press <Enter>. The following screen displays:
Multistore: The Store field defaults to the lock-in store. Orgill Brothers has only one file available for EFM that includes all stores, so you don't have to change the Store field.
At Printer and at Print Options, fill in your spool and print options.
At Vendor Code, type your vendor code for Orgill Brothers (this is the vendor code from Vendor Maintenance).
Review the remaining fields on the screen and fill in the fields for this EFM transmission. If you want to permanently save your changes as defaults, press <Change> after filling in the screen. Then the next time you run EFM, the defaults you saved will display. For more information about the fields, press <Shift> <Help> to display the Help Menu and press <Enter> to select Field Help.
Press <Run>. This message displays: Request has been sent to channel. Please press Enter to exit.
Press <Enter>. Your system dials Orgill Brothers and the EFM data is transmitted. If you experience any difficulties with the EFM transmission, contact Orgill Brothers at (800) 347-2860 or the Eagle Advice Line at (800) 322-3077. Review the Async Transmission Log (ASYMSG) before calling.
When the transmission is complete, review the report. For more information, see the next section EFM Transmission Report.
Review and finalize the EFM data. For more information, see the section Review and Finalize EFM Data.
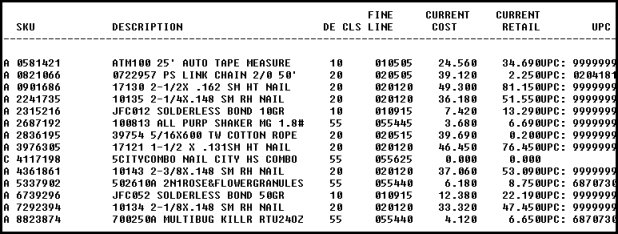
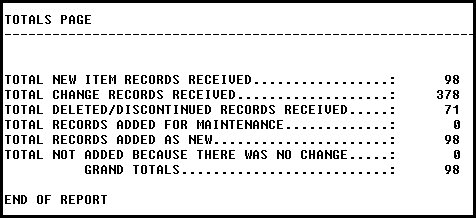
The EFM Transmission Report, titled Item File Maintenance Transmission (EFM), prints after the transmission is complete with Orgill Brothers. The report includes the following sections:
Exceptions— This section shows the items not added to the Flexible Inventory Loading (FIL) window and the reasons why. FIL is the function that you can use to display and review EFM data after it is received from Ogil Brothers.
Additional Information— This section includes information that is transmitted, but is not added to FIL. For example, a list of items that are to be discontinued at a future date.
Totals— This section shows information about the total number of records received for new and existing items, file numbers, and dates. Note that it is normal for the number of records to not add up to the Grand Total number.
The following are examples of the Exceptions and Totals sections.
Review and finalize the EFM data from Orgill Brothers using the following procedures. You can review the data directly in the Flexible Inventory Loading (FIL) window or by running the Flexible Inventory Loading (RFL) report. Changes can made in FIL. Then use RFL to move the EFM data to your Inventory file.
Review Using the Flexible Inventory Loading (RFL) Report
To review the EFM data using the Flexible Inventory Loading (RFL) report, follow this procedure.
From the Eagle Browser, click Reports Menu, Inventory Reports, Flexible Inventory Loading (RFL).
From the ![]() page, review the default entries in the fields and make changes if needed. For a definition of each field, click here.
page, review the default entries in the fields and make changes if needed. For a definition of each field, click here.
Click ![]() . A page of fields displays. Fill in the fields on the page, as appropriate. For a definition of each field, click here.
. A page of fields displays. Fill in the fields on the page, as appropriate. For a definition of each field, click here.
At Flex Name, use ORGNEW (to review new items not yet in your Inventory file) or ORGEFM (to review data about items that already exist in your Inventory file).
At Options, do not use Option F.
(Optional) Click ![]() . A page of fields displays. Fill in the fields if you want to fax the report. For a definition of each field, click here.
. A page of fields displays. Fill in the fields if you want to fax the report. For a definition of each field, click here.
Click Run if you are running this report now, or click Queue if you are adding this report to a queue. For more information about creating queues, click here.
Review Using Flexible Inventory Loading (FIL) Window
To review the EFM data one record at a time, use the Flexible Inventory Loading (FIL) window.
From the Eagle Browser, click Inventory Menu and then click Flexible Inventory Load (FIL). The Flexible Inventory Loading window displays.
From the Flex Name drop-down list, select ORGNEW (to review new items not yet in your Inventory file) or ORGEFM (to review data about items that already exist in your Inventory file).
Click Display and the EFM fields display. Review the SKUs and the EFM data.
To change EFM data, locate the SKU that you want to change, then click the field that you want to change and type the new data in that field, or clear the field so no changes are made. Repeat this process for any SKUs / EFM data that you want to change. Click Change to save your work.
To delete all EFM data for a SKU, delete the SKU from the grid. To do this, click the checkbox for that SKU to place a mark in the box. Then click Delete. Click Yes when asked if you are sure.
Finalize New and Updated Items with RFL
To finalize the EFM data and update your Inventory file with the EFM data from FIL, use the RFL report.
From the Eagle Browser, click Reports Menu, Inventory Reports, Flexible Inventory Loading (RFL).
From the ![]() page, review the default entries in the fields and make changes if needed. For a definition of each field, click here.
page, review the default entries in the fields and make changes if needed. For a definition of each field, click here.
Click ![]() . A page of fields displays. Fill in the fields on the page, as appropriate. For a definition of each field, click here.
. A page of fields displays. Fill in the fields on the page, as appropriate. For a definition of each field, click here.
At Flex Name, use ORGNEW (to review new items not yet in your Inventory file) or ORGEFM (to review data about items that already exist in your Inventory file).
At Options, use Option F.
(Optional) Click ![]() . A page of fields displays. Fill in the fields if you want to fax the report. For a definition of each field, click here.
. A page of fields displays. Fill in the fields if you want to fax the report. For a definition of each field, click here.
Click Run if you are running this report now, or click Queue if you are adding this report to a queue. For more information about creating queues, click here.
Finalize Audit of UPC Codes
Run the Alternate Part Number Report (RAP) with options FKV to finalize the audit of UPC codes..