Use the following procedure if you transmitted a purchase order to True Value (using your Epicor Eagle™ system or a Telxon) and you want to receive an Electronic Invoice (ERP). Click here for a list of the benefits of receiving your A-Copy invoice electronically.
This procedure assumes you have created a PO in the Purchasing and Receiving window that you wish to reconcile. If you order with a Telxon, you can still receive your A-Copy invoice using this procedure, but you must first create a PO "header"— that is, a PO with no line items on it— in the Purchasing and Receiving window.
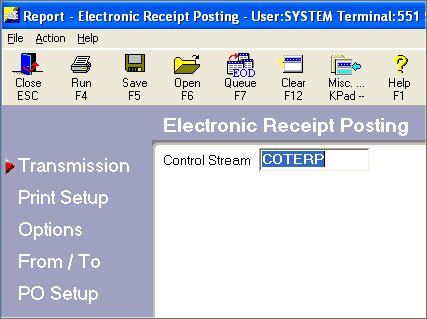
From the Eagle Browser, click True Value Telecommunications Menu, then click Receive A-Copy Invoice (ERP). The Electronic Receipt Posting report window displays.
If you have set up a Default Report Profile for this report, you can simply click Run to use the defaults. Or, you can retrieve a saved report, make any necessary changes, and click Run. Otherwise, continue with the next step.
In the Control Stream box, do one of the following, depending on whether you are receiving the A-Copy invoice for your weekly warehouse order, or the A-Copy invoice for a Relay order.
To receive the A-Copy for your weekly warehouse order, leave the default of COTERP if that's the name of your control stream, or enter the control stream name you use to receive invoices.
Multistore: Enter the control stream that was created for your store. For example, if you are Store 2 your control stream might be called COTERP2.
To receive an A-Copy for a Relay order, enter COTRLY in the Control Stream box.
Multistore: Enter the control stream that was created for your store. For example, if you are Store 2 your control stream might be called COTRLY2.
Click ![]() . A page of fields displays. Fill in the desired fields. For a definition of each field, click here.
. A page of fields displays. Fill in the desired fields. For a definition of each field, click here.
(Optional) Click ![]() . A page of fields displays. Fill in the desired fields. For a definition of each field, click here.
. A page of fields displays. Fill in the desired fields. For a definition of each field, click here.
![]()
If you have margin exception items, you must select Retail Posting Option 2, 3, 4, or 5 on this page.
Click ![]() . A page of fields displays. Fill in the desired fields.
. A page of fields displays. Fill in the desired fields.
For a definition of each field, click here.
Click ![]() . A page of options displays. Fill in the desired fields. If you want ERP to add new items automatically to your inventory file, enter a Y in the Add Items to Inventory field.
. A page of options displays. Fill in the desired fields. If you want ERP to add new items automatically to your inventory file, enter a Y in the Add Items to Inventory field.
For a definition of each option, click here.
Click Run. The transmission will take a few minutes. Click here for information about verifying that the transmission was successful.
Review the Exception Report that prints, and edit the PO as necessary.
Finalize the PO with RRP.