Use the Device Configuration window to assign a printer (or multiple printers) to which Enhanced Forms will print. If you haven't done so already, first set up Options Configuration. Click here to display the help topic.
![]()
Offline POS won’t print Enhanced Forms until after the next COR and offline refresh has occurred.
![]()
Pick/Pack/Ship users— The warehouse pick ticket Enhanced Form uses the option "Warehouse pick ticket printer" (ID#5096) to define its print location. This option must point to a network printer defined in MPS– Modify Printer Status (available from Network Access). When you complete a transaction that includes a pick ticket, the system sends the form to the device identified by this option. Then the system uses the Device Configuration for that network printer server to determine where to print the form.
For example, the warehouse pick ticket printer is defined as MPS Printer #3. In MPS, Printer #3 is set up to point to a specific PC and the output for the pick ticket form goes to the Eagle Listener program running on that PC. The Listener program then reads the Device Configuration setup for that PC to determine where to print the pick ticket.
From the Eagle Browser, click Utilities. From the list that displays, click Device Configuration to open the window.
In the Device column, double-click Invoice Printer. The current configuration for the Invoice Printer displays.
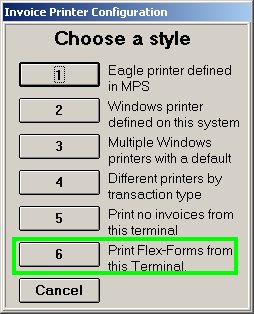
Click Device to display the following dialog. Then click 6-Print Enhanced Forms from this Terminal.
The Invoice Printer configuration dialog again displays, the Device field is now set to Enhanced Forms. Click OK to close the dialog. In the Device Configuration window, the other form types are added to the grid, below Flex Forms Default Printer.
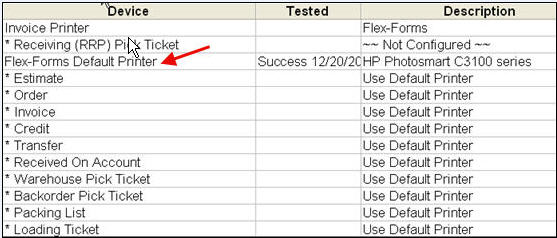
In the Device column, double-click Enhanced Forms Default Printer. This is the default print device for all Enhanced Forms printed from this terminal, the device to which all or most of the form types will print. Select a style from the dialog that displays. When the Enhanced Forms Default Printer dialog displays, click OK. If prompted to test the printer, click Yes and follow the prompts to test.
![]()
If you want to display a sample of the standard invoice flex forms, simply click Docs from the Enhanced Forms Default Printer dialog.
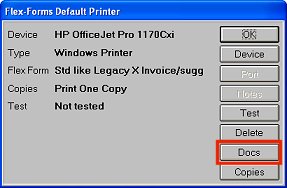
Then select the sample you want to view, and click OK.
If you will use multiple printers for Enhanced Forms from this terminal, configure the device for each form type that does not use the default printer defined in step 5. Double click a form type in the Device column and follow the prompts to select a printer other than the default printer.
If the POS window is open on this terminal, you must close the window and then re-open the POS window for the device changes to take effect.
Repeat steps 1 through 7 at each PC terminal from which Enhanced Forms will be printed.