How to Change Items' SKU Numbers
Always have a current backup available before running Change Item SKU Number (RCIN).
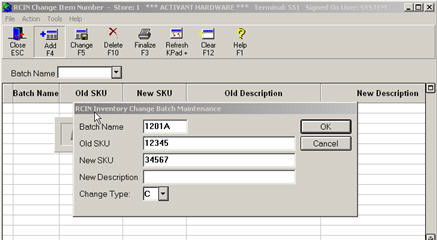
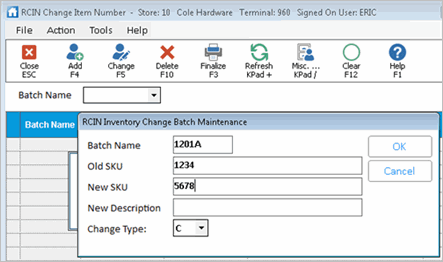
This procedure explains how to use RCIN to change a SKU from one item number to another. (You can also use RCIN to combine two SKUs or to run a custom SKU conversion)
RCIN for Windows is "batch" based, meaning that you add a list of old/new SKUs to a batch. You also display the pending old/new SKUs by batch, and you Finalize by batch.
Click here for the list of records that RCIN automatically updates.
![]()
RCIN doesn’t modify QuickFind.
![]()
You can also access the Change Item Number report by typing RCINR in the Launch bar of the Eagle Browser.
 and select S (Standard).
 and select the appropriate options in the Options field.
Click any of the following links for more information about an option (options not listed below are not applicable when changing item numbers).
A -Reset Date Added When Changing Items
![]()
If you use RCIN for Style-Color-Size items, note that in some situations, the SKU merge causes the “Keep Stock Info” field of the Style Item to be set to “Yes.” It does this to prevent any possible quantity on hand on the regular item from being lost. Because this field should always be set to “No” on Style Items, you must display the Style Item in Inventory Maintenance, and change this field back to “No” for All stores. If you have Compass, you can use it to help you correct this problem; set up a Compass Query that finds all Style items that have the "Keep Stocking Info” field set to “Yes” for any store.