Use the AP Assist Processing Viewer to import invoices and post them against the receiving document based on invoice number and date, matching status, etc. The viewer lets you scan and analyze your invoices all in one place.
You can also process non-purchase order type documents such as utility bills, internet bills, and any other expense types along with your standard invoicing. These documents can be exported and imported into Eagle AP Assist Processing Viewer (APA) to review and post an expense invoice to AP and create a Voucher for payment.
The application allows to process purchase orders received through ERP or EDIRP. Users that receive electronic purchase orders have the opportunity to allow the electronic invoice to update the purchase order receipt with invoice data.
Important:
When Option
1985 - "Update PO with Invoice Number from ERP?"
is set to Y, the Electronic Receipt Posting (ERP) doesn't include
any invoice data into the purchase order.
Note:
This option also requires
Option 1704 "AP Assist Import
on System?" set to
Y.
If Option 3232 "Enhanced EDI invoicing (EDIRP) on System?" is enabled, Eagle continues to generate a regular voucher for purchase orders received through EDIRP within the threshold. The regular vouchers include all invoice data and, therefore, can be processed in AP Assist.
In order to successfully import invoices into the AP Assist Processing Viewer, the following data is required:
Eagle Vendor Code
PO Number
Invoice Number
Invoice Total
Note: If any of these data fields are missing, the invoice will not import.
Additionally, the following fields are available to import:
Invoice Type
Invoice Number*
Image URL
Invoice Date*
Vendor Code
Vendor Name
Vendor Customer Number (Assigned Customer Number)
PO Number*
Discount Date*
Discount Due Date
Net Due Date*
Net Terms (Description)
Invoice Due Date
Misc Charges
Freight Charges
Total Tax
Invoice Total
*In Release 29.1, these fields are now editable using the Display in the Tool bar > Change Vendor Invoice Information option.
If no invoice date is provided, the Eagle uses the ‘Receipt Date’ of the PO as the Invoice Date. If no due date is provided, the system will use the Invoice Date and the PO Terms Code to calculate the invoice due date.
When you process non-purchase order type documents like utility bills, internet bills, and any other expense types, you can export and import these types into Eagle AP Assist Processing Viewer (APA). Then, you can review and post to an expense invoice in AP and create a Voucher for payment all from the same viewer.
Important: Webdocs (IMIGIT) must also be upgraded to create templates for scanned invoices that are not linked to Eagle purchase orders. Please log a case to EpicCare to coordinate and schedule the new AP Expense Cabinet update in Webdocs. For information about Webdocs setup, see Webdocs – Setting Up Template for AP Expense Cabinet in this documentation.
You must import your invoices before you can manage them. After scanning the invoice into IMIGIT, an export file is generated and saved on the local network containing all of the invoice information necessary for Eagle to import.
Note: The location for saving the export file is set up in the SPEID scanning utility. It is recommended to save this to a client computer on the network.
To import the assist file:
From the Purchasing & Receiving menu, select AP Assist Processing Viewer.
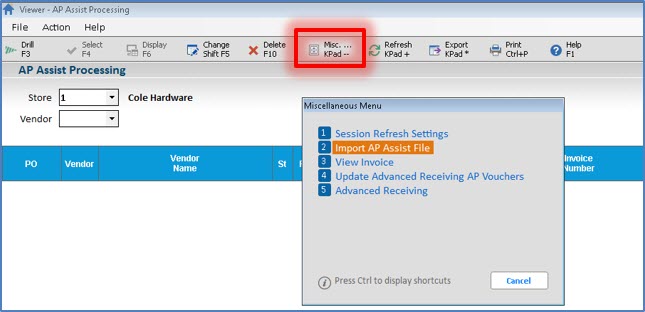
From the Misc Menu, select Import AP Assist File.
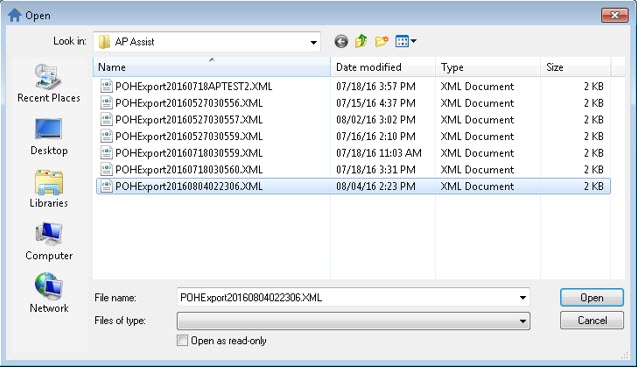
From the Open window, use the browser to navigate to your invoice AP Assist file:
Select the file and click Open. If the AP Assist file imported successfully, a confirmation message will appear and prompt to delete the import file:
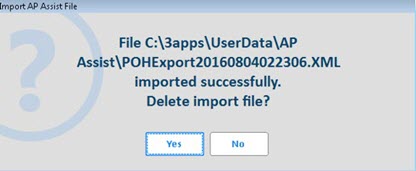
At the prompt, select Yes to delete the AP Assist file from the saved location. Selecting No to save the AP Assist file after the import.
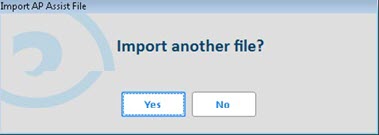
At the Import another file? prompt, select Yes to display the browser and select an additional file or No to continue to the processing viewer:
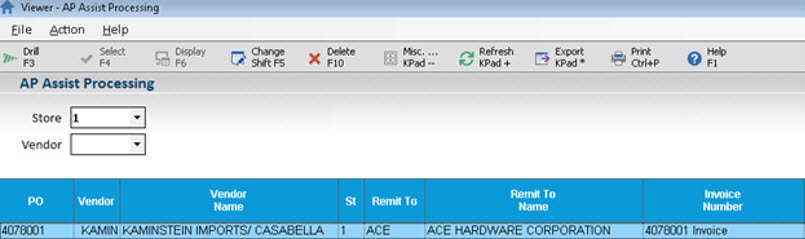
The scanned invoice displays in the AP Assist Processing Viewer:
After importing your respective invoice files, you can manage the POs displayed. As of Release 29.1, you can manage multiple purchase order records all at once. Use the new check boxes on the left hand side to select which POs you want to address.
Consider the following:
If a match is found, Eagle compares the Invoice Total from the scanned invoice to the Invoice Total from the receiving document.
If the Invoice Total of the scanned invoice is equal to or within the tolerable threshold allowance, the invoice is automatically marked OK to Finalize = Yes. This means that the invoice can post against the receiving document to create a regular payable voucher to Accounts Payable.
Note: For more information about matching, see Invoice Matching Details below.
If the Invoice Total of the scanned invoice is not within the tolerable threshold allowance, the invoice will be marked OK to Finalize = No. This means that the invoice cannot post against the receiving document until the ‘OK to Finalize’ flag is overridden to Yes.
Use the check boxes at the beginning of the lines to set the OK to Finalize flag for multiple PO records.
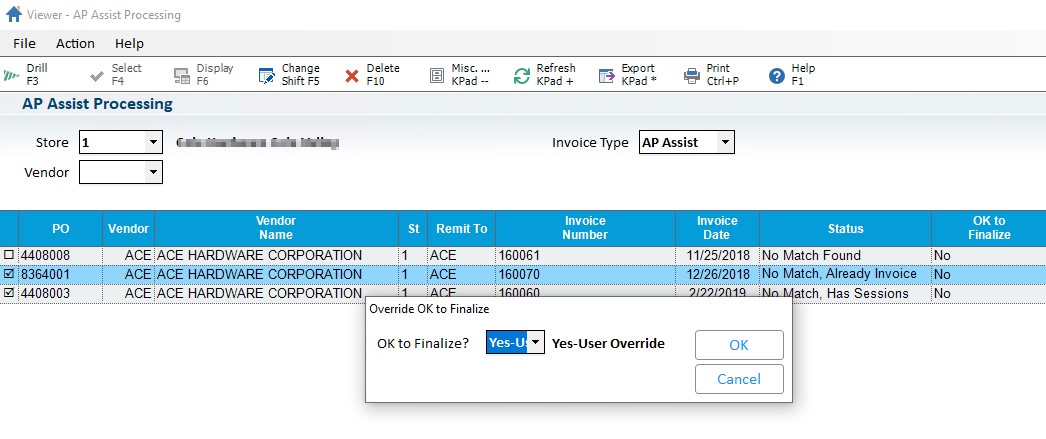
The Status column in the AP Assist Processing Viewer will show if there is a match and if it is within tolerance.
In Release 29.1, you can adjust the following fields on your vendor invoices, if needed:
P.O Number
Invoice Number
Invoice Date
Discount Date
Net Due Date
To adjust these fields:
From the AP Assist Processing View, click F6 - Display in the Toolbar.
Use the Change Vendor Invoice Information window to adjust these fields:
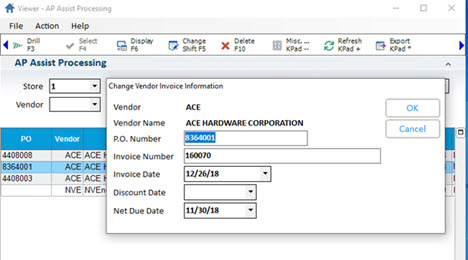
Click OK to save your changes.
Eagle uses the following matches to check invoices before processing:
If the scanned invoice is matched to an receiving document and the Invoice Total matches or is within the tolerable variance to the receiving Invoice Total, the Status column displays Match, Within Tolerance. Additionally, the OK to Finalize column displays as Yes.
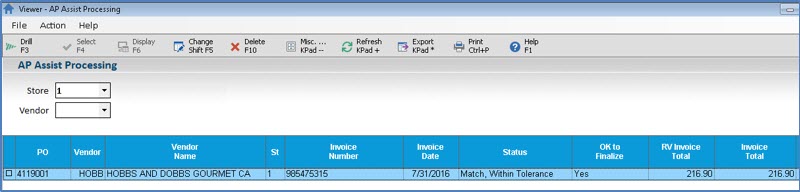
With no errors, this invoice can be posted to the receiving document immediately. If the invoice should not be posted to the receiving document, the OK to Finalize can be changed by pressing the Change (Shift F5) button. The OK to Finalize shows No – User Override.
If the scanned invoice is matched to a receiving document and the Invoice Total is not within tolerable variance to the receiving Invoice Total, the Status column displays Match, Outside Tolerance. The OK to Finalize column displays No:
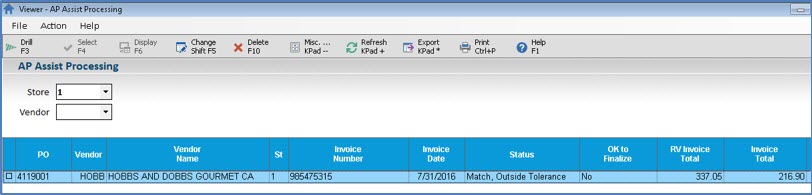
This invoice cannot be posted to the receiving document unless the following occur:
The receiving document is adjusted so that the receiving Invoice Total is within tolerance of the Invoice Total. If this happens, the Status changes to Match, Within Tolerance and the OK to Finalize changes to Yes.
The OK to Finalize flag is overridden by pressing the Change (Shift F5) button. The OK to Finalize changes to Yes – User Override.
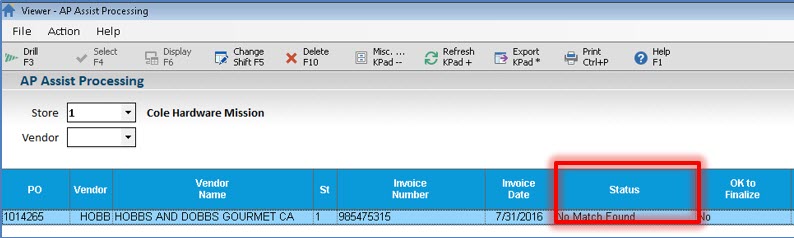
There are only three reasons why a ‘No Match’ status would appear when an invoice is imported:
Not in file – the PO Number from the imported invoice was not found in MRV. This means that either the PO has not been received in Eagle or the PO Number never existed.
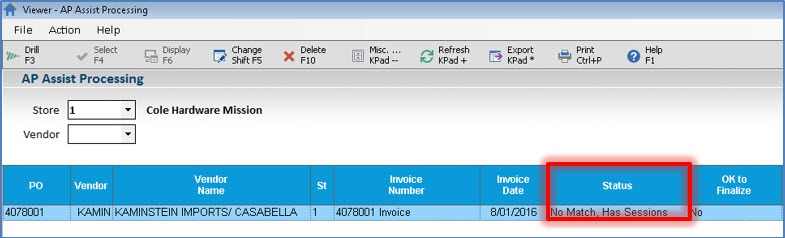
Has Sessions – the PO Number from the imported invoice was found in MRV, however, the PO has been modified into Sessions in MRV.
Already Invoiced – the PO Number from the imported invoice was found in MRV, however, the AP Invoice information has already been updated and cannot be updated again.
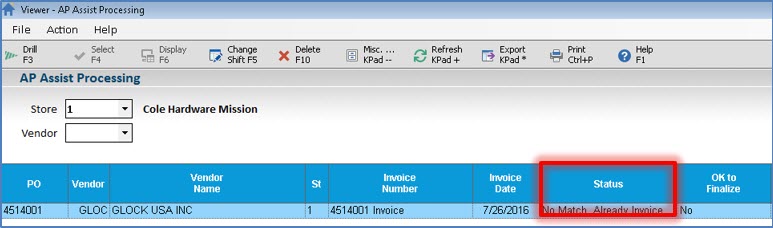
The OK to Finalize’ flag cannot be changed to Yes for No Match invoices.

Updating Matched Invoices
You can rematch the selected scanned invoice(s) to the receiving Vendor/PO sequence number in MRV.
Note: Requires Option 9962 "Matched invoices can be unmatched if overridden?" set to Yes or X (Exclude Yes-User Override).
Select the check boxes next to the invoice records you want to update.
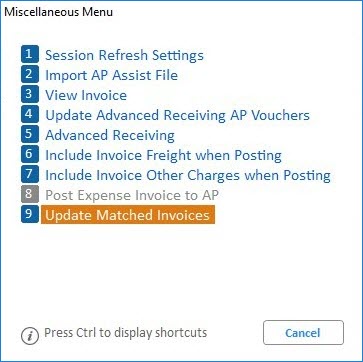
Click on the Miscellaneous Menu and select Option 9 “Update Matched Invoices”.
The grid will display the scanned invoices matched to the receiving Vendor/PO sequence number in MRV.
When you are ready, you can post the AP Expense invoices.
Click on the Miscellaneous Menu and select Option 8 “Post Expense Invoice to AP”.
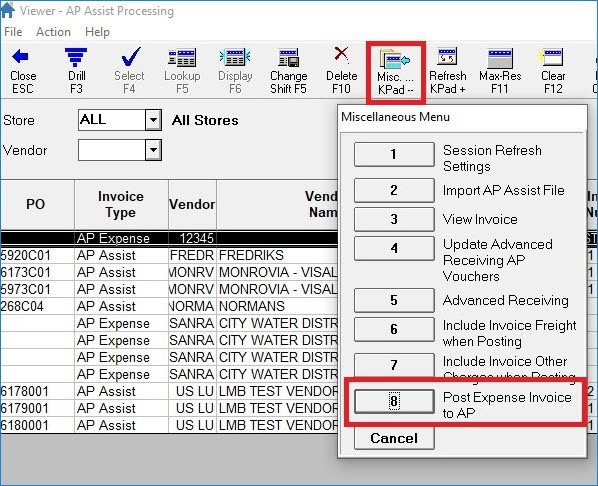
All AP Expense Invoices with the OK to Finalize column set to Yes will post from the AP Assist Processing Viewer to New A/P Transactions (ATMU).
Note: Only AP Expense Invoice Type invoices will post using this Misc Menu option. The AP Assist Invoice Type invoices will still use Option 4 “Update Advanced Receiving AP Vouchers”.
Eagle generates a spooled report named VIEWAPA for each AP Expense invoice posted. This report should confirm the generated voucher:

All imported invoices where the OK to Finalize flag is set to Yes or Yes – User Override, can be updated to the MRV AP Invoice window. After the invoice has posted to the MRV document, it is automatically deleted from the AP Assist Processing Viewer.
From the AP Assist Processing Viewer, go to the Misc Menu and select Update Advanced Receiving AP Vouchers.

After this option is selected, a prompt displays to confirm the Update Advanced Receiving:
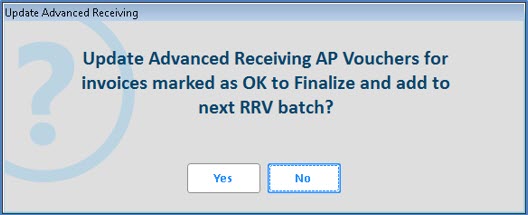
Yes - Posts all invoices where the OK to Finalize flag is set to Yes or Yes-User override.
No - Will not update any invoices to the MRV AP Invoice screen.
After that, the posted invoices will be automatically removed from the AP Assist Processing Viewer. When an invoice is updated to Advanced Receiving, the Batch flag in MRV is automatically set to Yes.
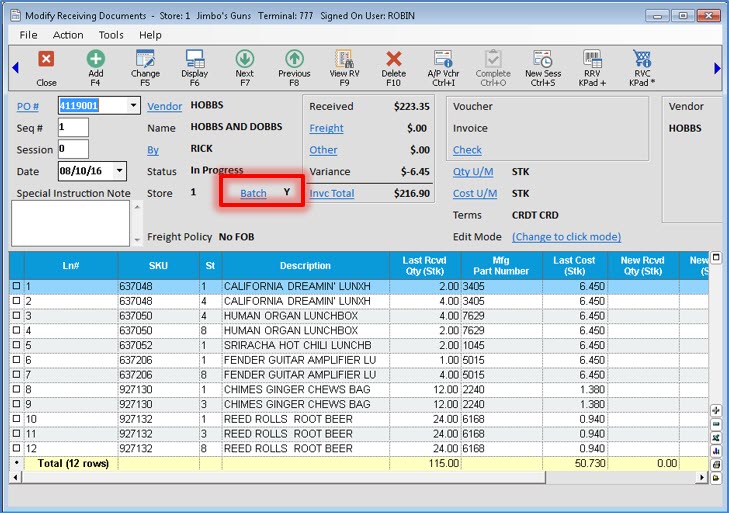
This allows RRV to run for all receiving documents where the Batch flag is set to Yes. Additionally, the process finalizes all of the receiving documents that now have invoice information posted.
To set RRV to run:
Ensure all receiving documents that have Batch flag is set to Yes.
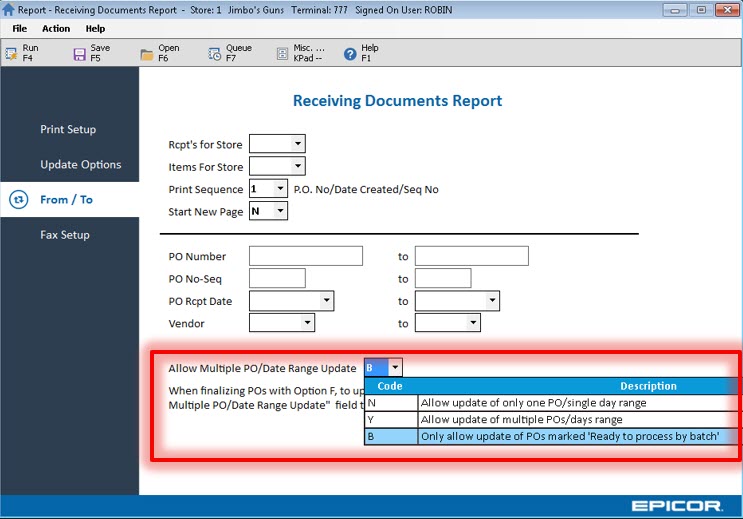
Update Options – F – Finalize PO Receipts
Review any additional options needed as part of normal business practices.
From/To – Leave all of the following fields blank:
Rcpt’s for Store
Items For Store
PO Number
PO No-Seq
PO Rcpt Date
Vendor
Set the Allow Multiple PO/Date Range Update to B – Only allow update of POs marked ‘Ready to process by batch’:
Once RRV has finished processing, the passoff from Purchasing to Accounts Payable can run:
APP – Creates the temporary and regular vouchers from MPO and MRV
RATJ – Posts the regular vouchers to the AP to be paid and accrues temporary vouchers
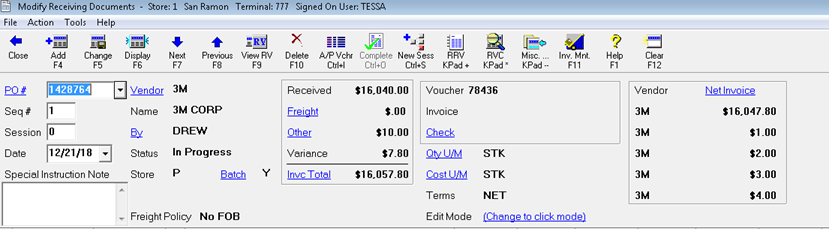
You can import the Freight Amount and Other Charges Amount(s) from the scanned AP Invoice to the Received Amount. Invoices received from a purchasing vendor will include additional freight and/or other charges that were not included on the purchase order at the initial time of receipt. The calculated total will be used to determine if the scanned invoice is within tolerance to post. Once posted, the freight and/or Other Charges amounts from the scanned invoice will update/overwrite the freight/Other Charges amount fields in Advanced Receiving.
![]() Option 1823 "AP
Assist – Update freight charges in MRV" and Option
1867 "AP Assist – Update Other Charges in MRV" must be set
to Yes.
Option 1823 "AP
Assist – Update freight charges in MRV" and Option
1867 "AP Assist – Update Other Charges in MRV" must be set
to Yes.
To update Freight Charges and Other charges in MRV, perform the following steps:
Import the scanned invoice into the AP Assist Processing Viewer. Eagle will default to calculate the variance and determine if the scanned invoice is within threshold based on the RV Invoice Amount to the scanned invoice amount.
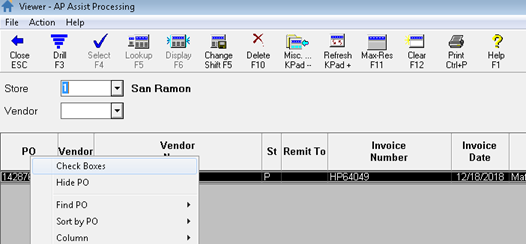
Select the check box for each row for invoices that should include the scanned invoice’s freight and/or other charges. The check box column is typically the first column for each row. If it’s not visible, right-click on any column header and select ‘Check Boxes’.
Once you have checked each row, go to the Misc Menu and select Option 6 – Include Invoice Freight when Posting and/or Option 7 – Include Invoice Other Charges when Posting. A prompt will display to confirm whether to include/not include Invoice freight/Invoice Other Charges.
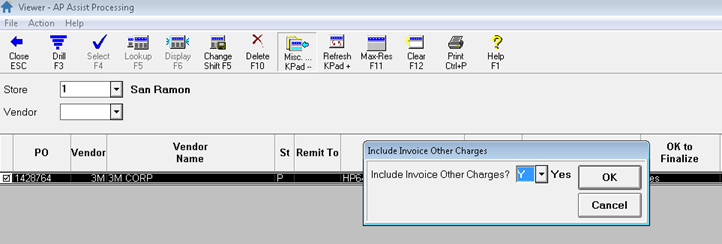
Select Y-Yes to include. The AP Assist Processing Viewer will automatically refresh and update each selected row with a recalculated Variance as well as display "Yes" in the Include Invoice Freight/Include Invoice Other column(s).
The recalculated Variance amount is calculated from (RV Received + Freight + Other + Other Charge 2 + Other Charge 3 + Other Charge 4 + Other Charge 5) vs Invoice Total.
Once all scanned invoices are imported, click on the Misc Menu and select Option 4 – Update Advanced Receiving AP Vouchers to post the scanned invoices to Advanced Receiving.
The RV document is now updated with the Invoice Freight/Invoice Other Charges and posted to Accounts Payable from RRV-F, APP and RATJ.
Clicking on the Other link now shows the breakdown of Other Charges that were pulled from the Vendor Invoice and imported to the AP Assist Processing Viewer.
Other Charges updates in MRV include – Invoice Vendor, Amount and uses the Landed default.