(Epson TM-J7100 receipt printer users only)
Use the following procedure to print header and footer logos on each receipt that is generated in Epicor Eagle™ POS for Windows.
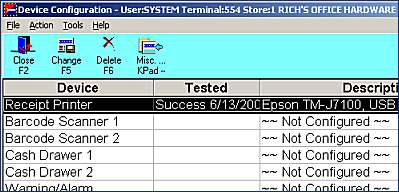
This procedure assumes the receipt printer has already been set up in Device Configuration.
Using a graphics program, create a company logo in .bmp format. Use the information below to determine the maximum size (width x height) of the header and footer logo, and the name you must use when saving it on your hard drive.
|
Type of Logo |
Name You Must Use |
Maximum Height |
Maximum Width |
|
Header logo |
ReceiptLogo1.bmp |
3" |
2 1/2" |
|
Footer logo |
ReceiptLogo2.bmp |
3" |
2 1/2"
|
Place the .bmp file(s) in the appropriate folder on the PC, as specified below:
If you are running a Network Master/Client setup, place the file(s) on the network master PC, in the C:\3net\Userdata\Logos folder.
If you are running a Standalone setup, place the file(s) in the C:\3apps\Userdata\Logos folder of the PC.
If you don't know what kind of setup you are running, click here.
From a POS station with an Epson TM-J7100 printer attached, do the following to display Device Configuration: from the Eagle Browser, click Utilities in the blue left pane of the window, and from the menu that displays, click Device Configuration.
Double-click on the Receipt Printer row in the grid.
Click the Logos button at the bottom of the window.
![]()
In the Enable/Download Logos dialog box, click in the box to the left of Receipt Header Logo and/or Receipt Footer Logo, depending on which type of logo(s) you placed in the Logos folder on your PC. Then click Change.
![]()
Click Load. In the next dialog box that displays, click the same logo(s) and click OK.
A window that says "For Your Information" displays. This window indicates that the printer is about to print the logo. Depending on the size of the logo file, there may be a short delay before the logo begins printing.
Once the logo has printed, click OK to continue.
If you downloaded both a header and footer logo, the "For Your Information" window displays again. Again, depending on the size of the footer logo, it may take a few seconds to print.
Click OK to continue.
Click Done, and then click OK to exit the Enable/Download Logos dialog.
Exit Device Configuration.
Repeat the above procedure at each POS station that has an Epson TM-J7100 receipt printer.
If you ever want to deactivate logo printing, initiate the logo download procedure, except un-check the header and footer logos in the Enable/Download Logos dialog box.