Use the following procedure to use the Cash Drawer Balancing feature at POS.
![]()
The system will always create a cash drawer session when a clerk rings up one or more sales, even if the clerk presses Escape when the Beginning Cash dialog displays.
If a clerk forgets to close out his/her drawer, it will be automatically closed during end-of-day processing if you set up the RDS report with option C to run on a daily basis. If you didn't set up RDS option C, you can close open drawers using the Cash Drawer Balancing Viewer.
Enter your Clerk ID, as you normally would.
The system looks for an open cash drawer record. If it finds one, POS simply continues to update the existing open cash drawer as you complete transactions. If it doesn't find one, it creates a new cash drawer record.
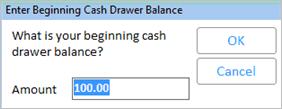
Depending on how you set up the option "Prompt for beginning cash for cash drawers," you may be prompted to enter beginning cash; if so, enter the beginning cash amount and press ENTER, or simply press ENTER to accept the default amount (which comes from the option "Default beginning cash for cash drawers" in Options Configuration).
![]()
If your system is set up to automatically start an order in POS (the option "Return to Header Screen After Each POS Transaction" is set to O in Options Configuration), the Beginning Cash dialog won't display automatically. You must press <F2> (Start Transaction) and select Sale if you want the Beginning Cash dialog to display.
![]()
If you don't want to start a cash drawer session (i.e. you want to enter POS merely to display an item or look up a transaction), simply click Cancel in the dialog box shown above.
Proceed with ringing up transactions, as you normally would.
When you're ready to close out the drawer (i.e. at the end of your shift, before a break, or upon closing for the day), select Menu, then select "Print totals and close cash drawer."

Select one of the choices from the dialog box that displays
: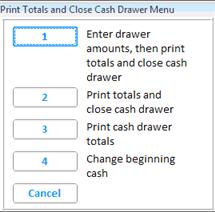
Press 1 to enter drawer amounts, then print totals and close the cash drawer.
press Cancel to keep the cash drawer session open.
If you selected option 1, the "Enter Cash Drawer Actuals" dialog box displays. Depending on whether you have security bit 718 ("Show expected cash amount when balancing cash drawer"), the dialog may include the expected cash amount. Do the following:
Count your drawer (after first removing the Beginning Cash).
Enter actual amounts by doing one of the following:
Enter the actual amounts in the spaces provided on the left side of the dialog box. If expected tender amounts are visible, you need only enter an actual amount if it differs from the expected amount. Note that if you set option 1069 "Record ECC and non-ECC checks separately in Cash Drawer Balancing" to Yes, you will enter separately the amounts for Electronic Check Conversion (ECC) checks, and the amounts for non-ECC checks.
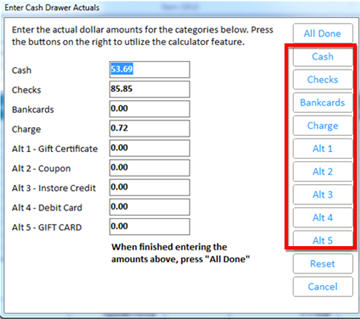
Use the buttons on the right to accumulate the total of each tender type.
When finished, click the All Done button. The Cash Drawer Totals receipt prints, the drawer is flagged as Closed, and the POS Signon dialog displays.
If you selected option 2 or 3, count your drawer (after first removing the Beginning Cash) and fill in the actual amounts on the Cash Drawer Totals Receipt that prints. Later (i.e. that night or the next morning) the designated employee (i.e. the manager) will enter the actual amounts of cash, checks, bank cards, etc. into the Cash Drawer Balancing Viewer.
Depending on whether you have security bit 718 ("Show expected cash amount when balancing cash drawer"), the receipt may include the expected tender amounts. For a sample receipt with expected amounts, click here. For a sample receipt without expected amounts, click here.
![]()
Offline POS users: Cash drawer totals records are uploaded when you perform the upload of Offline transactions. If the Eagle system has cash drawer totals with an "open" status for the same date and for the same clerk (terminal), the system will merge the two records together. Otherwise, the cash drawer totals record is simply added to the system, and remains in an Open status.