Ace Level Pricing allows you to make more educated pricing decisions by assigning more competitive pricing to some items, but higher margins to others. With Level Pricing, you receive three pricing levels (most competitive to least competitive): Checklist, Level 1, and Level 2. You download these three pricing levels from Ace via your weekly EFM transmission. Then you apply different pricing levels to different groups of items depending on their price sensitivity. You can assign more competitive pricing to selected items, based on their price sensitivity, yet still maintain higher margins on other items. For example, if you have a plumbing warehouse nearby, you can assign more competitive pricing (i.e. Checklist pricing) to your plumbing items, but higher prices (i.e. Level 2 pricing) to the rest of your store.
Level Pricing is researched and developed by Ace’s Category Management team, which is part of Merchandising. Their research and expertise allows you to make more educated pricing decisions. This topic explains how to set up your system so that Level Pricing information is downloaded via EFM, and how to process that information.
Call Ace Retail Technology Support at 1-800-777-6797 to request that you start receiving ERTL hotsheet records. ERTL hotsheets are used to process the Level Pricing information via EFM, as well as to keep the new Level Pricing fields updated in the Eagle for Windows Ace Catalog.
In Options Configuration, click ID and enter 8715 to display the option " Ace price to use when adding items from catalog.” In the Current Value column, select Level 1 or Level 2 (the other available selections are R–always add items based on the pricing strategy selected through ACENET, and C–always add items using Ace’s "Checklist” price). Then click Change.
Assign pricing levels by range by using Item Code Update (RICU). With RICU, you can update this field for an entire department, commodity group (class) or merchandise class (fineline). (Note: you can also assign pricing levels to individual items using the "Level Price Override” field on the Pricing tab of Inventory Maintenance. Multistore users: this field is master data).
By setting the pricing level in this field, you will no longer need to call Retail Services or use ACENET to change the "level" you are signed up for. (Note: to see what pricing level you are signed up for, check the "Level Code" field in the Eagle Ace catalog, or click the Retail hyperlink in Inventory Maintenance). Once you have assigned a Level Price Override, the item’s price will change with its next cost change downloaded via hotsheets (EFM). You can also request hotsheets through ACENET to have the retails updated immediately.
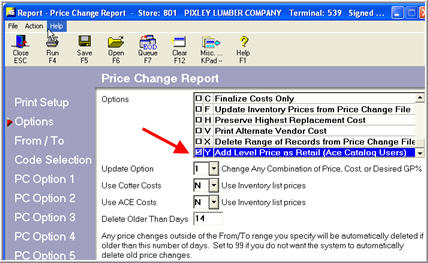
Specifying the same range of items you used in RICU in step 3, run the Price Change Report (RPC) with Option Y "Add Level Price as Retail” to update Retail with the Level 1 or Level 2 price from the Ace catalog.
Run RPC again, but this time with option F to finalize the prices you added in step 4.
When you process the updated Ace Catalog, Level pricing in the catalog will be updated.
Run EFM as you normally would. Since you are receiving ERTL hotsheets, you will automatically receive Level pricing via EFM.
Review the Price Change Transmission Report to view the new Level prices. To make changes to the pending price changes, use the Item Price Changes window.
Proceed as you normally would with printing bin labels, and then finalize the price changes as you normally would, by running the Price Change Report (RPC) with option F.