Use the following procedure to receive File Maintenance (EFM) from Ace. Click here for a complete list of the benefits of receiving EFM. Because new data is available each week, you should run it as part of a weekly queue.
![]()
Ace Electronic Catalog Users only:
While the actual transmission from Ace to retrieve EFM will be brief, it may take many hours for the system to process the catalog updates. Thus, the EFM procedure is typically run when the store is closed.
If you want all items in the national catalog to be updated when EFM runs, you must receive "all-item hotsheets." If you receive hotsheets based on your purchase history, only the items you've purchased will be updated in the catalog. If you want to switch to all-item hotsheets, notify Ace at 800-777-6797. However, keep in mind that switching to all-item hotsheets can affect the EFM information you download each week. For example, if you add new items during EFM, all new items will be downloaded, rather than just the items that are new to your mix. This may require more editing before you merge the EFM data with your inventory file.
This procedure assumes you have already completed telecommunications setup.
From the Eagle Browser, enter EFM in the Launch bar and press Enter.
Alternatively, you can click on the Ace Telecommunications Menu, and then select Receive File Maintenance (EFM).
In the Item File Maintenance Transmission window, in the Control Stream field, enter the name of your EFM control stream, or leave the default if your control stream name is ACEEFM.
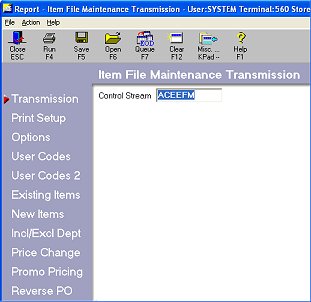
Multistore: If you receive hotsheets in multiple transmissions, enter the control stream for your store. For example, you are Store 2 and are receiving EFM data for Store 2. Enter ACEEFM2. For ACENET+ systems, enter ACEEFMA2.
Click ![]() . Review the default entries in the fields and make changes if needed.
. Review the default entries in the fields and make changes if needed.
Click ![]() and select the vendor code you use for Ace from the drop-down list.
and select the vendor code you use for Ace from the drop-down list.
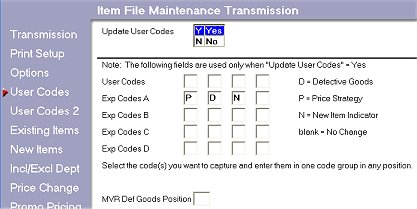
Click ![]() . Select Yes or No to update user codes. If you select Yes, use the bottom portion of the screen to enter the letters of the user codes you want to update. You must use only one User Code group but you can update any position in the group. In the example below, all three user codes (D, P, and N) are being updated in the Exp Codes A group.
. Select Yes or No to update user codes. If you select Yes, use the bottom portion of the screen to enter the letters of the user codes you want to update. You must use only one User Code group but you can update any position in the group. In the example below, all three user codes (D, P, and N) are being updated in the Exp Codes A group.
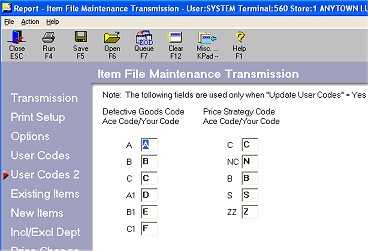
Click ![]() . If you selected Yes to update user codes in the previous step, use this page to define the user codes the system will use when updating Price Strategy and Defective Goods. You can leave the defaults or enter your own codes.
. If you selected Yes to update user codes in the previous step, use this page to define the user codes the system will use when updating Price Strategy and Defective Goods. You can leave the defaults or enter your own codes.
Click ![]() . Fill in the fields on the screen.
. Fill in the fields on the screen.
Click ![]() . Fill in the fields on the screen.
. Fill in the fields on the screen.
![]()
EFM will not run unless you select Yes to Update Existing items or to Add New Items (or both). You cannot answer No to both.
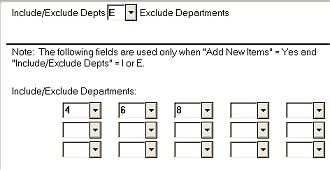
(Optional) Click ![]() . If you selected Yes to Add New Items in the previous step, use this page to include or exclude items from certain departments. For example, if you want to exclude items from departments 4, 6, and 8 from being added to your inventory, set the "Include/Exclude Depts" field to E, then enter 4, 6, and 8 in the fields below.
. If you selected Yes to Add New Items in the previous step, use this page to include or exclude items from certain departments. For example, if you want to exclude items from departments 4, 6, and 8 from being added to your inventory, set the "Include/Exclude Depts" field to E, then enter 4, 6, and 8 in the fields below.
Click ![]() . Fill in the desired options. In the Vendor Code field, select your vendor code for Ace.
. Fill in the desired options. In the Vendor Code field, select your vendor code for Ace.
Click ![]() . Fill in the desired options. In the Vendor Code field, select your vendor code for Ace. If you select Y in the "Add Items To Inventory" field, any Ace promotion items that do not exist in your Inventory file will be added, as long as the item is in the Ace catalog.
. Fill in the desired options. In the Vendor Code field, select your vendor code for Ace. If you select Y in the "Add Items To Inventory" field, any Ace promotion items that do not exist in your Inventory file will be added, as long as the item is in the Ace catalog.
![]()
For Ace Best Buys, Super Coupons, and Incredible Bargains, the promotion start/end dates are set to the first and last day of the month, respectively.
Beginning in Spring of 2007, you'll be able to download Major Market and National Event promotions at percent-off discounts (as opposed to being based on a specific price). These percent-off promotions will be downloaded through your regular EFM process.The ’percent off’ promotions are supported for the following hierarchy groups:
Merchandise Class
Merchandise Class - Product Group
Item
Vendor
Private Label (which will be sent as items)
Merchandise Class – Vendor Combination
Merchandise Class – Product Group – Vendor Combo
Merchandise Class – Private Label Combo
Merchandise Class – Product Group – Private Label Combo
(Optional) Click ![]() . Fill in the screen so that you can download Reverse purchase orders (Drop Ship orders) from Ace. Click here for a definition of the fields on the screen.
. Fill in the screen so that you can download Reverse purchase orders (Drop Ship orders) from Ace. Click here for a definition of the fields on the screen.
Click Run to initiate the transmission. Or, click Queue (F7) to add EFM to an end-of-day queue.
Give the transmission a few minutes to process, and then check the transmission results.
From the Eagle Browser in the Launch bar, type ASYMSG and press <Enter>.
Press Next (F7) to view the correct section of the log. A message similar to the following indicates a successful transmission.
ACEEFM: RECEIVING HOTSHEETS
ACEEFM: HANGING UP
ACEEFM: EVALUATING SCRIPT RESULTS
ACEEFM: BTC JOB SUCCEEDED
BTCTRAN: BEGIN ASYNC PROCESSING
BTCTRAN: END ACE ASYNC PROCESSING
BTCTRAN: TRANSMISSION SUCCESSFUL
The transmission reports print when the transmission process completes.
If you have a problem receiving EFM data, try receiving EFM data again. If you are still not successful, do the following:
Make note of any error messages you see in ASYMSG.
Call the Eagle Advice Line at 1(800) 322-3077 to help you solve the problem.