Creating Streamlined Special Orders in POS
- From the Eagle Browser, open POS, and press
F4 (SpOrd).
- In the Customer field, use any of the standard
lookup
methods to locate the customer. If you are using the cash customer,
then when prompted for customer information, type the information
(or scan the customer's drivers license), and then press OK.

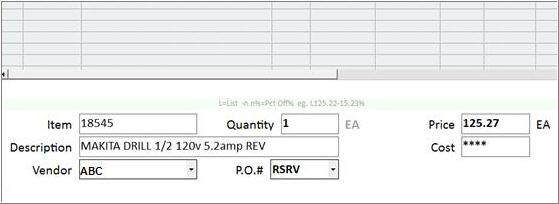
- In the Item/SKU field, enter the item to special
order, tab to the quantity field and input the quantity. If needed,
input the price and/or cost (asterisks display as the cost is typed
in). You can also use pricing
codes to calculate the price from the cost and description.
- Verify that the vendor field is defaulted to
correct vendor, tab to the PO number field, and enter RSRV (may be
already defaulted to RSRV based on setup), or use the drop-down
to choose the PO to which to append this item.
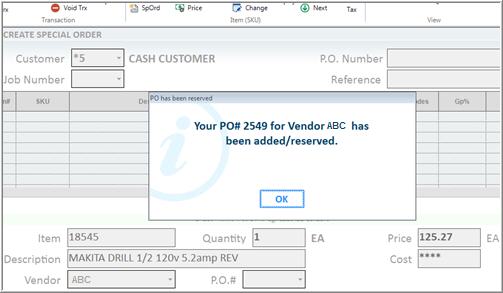
- Press Enter, and a message displays that "PO#
XXXX has been reserved" (Note: if option 9896 is set to default
the PO number to RSRV, you won't get this message). The PO number
that is reserved displays.
Note: If the setup
in your business modelThis
would be for a business model that allows their salesmen to create and
assign a purchase order number rather than using the system to generate
the purchase order number. is such that "Select
How to Assign PO number" is set to Manual (option 9042 is set to
Y), you would receive an additional prompt after pressing Enter to post
the item when PO number is set to RSRV. You would receive this additional
prompt before the above "Your PO# has been added/reserved" message.
- Press OK, and if no other items need to
be posted, press Total.
- Choose Save without printing or to Save and
Print, and tender the deposit. The clerk receives a prompt informing
them of the assigned special order Transaction number.
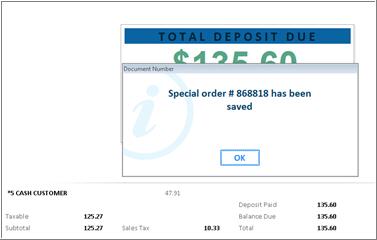
- Press OK, and the system auto-appends
the items ordered to the reserved purchase order. If signature capture
is used on this system, at this time the signature capture prompt
displays for the customer signature.