Use COPYRECS to copy Inventory records that exist in one store to another store where they do not currently exist (use Copyfields to copy individual store specific fields from one store to another).
The COPYRECS function allows you to copy many fields and have great flexibility in copying. The flexibility is most helpful in the types of fields in which you can copy the ranges of items you select to copy. By default, it will have almost all the optional fields selected, but you can deselect specific fields or record types to copy. You can queue COPYRECS to run in an end-of-day or end -of-month queue.
To use the COPYRECS function, you need to make sure that Security Bit 853 is set to Yes. This Security Bit allows you to use both the COPYRECS and Copyfields functions.
From the Eagle Browser, click Reports Menu, then Inventory Reports.
Click Copy Records from Store to Store. The Copy Records window displays.
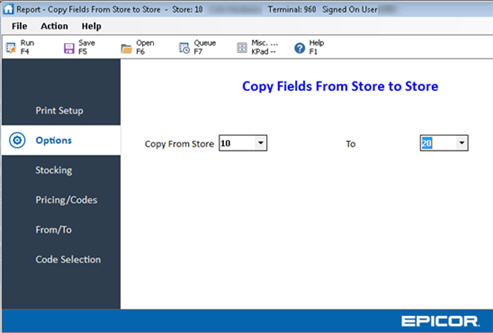
Click Options. The following window displays.
In the Copy From Store field, select the store from which you will copy records.
In the To field, select the store to which you will copy records. Or, you can select ALL to copy supporting files (not inventory records) from the From store to all other stores.
In the Options field, all options are selected by default. If you do not want to copy discontinued items and store closeout items, click to deselect.
In the Copy Supporting Files field, all options are selected by default. The following records can be added to a store (or to all stores if you selected ALL in the To field):
Department
Class
Finelines
Kits
Bill of Materials (BOMs)
Vendors
Vendor Line Cross Reference (Auto Eagle Only)
Vendor Transmission (Auto Eagle Only)
By selecting these fields to be copied to the new store, you will greatly reduce the potential of items not being added to the new store because these records were missing. If you do not want to add any records, click to deselect.
![]()
Running COPYRECS to copy supporting files will also copy the inventory items in the ‘from’ store to the ‘to’ store. So, be sure to use the proper from/to’s and code exclusions as necessary.
Click Stocking. The following window displays.
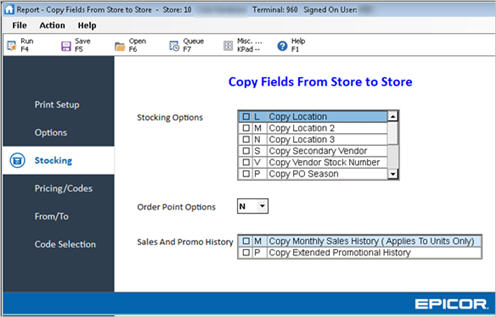
In the Stocking Options field, all options are selected by default. If you do not want to add any of the following fields, click to deselect:
Copy Location
Copy Location 2
Copy Location 3
Copy Secondary Vendor
Copy Vendor Stock Number
Copy PO Season
Copy Number of Bin Labels
Copy Min # of Stc Pkgs
Copy New Order Qty
Copy Fixed Order Qty
In the Order Point Options field, you can select one of the following options.

In the Sales/Promo History field, you can copy over monthly sales units and promo units to assist with future projections and order point calculations. All options are selected by default.
Click Pricing/Codes. The following window displays. The information on this window is from the Inventory Maintenance window Pricing Codes tab.
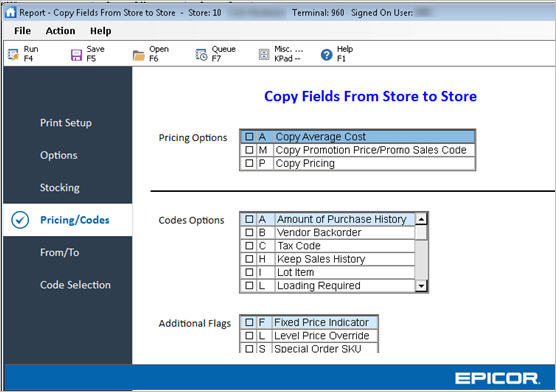
In the Pricing Options field, you can select the following:
Copy Average Cost
Copy Promotion Price/Promo Sales Code
Copy Pricing
Copy Last Cost
Copy POS Sellable
Copy Tax Exempt Category
Copy Consumer Info Code
Note: Most commonly selected options would be to not select A or M, but to select P if the system is set to keep prices the same. If the system is set with the option to keep prices the same in all stores, the option P will have no effect.
In the Codes Options field, you will see some of the store specific fields found on the Inventory Maintenance window Codes tab. You can select the following fields to copy:
Amount of Purchase History
Vendor Backorder
Taxable
Keep Sales History
Lot Item
Loading Required
Count Promo Sales
Keep Promo History
Store Closeout
ROP Protect
Special Record
Tax Code
Popularity Code
Keep Stock Info
Keep Prices
All of these fields are selected by default; if
you do not want to add any of the following fields, click to deselect.
If deselected, they will default to the values that are defined on the
Options Configuration window (Function MIC).
Note: Selecting or deselecting some of these fields can have some unexpected results. For example, if you copy over the code for Lot Items, but do not define any lots for the new store. Also, selecting Store Closeout, but having chosen not to copy these on the Options tab will cause you to not have any records flagged this way. Tax code could also present you with challenges if you are using line item tax codes by store.
In the More Codes field, you can select the following fields that are found on the Inventory Maintenance window Codes tab. All fields are selected by default.
Prompt for Transfer
Tally
Tint Cost / Flat Fee
Hazardous Item Code
Harmonized System Code
WIC Code
Restricted Hours
Special Fee Code
Weighable?
In the Additional Flags field, you will see some of the fields that you can access with the Additional Codes Flags hyperlink on the Inventory Maintenance window Codes tab. You can select the following fields:
Fixed Price Indicator
Level Price Override (Ace Specific)
Special Order SKU
Click From/To. The following window displays.
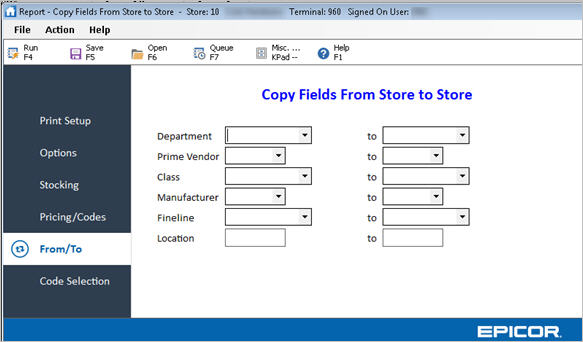
Select the ranges you want in the following fields:
Department
Prime Vendor
Class
Manufacturer
Fineline
Location
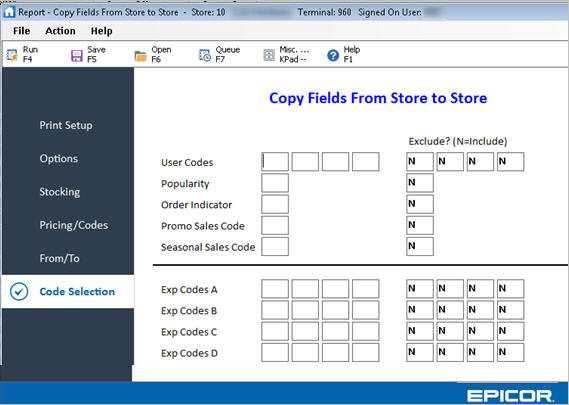
Click Code Selection. Fill in the desired fields to include or exclude groups of items.
Click Run.
Related Topics