Using POS Dated Billing
(A/R Pro users only)
This procedure assumes you have already completed the setup for POS Dated Billing.
You can use Dated Billing for a POS transaction if all of the following are true:
-
The transaction type is a Sale, Order, or Special Order
-
The transaction amount is greater than zero
-
You have not entered a deposit (if the transactions is an Order or Special Order)
-
The "Charge Allowed" and "Allow Dated Billing" fields are set to Y in Customer Maintenance
-
You have security to use Dated Billing
Using Dated Billing
-
Create the transaction (Sale, Order, or Special Order) as you normally would.
-
Press Total (+ on the keypad).

Since the Dated Billing function calculates with a total outstanding amount, the counterperson procedurally would perform the Dated Billing after taking payment for any alternate tender types (e.g. cash, credit card, etc).
-
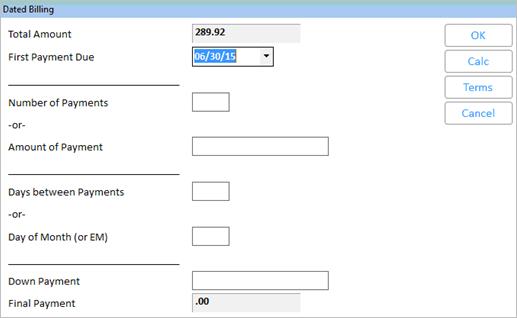
Press Menu (- on the keypad), and select Enter Dated Billing. The Dated Billing dialog box displays. Notice the amount due is automatically entered in the Total Amount field.
-
Fill in the fields as desired. For more information about a particular field, click any of the following.
Total AmountThe system automatically fills in this field with the total transaction amount.
First Payment DueThe due date of the first installment. If you leave this field blank, it will default to the due date of a transaction which would appear on the customer's upcoming statement. In other words, the transaction's terms are used in conjunction with the projected statement date (i.e. the normal due date calculation for a newly added transaction).
Number of PaymentsEnter the number of payments (between 1 and 99) you want to create for this transaction, or leave this field blank and the system will calculate the number of payments based on the Payment Amount field. (Note: the final payment is counted as one of the payments)
Amount of PaymentEnter the amount you want the payments to be (between .01 and 9999999.99), or leave this field blank and the system will calculate the payment amount based on the Number of Payments field (with the possibility of a different amount for the final payment). If you leave both this field and the Number of Payments field blank, the <Calc> function sets this field to the amount in the Total Amount field.
Days between PaymentsEnter a number between 1 and 99 to determine the number of days between payments.
Day of MonthEnter a the day of the month (from 1 to 31), or enter EM to signify end-of-month. If both this field and the Days between Payments field are left blank, the <Calc> function automatically sets this field to EM. As is tru throughout the system, 31 means the last day of the month and is equivalent to EM.
Down PaymentIf the customer is giving you a down payment, enter the amount in this field. The amount of the down payment reduces the total amount being paid by installments.
Final PaymentThe Final Payment is the amount outstanding when the system divides the total amount due by the number of payments. If the calculated final payment is less than $1, it is added to the previous installment, making the last installment larger than the other installments.
The final payment may be smaller, larger, or the same as the normal installment amount. For example, if the transaction total is $500, and you enter $60 in the Down Payment field, the system will calculate that there will be 4 payments of 100.00, and the final payment will be $40 (due to the $60 down payment). In contrast, if no down payment had been entered, the Final Payment would have been 100.00 (the same as the other installments).
-
-
If the customer is using another payment type besides Dated Billing (i.e. cash, credit card, etc), accept the other payment type BEFORE using the Dated Billing feature.
-
When using the Dated Billing feature, you should NEVER use the Menu option "Change date or invoice number," because this option can cause unexpected results when used in conjunction with Dated Billing. If you need to change the due date of a Dated Billing installment, click here.
-
When finished filling in the fields, Press Calc. The fields you left blank are calculated based on the fields you entered.
-
If you are satisfied with the payments, press OK. Otherwise, make any changes, press Calc again, and then press OK.
A summary of the dated billing terms print in the body of the invoice (and is viewable in QuickRecall). The following is an example for a $500 transaction with a $60 down payment; with the balance to be paid in 5 installments (including the Final Payment).
Down Payment (due now) 60.00
A/R Future 440.00
First Payment Due 06/25/06
4 Payments 100.00
Final Payment 40.00
-
The Dated Billing transactions are now stored in the A/R application, just like any other A/R transactions. If desired, you can view the Dated Billing transactions. If you want to change a due date, see the topic "Dated Billing: Changing Due Dates."