(Advanced Special Order users only)
Use the following procedure to quickly add non-stock items to inventory from POS using SKU templates. You can use this feature for non-catalog items, or for items in your electronic catalog(s). This procedure assumes you have already completed the setup, which includes setting up security and options, and setting up template SKUs.
![]()
The fields "Keep Stock Info" and "Keep Prices" will automatically be set to Y for the non-stock SKUs you add, regardless of how the template is set. In addition, the "Special Order SKU" field will also be set to Y to ensure that the non-stock item will NOT appear on Suggested Orders (RSO).
Click one of the following to go to the procedure steps:
Adding Non-Stock Items NOT in the Electronic Catalog
Adding Non-Stock Items from the Electronic Catalog
In POS, enter the template SKU that is appropriate to the non-stock item you're placing on the transaction, and press Enter. The Add SKU dialog displays.
In the Add SKU dialog, fill in the fields. Minimally, you must enter a SKU (unless you set up option 8718 to auto-generate SKUs), Description, and Order Quantity. All other fields will use the template SKU value if they are left blank. Multistore users: If you want to add the non-stock item to additional stores, select the appropriate stores in the Add To Additional Stores field (Note: the default stores/store groups in this field come from option 8457 “Default store group for Quick Add of Non-Stock items in POS”)
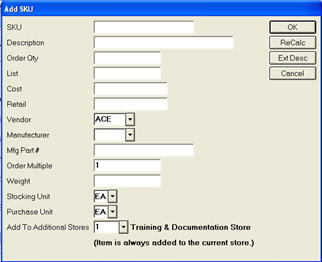

If you enter a template SKU that you set up as Record Type L (lumber), the add dialog indicates that you must enter the Cost and Price in the pricing unit of measure (not in stocking units as with Record Type H-hardware).
Note the following special features that you may want to utilize in the Add dialog:
In the Retail field, you can calculate the retail using one of the following methods (if option 8451 "Pricing Codes can be entered in Price field" is set to Yes):
Discount off List price. To do this, enter MXX in the Retail field, where XX is the markup from cost. For example, to calculate a cost of 20% off List price, enter M.80
Markup from cost. To do this, enter CMXX in the Retail field, where XX is the markup from cost. For example, to calculate a markup of 30% above cost, enter CM30
Gross margin markup from cost. To do this, enter GXX in the Retail field, where XX is the gross margin markup from cost. For example, to calculate a gross margin mark up from cost of 40% enter G40
Note: if option 8452 "Display tool tip for pricing codes available in the price field" is set to Yes, a tool tip displays which describes these various pricing methods.
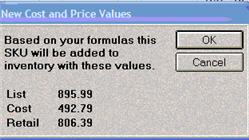
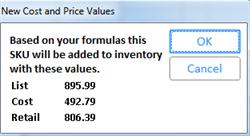
You can use the Recalc button to preview the prices the system will calculate based on the formula you entered in the Retail field. If you click OK, the system pastes the calculated values into the Cost and Retail fields in the add dialog box, and uses the calculated values when adding the item to inventory. If you click Cancel, the add dialog box displays with the formula in the cost and retail fields, giving you the opportunity to set different values.
Click the ExtDesc button to add an extended (longer) description or pre-defined comments. The system adds the extended description to the non-stock SKU as a Type 1 Note, which prints on the order and invoice.
When finished filling in the Add SKU dialog, click OK.
Multistore users only: the SKU is added to the current POS Header store, and any additional stores you select in the Add To Additional Stores field (Note: the default stores/store groups in this field come from option 8457 “Default store group for Quick Add of Non-Stock items in POS”). However, if the SKU already exists in another store, you'll be given the choice to add the item or go back to the Add SKU dialog. If you elect to add the item, the master data from the existing SKU will be used; only store-specific information will be updated based on the information you entered in the Add SKU dialog.
When adding non-stock items from the catalog, option 8717 determines whether your Eagle system uses the "Add Dialogue mode" or the "Silent mode." See the options setup topic for more information about these two modes.
If you use the Add Dialogue mode:
Locate the item in the catalog that you wish to sell in POS, and click it in the grid so that it is highlighted.
Click Sell. The Add SKU dialog displays. This dialog includes basic information unique to the product such as SKU / part number, Description, Sell Quantity, List Price, Cost, Retail, Primary Vendor, Mfg. Vendor, Order Multiple, Stock Unit of Measure, and Purchasing Unit of Measure. Multistore users: If you want to add the non-stock item to additional stores, select the appropriate stores in the Add To Additional Stores field (Note: the default stores/store groups in this field come from option 8457 “Default store group for Quick Add of Non-Stock items in POS”).
Fill in the Order Qty field, and any additional fields as desired.
See step 3 in the previous section if you want to use any special features in the Add SKU dialog.
When finished filling in the Add SKU dialog, click OK.
If you use the Silent mode:
Locate the item in the catalog that you wish to sell in POS, and click it in the grid so that it is highlighted.
Click Sell.
No additional clerk intervention is required. The item is added to inventory via the same method the system uses if you were not using the Quick Add Non-Stock Items feature, and the item is pasted into the posting area of the transaction, ready for you to press Enter to post the item.