
You must set up a tax code for each sales tax rate you charge. After that, you will indicate the "Customer Default - Tax Code" in Options Configuration to designate which tax code applies as a general rule to most of your Accounts Receivable accounts. For accounts that are exceptions to the rule, you can indicate the tax code that applies to that account.
Your Epicor Eagle™ system automatically tracks the amount of sales tax you collect at POS, and accumulates the information in the Sales Tax File. You will use this information for your government tax reporting.
Multistore users only:
There is no Store field on this screen. That’s because any tax
code you enter can be used by any store–they’re not storespecific.
Even if various stores charge the same tax rates,
you will repeat this procedure, once for each store, to create
a separate but identical code for each store.
Even if you never collect any sales tax, you still must set up at least one tax code. If all your sales are reported as non-taxable, you can enter a code whose tax rate is 0%.
Note: if you are using destination-based sales tax, click here to go to the job aid.
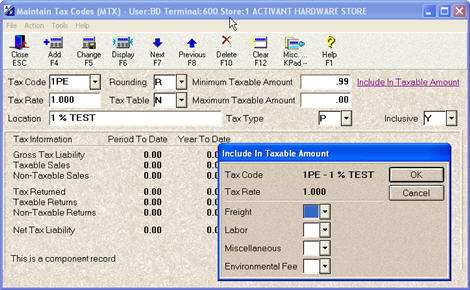
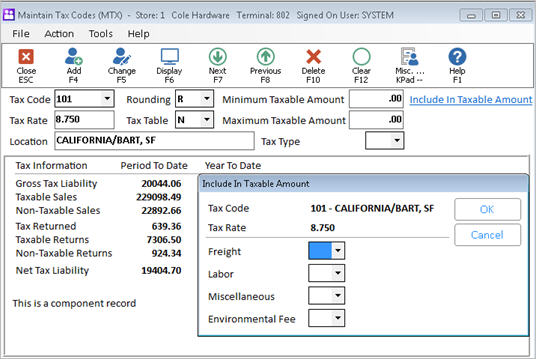
Click GoTo, then click Maintain Tax Codes (MTX). The Maintain Tax Codes window displays.


In the Tax Code box, enter a code (up to three digits) for the tax amount you are setting up.
In the Tax Rate box, enter the sales tax percent for this tax rate.
In the Location box, type the name of the agency that levies this tax.
For example, if you're entering a state sales tax, type the name of the state.
In the Rounding box, select a code from the drop-down list to indicate how the Epicor Eagle™ is to round off tax amounts that end with a fraction of a cent.
For a definition of each rounding type, click here.
In the Tax Table box, leave the N if the tax rate you entered above always yields correct tax amounts. If you have to charge tax according to a tax card that is not always the same as the percentage tax rate, select C or R to indicate whether your tax card is based on a Ceiling or Repeating table.
For a definition of each field, click here.
In the Minimum and Maximum Taxable Amount fields, enter the minimum and maximum tax amounts that you can assess, if applicable.
If a non-merchandise category (Freight, Labor, Miscellaneous, or Environmental Fees) has a special tax status, click the Include in Taxable Amount hyperlink and select one of the following settings for each category:
N = Do not include in taxable amount
Y = Do include in taxable amount
(Blank = The system simply uses the Tax Status field in Inventory Maintenance to determine if this category of non-merchandise is taxable or not)
This is used to override the SKU Part ’s Tax Status flag when the item is taxed in some tax jurisdictions and not in others.
Click Add.
If the Tax Table box displays in the lower right corner of the window (it will display If you entered C or R in the Tax Table box in the upper middle portion of the window), enter the ceiling or repeating tax table, and then click Change.
For a definition of each field, click here.

Using separate but identical tax codes for cash customer sales and charge customer sales can be helpful in tracking and balancing operations. Other groupings of customers that you use on reports (such as your matrix pricing groups) can also be defined and tracked this way.
If you are in Canada, see the topic Setting Up a Composite Tax Code (Canada)