(Document Scanning users)
Use the following procedure to scan documents into the Document Scanning (DS) application.
Electronic documents (Microsoft Word files, Adobe PDF files, image files, etc.) can also be imported into DS. Click here for the import procedure.
Place the document to be scanned into the scanner. Make sure the document is facing in the correct direction.
If you're using OCR, you can load a stack of POS documents into the document feeder. Make sure all the documents are facing the same way, and are inserted into the scanner facing in the correct direction.
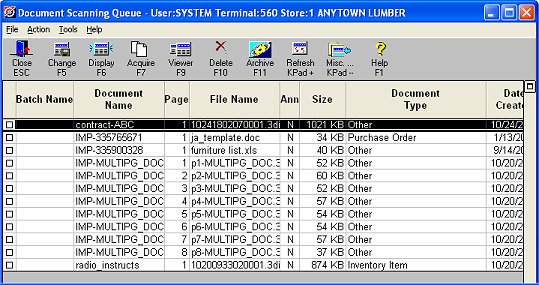
Display the Document Scanning Queue. For a definition of each field in the viewer, click here.
Click Acquire. The Document Attributes dialog displays. Attributes link your scanned or imported documents to specific records (such as SKUs, customers, invoices, purchase orders, etc) in Eagle applications. For example, if you select Inventory Item in the "Document is related to" field, and enter a SKU in the "Item Number" field, then when you display that SKU in Inventory Maintenance, you can link directly to the corresponding document.
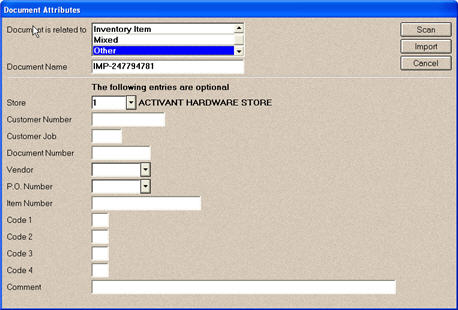
Fill in any of the desired attributes. The attributes you select will be applied to all documents in this scanning session,unless you choose to change attributes between scans. If you're using OCR, you do not have to fill in this screen; the barcode on the document automatically tells the system its attributes.
Click Scan. The Document Scanning dialog displays.
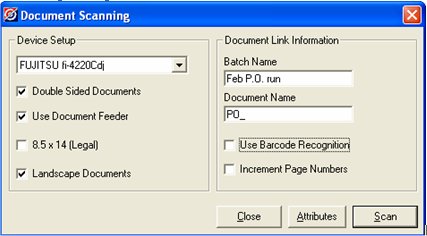
On the left side of the dialog, select the appropriate device (scanner) in the Device Setup field, and place a checkmark next to any of the other relevant fields. Any fields that are greyed out are unavailable on the scanner you selected.
On the right side of the dialog:
You can optionally assign a Batch Name to group documents together in the Document Scanning Queue, and/or a Document Name to help you identify documents. Note that the information you enter in these fields is saved in the Document Scanning Queue only; the information is not saved in the archive.
If you purchased the barcode recognition feature (OCR), click Use Barcode Recognition. Any valid Epicor barcode will be read in order to auto-assign document attributes (which override the attributes set up in the document attributes screen). Note that in a given scan session, you can mix barcode and non-barcode documents.
Click Increment Page Numbers if you want to link documents together in the Document Scanning Queue and in the Archive viewer. When a set of scanned documents are associated by page number, the Document Imaging Viewer treats all the pages as a single multi-page document. NOTE: The barcode used by Enhanced Forms already includes page number, which will automatically associate a group of documents and assign page numbers accordingly.
If you need to return to the Attributes dialog, click Attributes. When finished changing the attributes, click Scan to return to the Document Scanning dialog.
Click Scan. The scanner begins scanning the document.
When the scanner finishes, click OK to confirm the scan is completed.
Remove the document from the scanner. Place another document in the scanner (make sure the document is facing in the correct direction), and repeat steps 6-8, or click Close to exit the dialog box.
The scanned document is now listed in the Document Scanning Queue viewer, where you can change the attributes you assigned to the document, or make any annotations to the document. You should then archive the document so that it will reside on the Eagle server. (Note: you can also annotate the document from the archive.)