(Service and Repair users only)
This topic explains how to create Service Orders in POS. You must have security bit 911 to execute this procedure. Note that if you want to special order an item on a Service Order, you must have Customer Order Management (COM).
Display the POS window. You must begin Service Orders from the posting screen. You cannot begin them from the Header screen.
If you set option 102 "POS Return to Header Screen After Each POS Transaction" to S (Header/Service Order), skip to step 4.
Press Start (F2), and select S-Service Order.
In the Start or Recall Service Order dialog, select S-Start New Order.
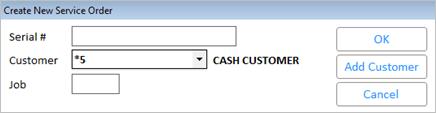
In the Create New Service Order dialog that displays, enter the Serial #, VIN #, or Tag #, depending on how you set up option 9242. Select the Customer (and Job, if applicable), and press Enter.
![]()
If you enter the Serial Number of an item that you have serviced before, or that was purchased in your store, the system displays a dialog in which you can change the customer, or press OK to use the information from the previous transaction for this item.
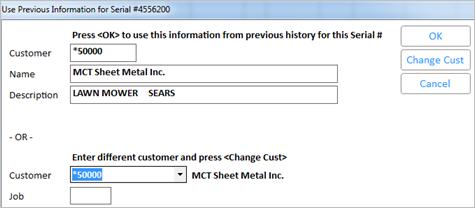
Using the previous information saves you time in step 7 below. Note, however, that although the system enters the equipment description, you may need to modify it.
If you don't use Customer Quick Add, skip this step.
If you use Customer Quick Add and you want to add a customer account, press Add Customer, fill in the information and click Add. After the customer is added, press Close to close this dialog. The system returns to the service order header to allow you to enter the serial number. If you entered the serial number before pressing Add Customer, then you will be returned to the service order header, ready to enter the equipment description. Customer information automatically pastes in from the Customer Add dialog.
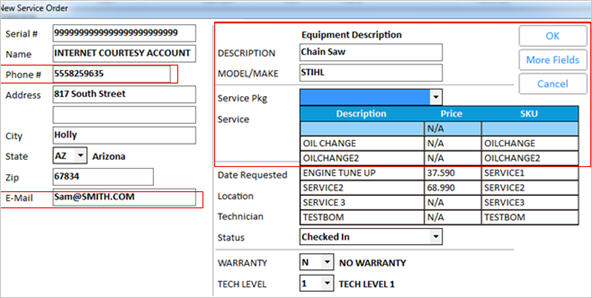
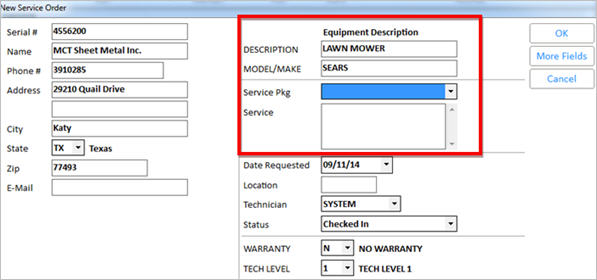
You must enter either a Phone Number or Email, unless one or both are already indicated in the customer you selected.
You must fill in any fields that display in the Equipment Description area. The fields that display are based on options 9301-9303.
Select a Service Package (the Service Pkg field displays only if you set up one or more service SKUs), or enter a description of the service in the Service field. If you do select a Service Package, you can still enter something in the Service field if desired (for example, any additional information about the service or repair).
If desired, click More Fields to access and change the following header fields:PO #, Reference, Tax Code, Terms Code, Salesperson, Resale #, or Short ID.
Note: You can also display this dialog in the Recall mode to view any deposit amounts.

When finished, press Enter to return to the New Service Order dialog, and press Enter again to close it.
If the Enter Additional Service Information dialog displays, fill in the fields as needed, and press Enter.

The system posts your selections. If prompted, enter the quantity of the Service SKU and press Enter. If you didn't use a Service SKU, enter the appropriate SKU to enter the fee for the service or repair.
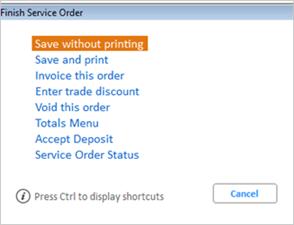
Press Total, and select the appropriate option from the Finish Service Order dialog. If you save the Service Order, you are given the opportunity to enter a deposit, just like you would with any POS Order.
![]()
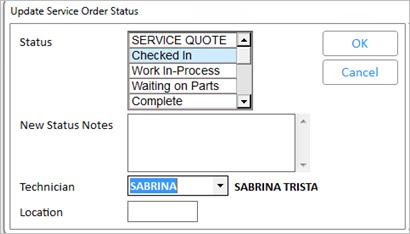
S- Service Order Status allows you can change the status of the Service Order in the Update Service Order Status dialog that displays. For example, you could change the Status of the Service Order from Quote to Checked in or Work in Progress and/or assign a technician. You may also enter New Status Notes to indicate the reason for changing this service order status such as " Customer approved quote, repair now in progress" and this note will display in the Service History files. When finished, press Enter. The Finish Service Order dialog re-displays for you to make another selection. You also have the ability to change a service order's status or technican in the Service Order header or in the POS Open Service Order Viewer.
![]()
To print Service Order labels for tagging items to be serviced, select the label print option "Package ( no items)"

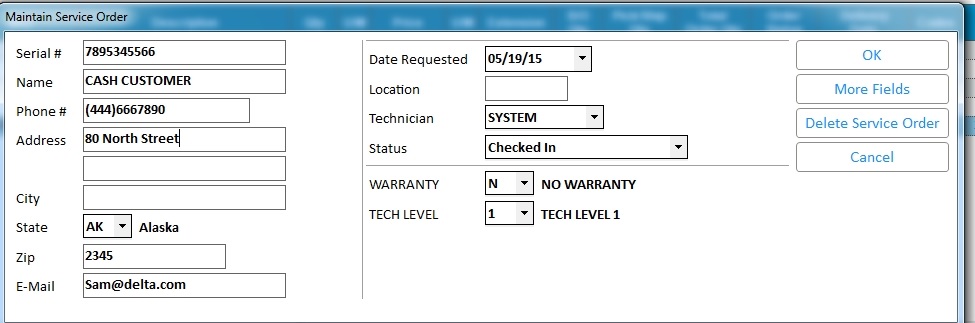
If you have Option 9242 "Field Label for Service Order Identifier" set to S (serial number) to track service orders by the item's serial number (giving repair history by item), you can change the service order's serial number after the order has been created. If you don’t know the serial # of the equipment when creating a Service Order, create the order using perhaps the customer’s phone #. Once the item’s serial number is known, recall the Service Order and press <Header/F11> to bring up the Maintain Service Order header (see below). Change the Serial Number and press Enter or click <OK> to save your change.

The serial #, recorded in the body of the transaction when it was created, will not be automatically changed. If you want to change this ‘information only’ comment use <Change> and enter the line # of the comment line which has the serial #.