As sales history accumulates and changes over time, you can use the Epicor Eagle™ system to calculate order points by running the Order Point Report (ROP). Simply stated, an order point is the optimum stocking level for a particular item. Optimum stocking levels are based on demand, lead time and cost.
Due to the changing nature of sales history, you should recalculate order points frequently— perhaps as often as weekly. Then, when the time comes to order, the Eagle system compares each item's quantity-on-hand to its optimum stock level and recommends purchase quantities accordingly.
![]()
If the Inventory Transaction Register (ITR) is enabled on your system, then ITR records may impact order point calculations. These records include Lost Sales, Unusual Usage, and Transfers-In. Your system setup determines what impact, if any, these records have when running the ROP report. For more information refer to the online help topics for Lost Sales, or Unusual Usage, or Transfers-In.
If you do not use Maximum Stock Levels, skip this section. If you use Maximum Stock Levels and run the Order Point Report (ROP) with the "Max Stock Level" field set to "C" (Do not change max stock level), you may want to set up the option "ROP Max Stock Level (Opt C) behavior when new OP > Max” (ID# 8859) in Options Configuration. This option determines how setting "C" should work in cases where the calculated order point is greater than the Max Stock Level. If you don't change this option, and the ROP is run with the Max Stock Level option set to C, and the calculated Order Point is higher than the Max Stock Level, the system will set the Max Stock Level to the Order Point + 1. This would change the Max Stock Level even though you used the option to NOT change it. To avoid this behavior, set this option to 2, so that if the calculated Order Point is greater than the Max Stock Level, the system will set the Order Point to 1 less than the Max Stock Level. In other words, the Max Stock Level will not change, even if the system calculates an Order Point that is greater than the Max Stock Level.
To change this option so that Max Stock Levels do NOT change when you enter C in the Max Stock Level field in ROP, do the following. You only have to do this once.
Click ID, enter 8859, and press Enter. The option "ROP Max Stock Level (Opt C) behavior when new OP > Max” displays.
Click the Current Value column, type a 2, and press Enter. Then click Change on the toolbar to save your selection.
From the Purchasing and Receiving window, click Reports, and then click Order Point Calculation (ROP). The Order Point Report window displays.
If you have set up a Default Report Profile for this report, you can simply click Run to use the defaults. Or, you can retrieve a saved report, make any necessary changes, and click Run. Otherwise, continue with the next step.
From the 
 page, review the default entries in the fields and make changes if needed. For a definition of each field, click here.
Click ![]()
 . A page of fields displays.
In the Options field, select options F and C and any other options you want to use. Note: if you merely want a "what if" report, and don't want your order points to change, do not use option F.
Stock Transfer Balancing Users only: In the Calculate Order Point field, select which order point you want to update: Order Point, Order Point A, Order Point B, Order Point C, or Order Point D (note: you can also manually update these fields from the Order Point hyperlink in Inventory Maintenance). If you use maximum stock levels, the corresponding Max Stock Level field will be updated automatically based on the Max Stock Level setting.
In the Minimum New OP field, Epicor recommends you enter 1, 2, or 3. If you leave the field blank, you might accidentally discontinue items just by failing to ever re-order them.
In the Max Stock Level field, leave the A if you don't use a Min-Max system. If you do use Min-Max, select A, B, or C.
(Optional) In the Exclude Records Added After___or Within Last ___Days, enter a date (in the format mm/dd/yy) or number of days from which you want to exclude records. For example, if you enter the date 02/14/01, no order points will be calculated for items added to your inventory after February 14, 2001.
For a complete definition of each field, click here.
Click ![]()
 . A page of fields displays.
If you want to limit the items on the report, fill in the appropriate information in the blank fields. For example, if you only want to calculate order points for items in a particular department, you need to enter a department, as shown here.
![]()
Review the default entries in the other fields and make changes if needed.
For a definition of each field, click here.
(Optional) Click 
 . A page of fields displays. Fill in the desired fields to include or exclude groups of items. For a definition of each field, click here.
If you chose Printing Sequence 5 (User Defined) on the From/To page, click ![]()
 . If you did not choose Printing Sequence 5, skip this step.
Fill in the fields to define the sequence in which you want the report to print. For a definition of each field, click here.
Click ![]()
 . Fill in the information in the Method you want to use. You can use Methods 1 and 3 at the same time. Method 2 must be used by itself.
For a definition of each Method, click here.
If you chose Method 3 in the previous step, click ![]()
 . If you didn't choose method Method 3, skip this step.
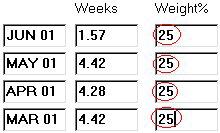
Enter the percent of total weight to be accorded to each period of sales history. For example, if you want sales figures from June, May, April, and March to be weighted all equally, type 25 in the Weight % box next to those four months.
For a definition of each field, click here.
In the Total 100% field, enter a Y or N.
(Optional) Click ![]()
 . A page of fields displays. Fill in the fields if you want to fax the report.
For a definition of each field, click here.
Click Run if you are running this report now, or click ![]()
 if you are adding this report to a queue. For more information about creating queues, click here.